In this post, we will perform step by step installation of vCloud Foundation 4.0. It has been couple of weeks since this version has released. I have been working on VCF & VVD since couple of years and deployed it multiple times, hence wanted to write a blog on it.
Before we start with VCF 4.0, Please check the network configuration in my VyOS Virtual Router blog here.
Introduction:
VMware Cloud Foundation is a private as well as public cloud solution. It is a unified platform which will give you entire SDDC stack. VCF 4.0 includes vSphere 7.0, VSAN 7.0, NSX-T 3.0, VRA 8.1 as well as SDDC manager to manage your virtual infrastructure domains. One more big change in VCF 4.0 is, Kubernetes Cluster deployment through SDDC manager after successful deployment of management domain.
Bills of material (Image copied from VMware site)

Check out VMware’s official site for all new features & release notes here…
With that, let’s get started…
vCloud Foundation deployment requires multiple networks to be in place before we start the deployment. We will discuss about the network requirements for successful deployment.
Network Requirements: Following management domain networks to be in place on physical switch (TOR). Jumbo frames (MTU 9000) are recommended on all VLANs or minimum of 1600 MTU. Check out the ports requirements on VMware site https://ports.vmware.com/home/VMware-Cloud-Foundation

Follow my previous blog for network configuration here.
https://virtualrove.com/2020/04/30/vyos-virtual-router/
Physical Hardware: Minimum 4 physical server with preinstalled VMware ESXi 7.0 hypervisor for VSAN cluster.
AD & DNS Requirements: Active Directory (Domain Controller) to be in place. In our case, DC is connected to 1631 VLAN on VyOS. Following DNS records to be in place before we start with the installation.

Pre-installed ESXi Configuration:
All ESXi must have ‘VM network’ and ‘Management network’ VLAN id 1631 configured.
NTP server address should be in place on all ESXi.
SSH & NTP service to be enabled and policy set to ‘Start & Stop with the host’
All additional disks to be present on an ESXi for VSAN configuration.
Let’s begin with the nested ESXi configuration for our lab.
Create 4 new VM’s on physical ESXi. These will be our nested ESXi where our VCF env will get install. All ESXi should have identical configuration. I have following configuration in my lab.
CPU: 16
CPU hot plug: Enabled
Hardware Virtualization: Enabled

Memory: 50 GB

HDD1: ESXi OS installation
HDD2: VSAN Cache Tier
HDD3: VSAN Capacity Tier
HDD4: VSAN Capacity Tier

2 Network Adapter: Connected to ‘Trunk’ port group.

And the ESXi ISO attached to CD drive.
After completing ESXi installation. Configure them with correct IP address and make sure that ‘Test management network’ shows OK for all ESXi’s.

We now need to mark additional HDD of ESXi to SSD. You can either connect to DC and putty to ESXi or open ESXi console and run these commands.
esxcli storage nmp satp rule add -s VMW_SATP_LOCAL -d mpx.vmhba1:C0:T1:L0 -o enable_ssd
esxcli storage nmp satp rule add -s VMW_SATP_LOCAL -d mpx.vmhba1:C0:T2:L0 -o enable_ssd
esxcli storage nmp satp rule add -s VMW_SATP_LOCAL -d mpx.vmhba1:C0:T3:L0 -o enable_ssd
esxcli storage core claiming reclaim -d mpx.vmhba1:C0:T1:L0
esxcli storage core claiming reclaim -d mpx.vmhba1:C0:T2:L0
esxcli storage core claiming reclaim -d mpx.vmhba1:C0:T3:L0
Once done, run ‘esxcli storage core device list’ command and verify if you see SSD instead of HDD.

This completes our ESXi configuration.
Cloud Builder:
Cloud Builder is an appliance provided by VMware to build VCF env on target ESXi’s. It is one time use VM and can be powered off after the successful deployment of VCF management domain. After deployment, we will use SDDC manager for managing additional VI domains. I will be deploying this appliance in VLAN 1631, so that it gets access to DC and all our ESXi servers. Download the CB appliance from VMware downloads.
Deployment is straight forward like any other ova deployment. Make sure to you choose right password while deploying the ova. The admin & root password must be a minimum of 8 characters and include at least one uppercase, one lowercase, one digit, and one special character. If this does not meet, then the deployment will fail which results in re-deploying ova.
Till now, we have completed configuration of Domain controller, VyoS router, nested ESXi & Cloud Builder ova deployment. Following VM’s have been created on my physical ESXi host.

Log into Cloud Builder using configured fqdn and click next on this screen.

Check if all prereqs are in place and click Next.

Download the ‘Deployment Parameter Workbook’ on this page.

Deployment Parameter Workbook:
It is an Excel sheet which needs to be filled accurately without breaking its format. Be careful while filling this workbook, as it provides all input parameters for our VCF deployment. Let’s have a look at the sheet.
Prerequisite Checklist: Cross check your environment as per prereqs.
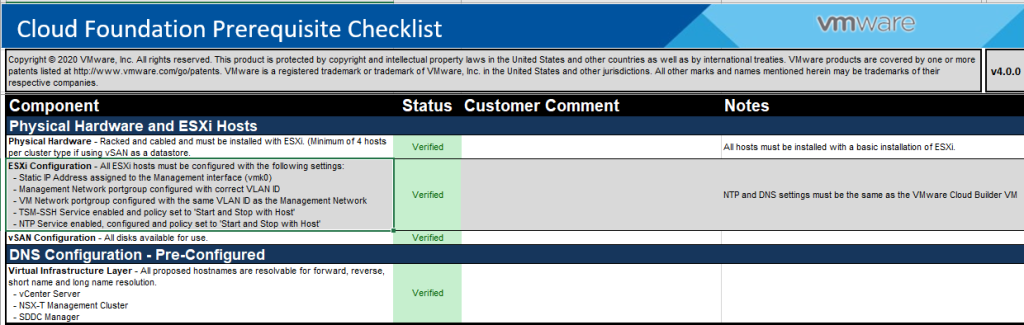
Management Workloads: All license information needs to go in here.

Users and Groups: You need specify all passwords here. Check out the NSX-T passwords, as the validation fails if it does not match the password policy.

Hosts and Networks: Edit network information as per the environment and update ESXi information accordingly.

Deploy Parameters: Fill out all the information as per your environment. If you miss something, the cell turns red which causes failure in validation.

After you complete this sheet, it needs to be uploaded in cloud builder on this page.

Next is, Validation of the workbook and preinstalled ESXi.

Resolve any errors / warnings that shows up here.
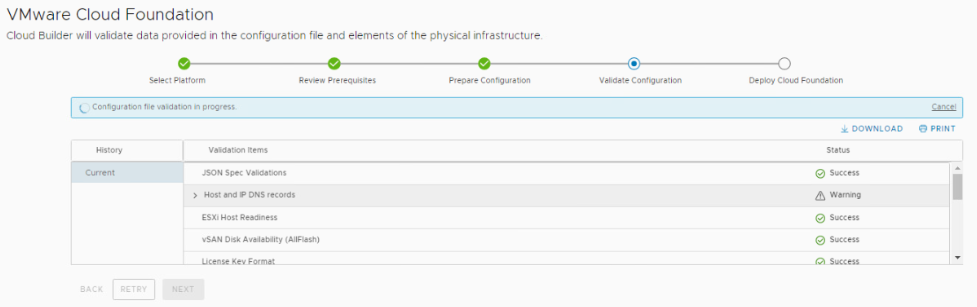
Status should show ‘Success’ for all validation items. Click Next and click on Deploy SDDC.

All SDDC components gets installed on nested ESXi and you see this message.

SDDC Deployment Complete.

Check the SDDC Manager and vCenter.


It was defiantly not that easy for me first time. This was my 3rd deployment which got successful in 1st run. The last successful run took around 4 hours to complete. I have written this blog after resolving the errors that I got, so that you don’t waste time in troubleshooting. If you miss any steps in this post, you will surely end up in errors.
Here are some suggestions.
Keep checking vcf-bringup.log in cloud builder for any errors in deployment. The location of the file is ‘/opt/vmware/bringup/logs/’ in cloud builder. This file will give you live update of the deployment and any errors which caused the deployment to fail. Use ‘tail -f vcf-bringup.log’ to get the latest update on deployment. PFB.

Another error ‘The manifest is present but user flag causing to skip it.’ caused my deployment to fail.

To resolve this, I changed the deployment model of NSX-T to ‘Small’ from ‘Medium’. Looked like it was compute resource issue.
Also, keep checking NTP sync on the cloud builder. Mine did not sync with NTP for some reason and I had to manually sync it.

Steps to manually sync NTP…
ntpq -p
systemctl stop ntpd.service
ntpdate 172.16.31.110
Wait for a min and again run this
ntpdate 172.16.31.110
systemctl start ntpd.service
systemctl restart ntpd.service
ntpq -p
Verify the offset again. It must be closer to 0.
NSX-T Deployment error.

The NSX-T OVF wasn’t getting installed. I could see generic error in vCenter. Reboot of entire environment fixed the issue for me.
Also, use this command ‘systemctl restart vcf-bringup’ to pause the deployment when required.
For example, my NSX-T manger was taking time to get deployed, and due to an interval on cloud builder, it used to cancel the deployment assuming some failure. So, I paused the deployment after nsx-t ova job got triggered from CB and hit ‘Retry’ after nsx got deployed successfully in vCenter. It picked it up from that point and moved on.
That’s it for this post. I will come up with some more posts on VCF 4.0. Next is to deploy additional workload domain and application networks for it.
Feel free to share my blog on social media. 😊
Are you looking out for a lab to practice VMware products..? If yes, then click here to know more about our Lab-as-a-Service (LaaS).
Subscribe for my latest blogs…

I am typically to running a blog and i really admire your content. The article has actually peaks my interest. I’m going to bookmark your web site and preserve checking for new information.
LikeLiked by 1 person
Hi Chad, Thank you for your valuable comments. It inspires me to write more blogs. Cheers. 🙂
LikeLike
It’s hard to come by educated people on this subject, but you sound like you know what you’re talking about! Thanks
LikeLike
Thanks Tula. Yeah, after all this is my favorite topic and i love these (VVD & VCF) products from VMware. 🙂
LikeLike
I have been examinating out many of your articles and it’s nice stuff. I will surely bookmark your site.
LikeLiked by 1 person
Thank You. I still have to write a lot on VCF (as and when time allows) 🙂
LikeLike
Hi Roshan,
NSX-T failed and VCF deployment failure, i tried your solution and failed also.
LikeLike
NO worries. Lets connect one to one and see what went wrong.
LikeLike
hello, thank you for this post. why i can ping my esxi from jump host but my esxi 1 can not ping esxi 2. the two esxi has trunk port connected.
LikeLiked by 1 person
Well, this will get in to troubleshooting mode. There are multiple things to check.
Is “Test Connections” from ESXi ‘OK’ for DG,DNS and all..?
Is your vyos able to ping all ESXi and vice versa.. ?
Is your StdSwitch on ESXi has all settings in place..
Promiscuous Mode – Accept
MAC change – Accept
Forged Transmits – Accept
Let me know.
LikeLike
hello, my CB vm can not ping esxi VM, is it normal and how can i solve that?
LikeLike
I hope this was resolved, since you posted another issue in the comment.
LikeLike
in bring up process i have this error:
vMotion Network Connectivity Validation
Warning
Gateway 172.16.32.253 for VMOTION network is not responding from esxi01
Gateway 172.16.32.253 for VMOTION network is not responding from esxi02
Gateway 172.16.32.253 for VMOTION network is not responding from esxi03.
Gateway 172.16.32.253 for VMOTION network is not responding from esxi04.
vSAN Network Connectivity Validation
Warning
Gateway 172.16.33.253 for VSAN network is not responding from esxi01.
Gateway 172.16.33.253 for VSAN network is not responding from esxi02
Gateway 172.16.33.253 for VSAN network is not responding from esxi03.
Gateway 172.16.33.253 for VSAN network is not responding from esxi04.
NSX-T Data Center Host Overlay Network Connectivity Validation
Success
NSX-T Data Center Edge Overlay Network Connectivity Validation
Warning
Gateway 172.27.13.253 for NSXT_EDGE_TEP network is not responding from esxi01.
Gateway 172.27.13.253 for NSXT_EDGE_TEP network is not responding from esxi02.
Gateway 172.27.13.253 for NSXT_EDGE_TEP network is not responding from esxi03.
Gateway 172.27.13.253 for NSXT_EDGE_TEP network is not responding from esxi04.
NSX-T Data Center Uplink 1 Network Connectivity Validation
can you help please
LikeLike
Looks like issues on the VyoS, see if you can ping all DG from vyos and from all esxi’s or from DC. Its fun, keep troubleshooting. Let me know, i will happy to help.
LikeLike
ok i will do but i did the same configuration like you, so for your case you configure some route or firewall rules?
LikeLike
No firewall rules. Just the configuration on VyOS. Let me know if your ping test is good. If not, then thats the area of troubleshooting for you.
LikeLike
all ping are ok for my case but i have the same issue 😦
vMotion Network Connectivity Validation
Warning
Gateway 172.16.32.253 for VMOTION network is not responding from esxi01
Gateway 172.16.32.253 for VMOTION network is not responding from esxi02
……….;
how can i solve this please.
i checked also
Promiscuous Mode – Accept
MAC change – Accept
Forged Transmits – Accept
LikeLike
If you are able to ping “172.16.32.253” netwrok from all esxi’s as well as from cloud builder vm, then ‘Acknowledge’ warning and move on. I recently discovered this in version 4.2.1. I was getting “not responding” warning for host TEP’s & for mgmnt network even if the IP was reachable. I moved on and it did not give me any error in deploymetn phase.
LikeLike
i think that i find the pb from logs, i just use your tuto to have vcf but this is KO. i check all mtu in switch and vmk for all esxi and i put it 9000. but i still have the same issue, i will share with you the solution when i find it. this is my error in logs:
End of execution of command [vmkping -4 -I vmk30 -s 1470 -d -W * 172.16.32.253], Status: 1
Output: PING 172.16.32.253 (172.16.32.253): 1470 data bytes
— 172.16.32.253 ping statistics —
3 packets transmitted, 0 packets received, 100% packet loss
LikeLike
yes i use this version of CB. ok i will ignore this error. i will keep you informed for what i will obtain as result.
LikeLike
i have a last question please. i should put nested esxi to MTU 9000? or let it 1500
LikeLike
The only place i remember touching MTU settings…
While setting up interfaces on VyOS
Other, in deployment parameters sheet “Hosts and Networks”
reset leave it to default settings.
LikeLike
Hi Roshan, Great blog! I am having issues with converting the HDD to SSD. I am able to execute the above mentioned commands but still no go. Any help you can provide is highly appreciated!
LikeLike
Thank you Sachin. If you are able to execute the command with no erros then it should show SSD in devices. Check at the command prompt or give a reboot maybe. If that does not work, then remove HDD from esxi and readd it. Let me know how it goes.
LikeLike