We have prepared the environment for VCF deployment. Its time to discuss the “Deployment Parameters” excel sheet in detail. Following are lists of blogs in this series.
VCF 5.0 Series-Step by Step-Phase1 – Preparation
VCF 5.0 Series-Step by Step Phase2 – Deployment Parameters Excel sheet
VCF 5.0 Series-Step by Step-Phase3 – Deployment
VCF 5.0 Series-Step by Step-Phase4 – Post Deployment Checks
“Introduction” sheet from the deployment parameter.
Go through this carefully and make sure that you have everything in place that is needed for the deployment. NO edits on this sheet.

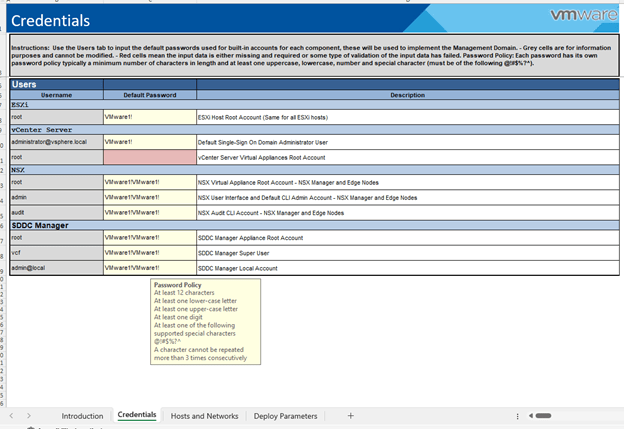
Next, “Credentials” sheet.
Check the password policy and make sure to generate passwords accordingly. It fails at validation if its not meet.
Any unacceptable values cell turns to RED in this entire sheet.
Moving on to next sheet “Hosts and Networks”.
Couple of things to discuss here,
Management Domain Networks – All networks should be pre-created on the TOR.

Here is the screenshot from my TOR.

Management Domain ESXi Hosts – All IP’s to be reserved and DNS records in place.

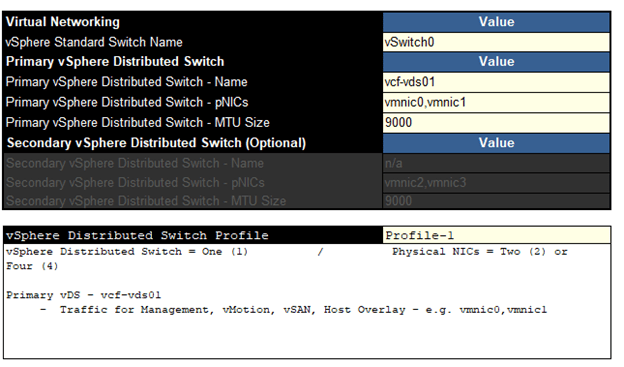
Moving onto “vSphere Distributed Switch Profile” in this sheet. It has 3 profiles. Let’s talk about available options.
Profile-1
This profile will deploy a single vDS with 2 or 4 uplinks. All network traffic will flow through the assigned nics in this vDS.
Profile-2
If you want to split the VSAN traffic on dedicated pnics, choose this option.
This one deploys 2 VDS. You can see that the first vDS will carry management, vMotion, Host Overlay traffic and the other one is for VSAN. Each vDS can have up to 2 pnics.

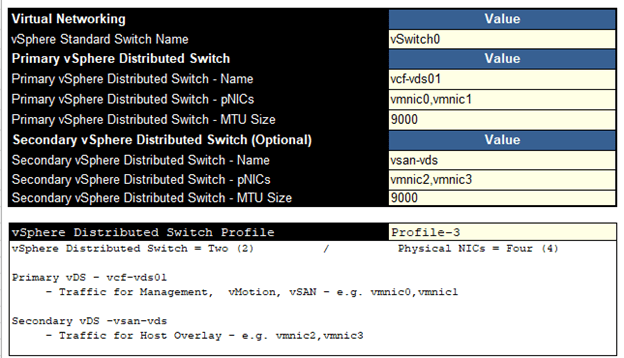
Profile-3
This one also deploys 2 vDS, just that the VSAN traffic is merged into 1stvds and 2nd vds only carries host overlay traffic.
Select the profile as per your business requirement and move to next step. For this lab, I have selected the 1st profile.
Moving to the “NSX Host Overlay Network” – You have an option to enable DHCP on 1634 vlan or define values manually.

Next – “Deploy Parameters” sheet,
Define all parameters here carefully. Again, If something is not good, the cell would turn RED.

As discussed in 1st blog in this series, VCF has now introduced subscription-based licensing. If you select “NO”, then you have to manually enter license keys here. If yes, a note appears in RED,

Just found out that the vmware kb’s are redirecting to Broadcom already. 😊
Check this Broadcom kb for more information,
https://knowledge.broadcom.com/external/article?legacyId=89567
“During bring-up, in subscription licensing mode, the management domain is deployed in evaluation mode. It is expected that you complete the subscription process for VMware Cloud Foundation+ within 60 days. After the period has expired, you cannot do any actions related the workload domains, such as add or expand workload domain, add or remove cluster, add or remove host”
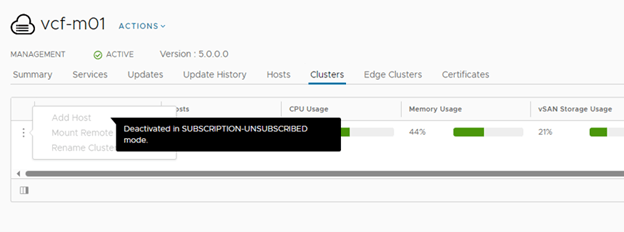
One caveat here, if you deploy the stack in subscription-based model, the SDDC manager does not allow perform any additional operations until you finish the subscription process. In short, it is of no use until you finish the subscription.
Let me show you,
This screenshot was captured when I deployed it subscription model.
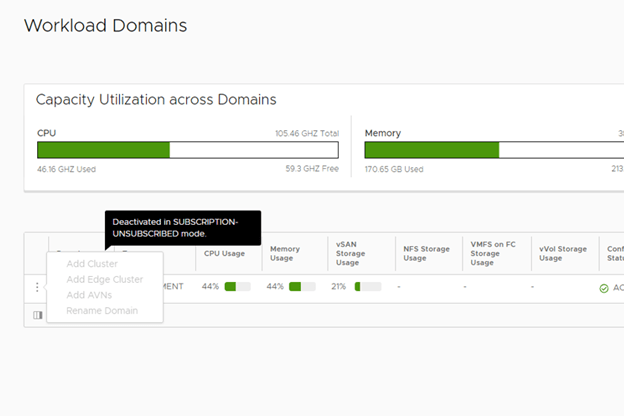
This is what you see when you deploy it in subscription model and do not activate it,

All additional config options will be grayed out. You see a msg there “Deactivated in Subscription-Unsubscribed mode.”
Any changes to “Workload Domain” will be blocked.
No adding hosts to mgmnt domain,
Back to Deploy Parameter, So, make your choices wisely and plan it accordingly.
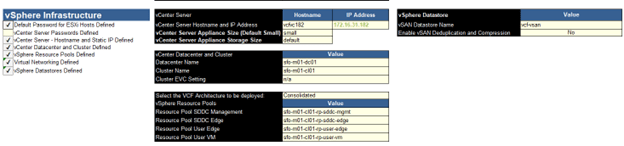
Moving to “vSphere Infra” section in the deployment parameters sheet.
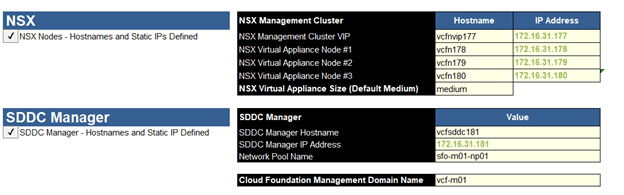
And finally, the NSX & SDDC section,
We are all set to upload this “Deployment Parameter” sheet to Cloud Builder and begin the deployment. That is all for this blog. We will perform the actual deployment in next blog.
Are you looking out for a lab to practice VMware products…? If yes, then click here to know more about our Lab-as-a-Service (LaaS).
Leave your email address in the box below to receive notification on my new blogs.
