Upgrading VMware Cloud Foundation to version 9.1: Part 3 – NSX Manager, vCenter & ESXi Upgrade

Step 6: Upgrade NSX Manager

Run NSX upgrade prechecks and resolve any reported issue before starting the upgrade.
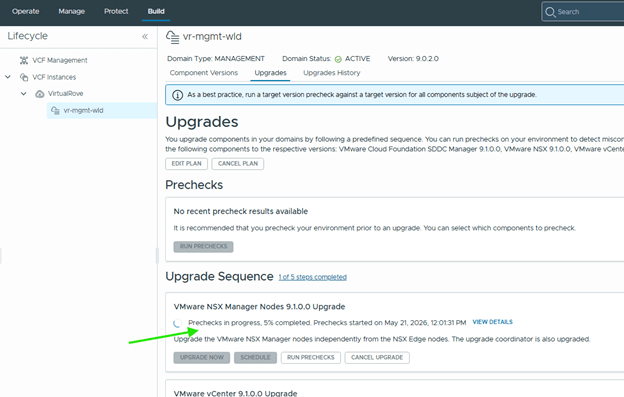
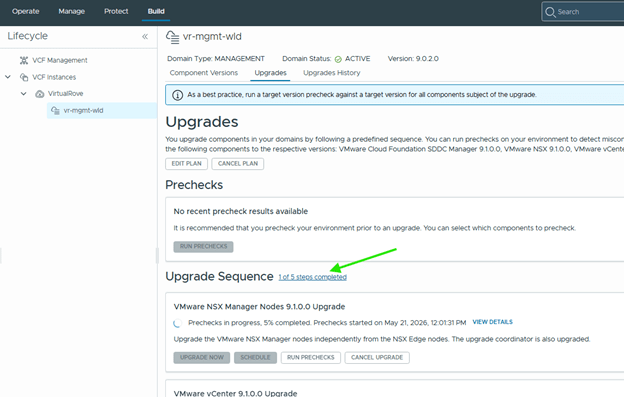
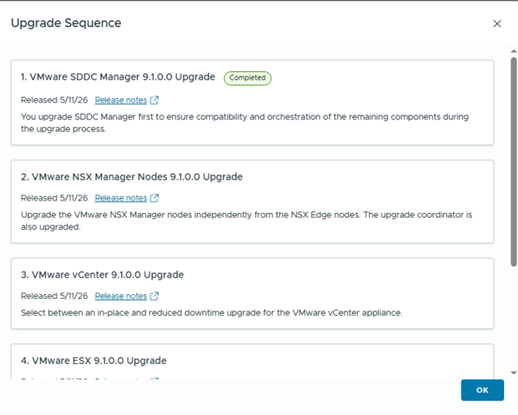
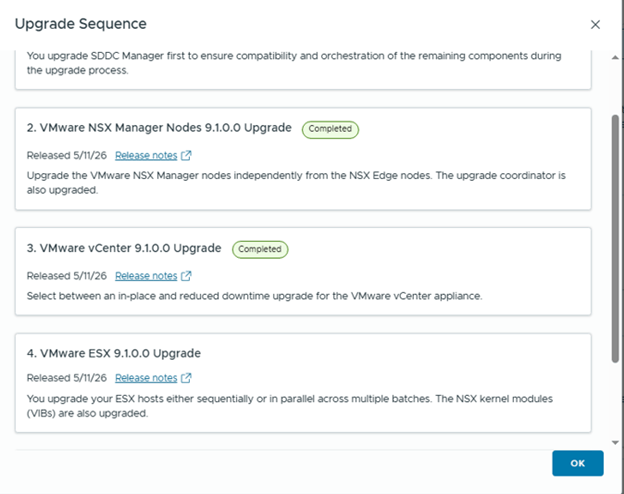
You can also check high level upgrade sequence,
Once all prechecks completes, you can start the upgrade or schedule it,
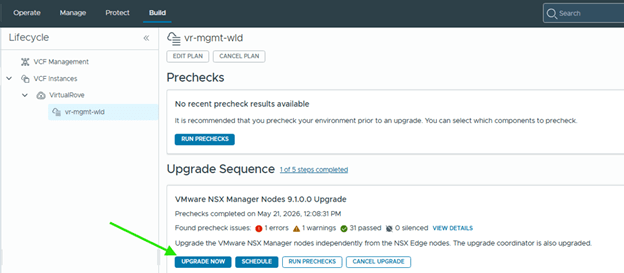
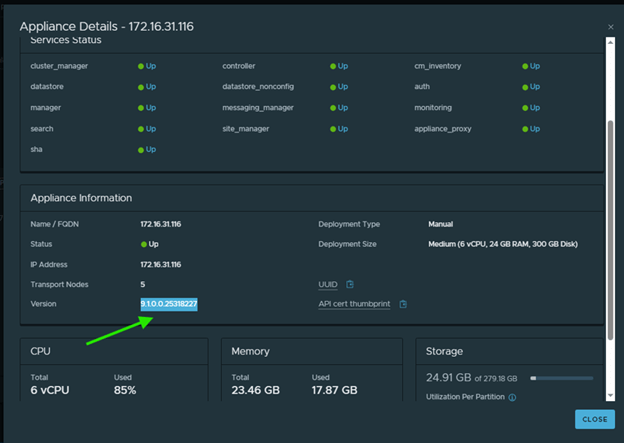
Important: You may not see the NSX version fully reflected immediately after the NSX Manager upgrade. NSX is not considered fully upgraded until all ESX hosts in every vSphere cluster that shares the NSX Manager are upgraded to 9.x and the NSX finalize procedure completes.

However, the latest version can be seen on NSX Appliance page,
After NSX is upgraded, it disappears from the active upgrade list and the next component available for upgrade which is vCenter.
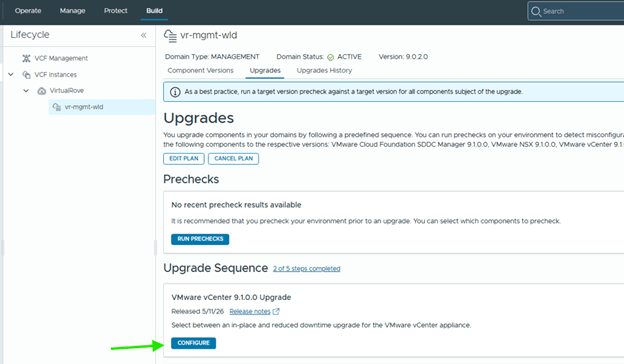
Step 7: Upgrade vCenter

The vCenter upgrade workflow provides two upgrade options.

vCenter Reduced Downtime Upgrade: This method uses a migration-based approach. In this approach, a new vCenter appliance is deployed and the current vCenter data and configuration is copied to it. During the preparation phase of a reduced downtime upgrade, the source vCenter instance and all resources remain online. The only downtime occurs when the source vCenter instance is stopped, the configuration is switched over to the target vCenter, and the services are started.

vCenter Regular Upgrade: Requires downtime of the vCenter instance during the entire upgrade process.
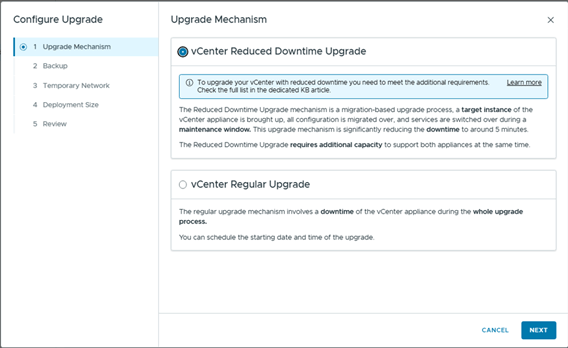
The reduced downtime method requires an additional temporary IP address from the VM Management subnet. Provide the required details and complete the wizard.
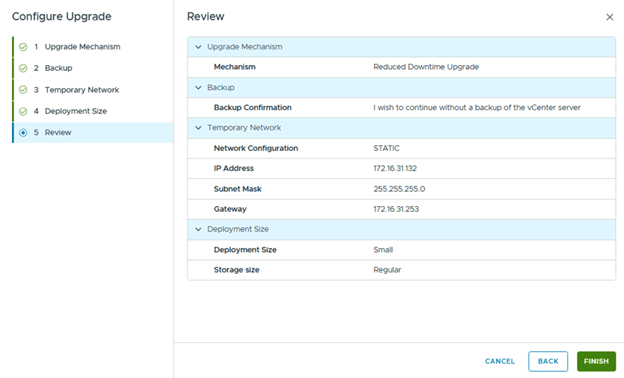
Completing this wizard prepares the upgrade configuration but does not immediately trigger the upgrade.

Return to VCF Operations to schedule the vCenter upgrade and cutover.
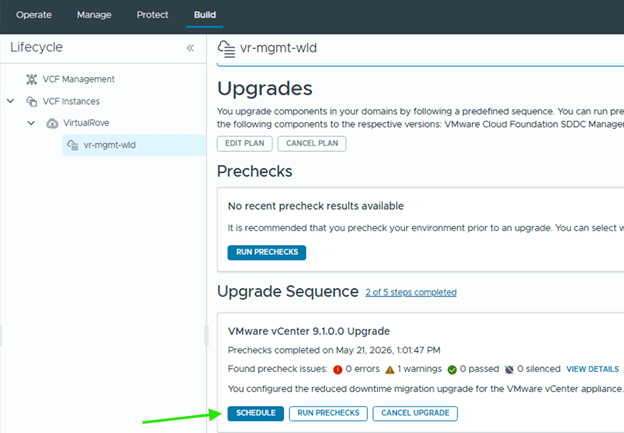
Choose appropriate options here,
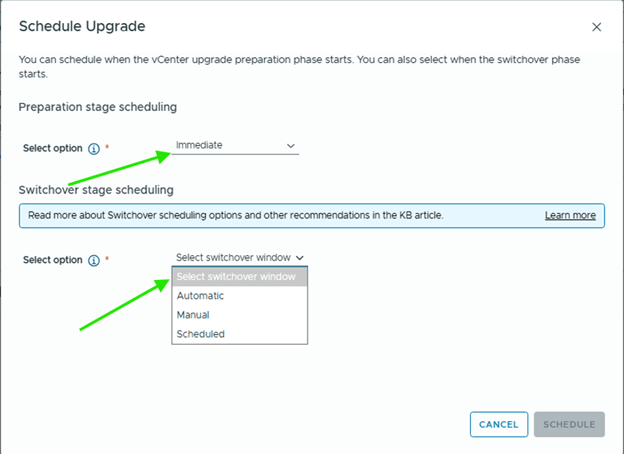
And schedule.

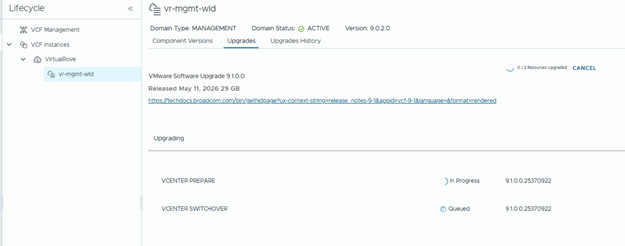
Upgrade status can be monitored,
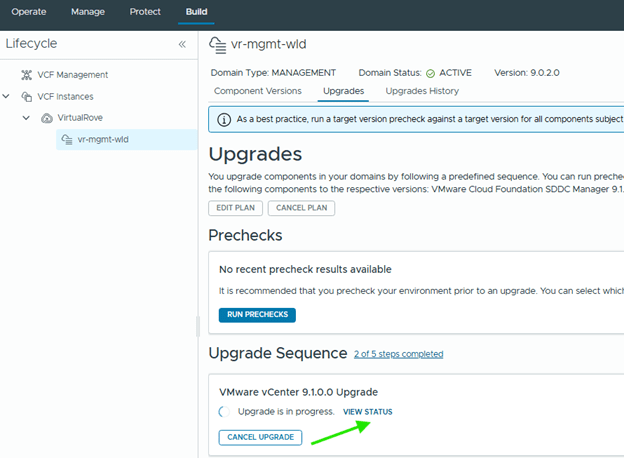
During the reduced downtime upgrade, a temporary vCenter appliance is created and data is migrated to it. After the workflow completes, review the upgrade sequence again to confirm the next available component.
Step 8: Configure and Upgrade ESX Hosts

Before upgrading ESX hosts, create and assign the correct vSphere Lifecycle Manager image with the required ESX version and vendor add-ons.
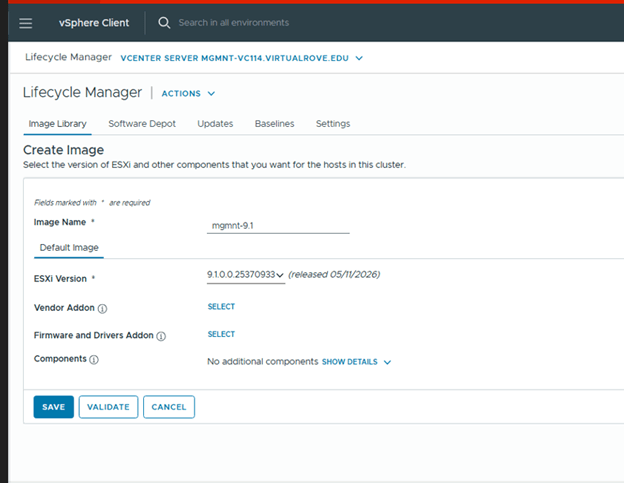
Create and assign the correct image with the target ESX version and vendor add-ons.

Login to MGMNT vCenter> Lifecycle Manager> Create New Image,
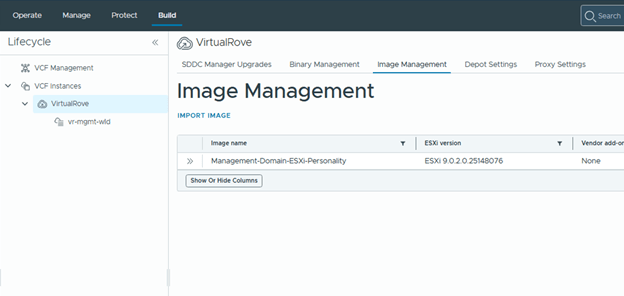
Then import the newly created image into VCF Operations.
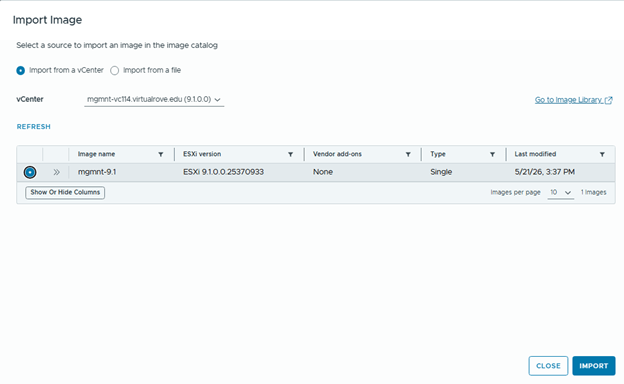
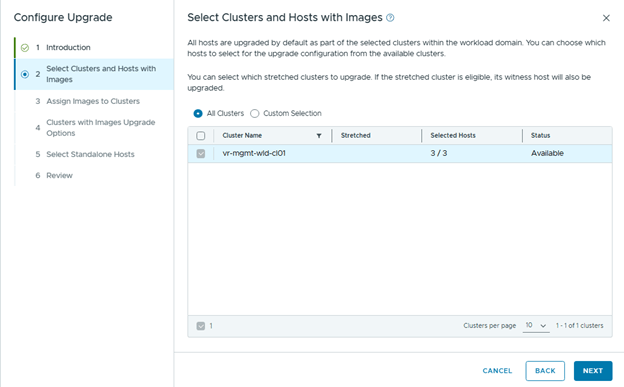
Assign the newly created image in “configure upgrade” wizard,
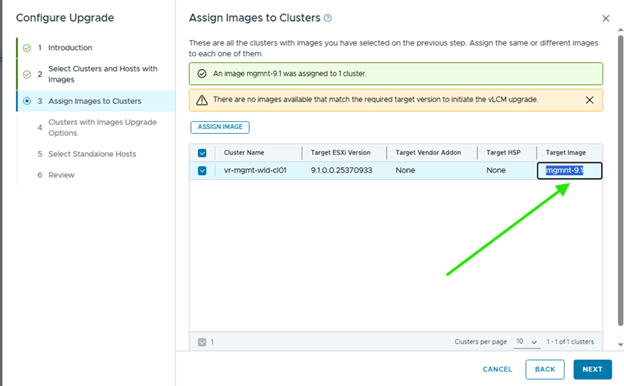
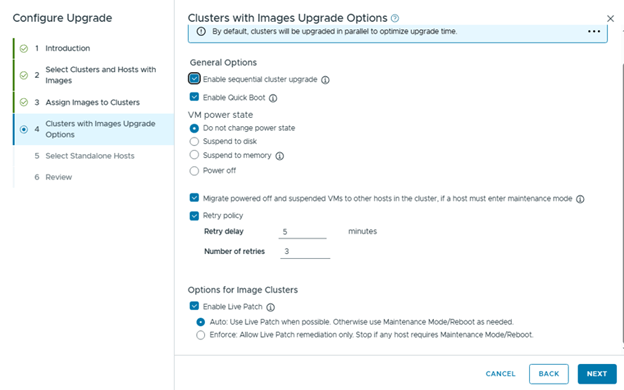
Choose the appropriate upgrade options. In my lab, I selected the sequential upgrade option.
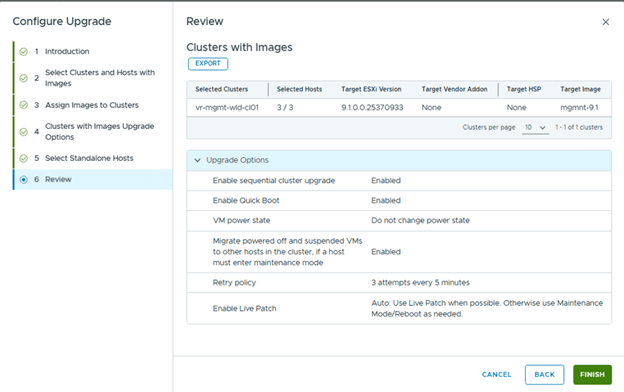
Review and Finish,
Then you can schedule or immediate upgrade from the upgrade page,
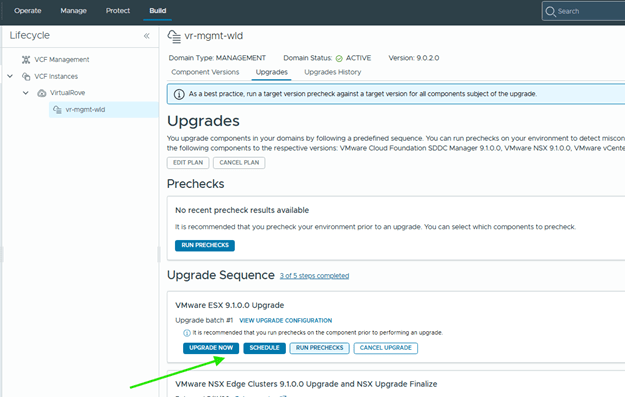
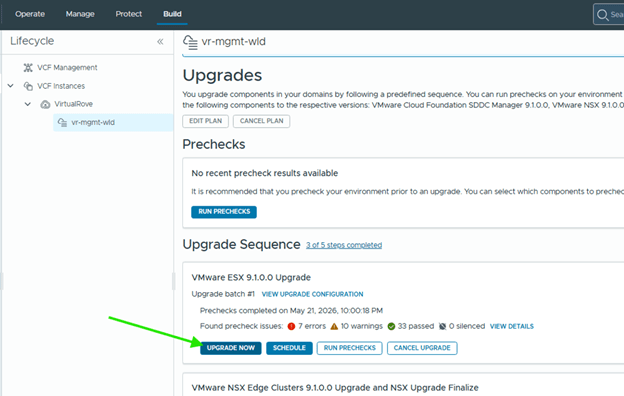
Got an error here in prechecks,

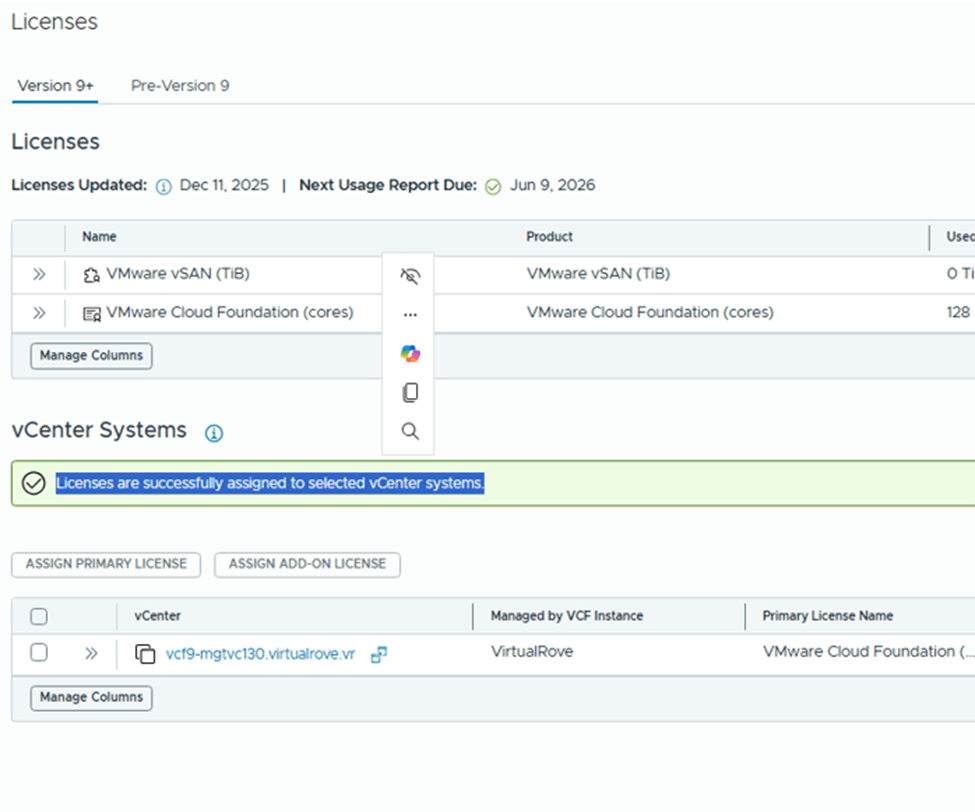
Error – The current vCenter is not licensed by a license server.

I’ve put together a short blog post on it,

VCF Upgrade Precheck Error: vCenter Is Not Licensed by a License Server

Back to upgrade process and hit upgrade for esxi,
Monitor the status,
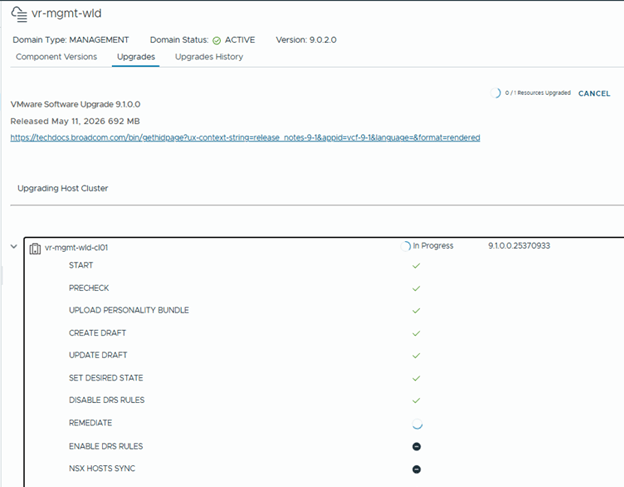
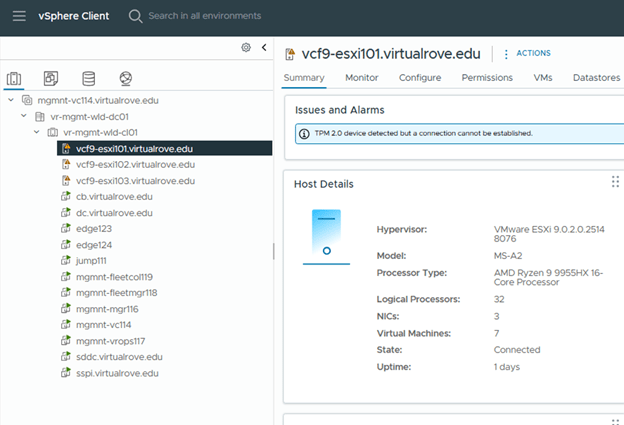
At a high level, each ESX host enters maintenance mode, virtual machines are migrated to other hosts, and the host is upgraded before moving to the next host.

After the workflow completes, all ESX hosts are upgraded to version 9.1.
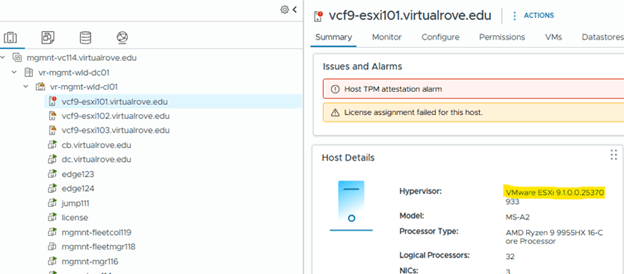
Step 9: Upgrade Edge Clusters

The final lifecycle step is to upgrade the NSX Edge clusters in the environment.

Click on Configure,
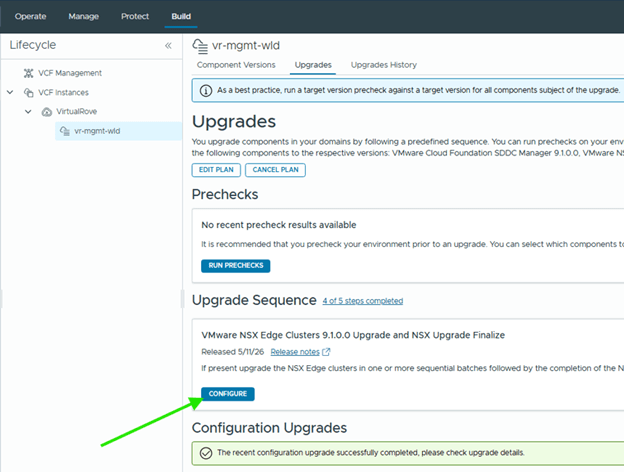
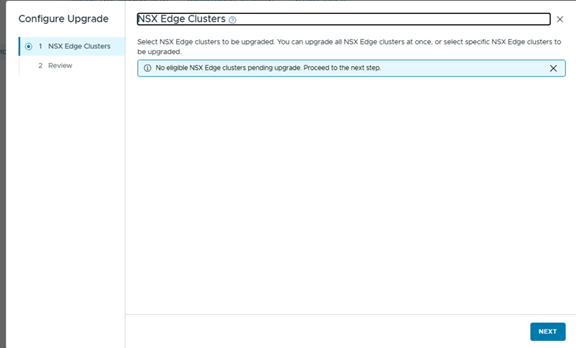
My lab environment does not have any Edge clusters, so I proceeded through the workflow and completed the step.
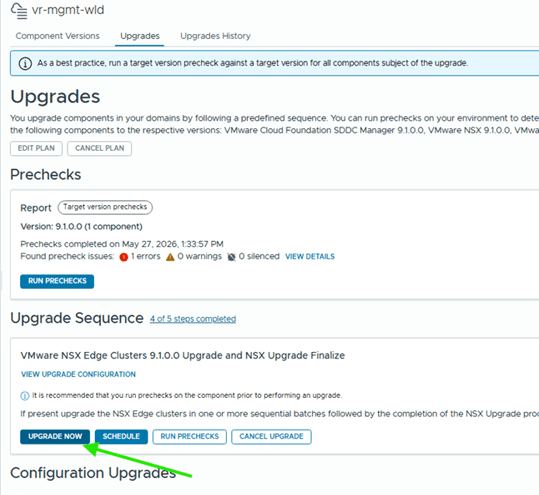
Click Upgrade on last step,
Upgrade Complete

At this point, the management domain upgrade from VCF 9.0.2 to VCF 9.1 is complete.
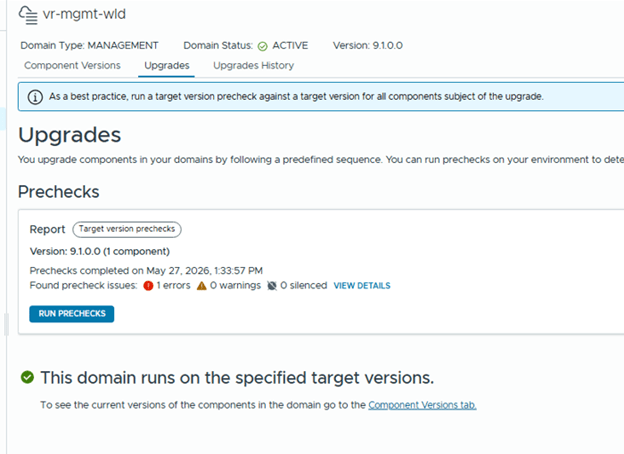
As a final validation, review the Component Versions tab and confirm that all upgraded components report the expected VCF 9.1 versions.
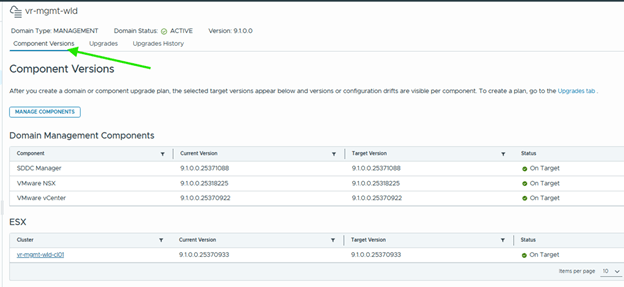
After the management domain is upgraded, follow the same procedure for each workload domain in the environment.

Here is the official documentation link for an upgrade process,

Upgrading to VMware Cloud Foundation 9.1

Reminder: This blog covers the upgrade process from VCF version 9.0.2 to VCF 9.1. If you are upgrading from VCF 5.x to VCF 9.1, review the official documentation and supported upgrade path before starting.

The next and final blog in this series will cover post-upgrade validation checks after upgrading to VCF 9.1. Stay tuned.

Lessons Learned and Practical Notes

  • The upgrade process automatically decommissions the standalone VCF Operations Fleet Management appliance. Fleet management capabilities move into the updated VCF Operations and management services architecture.
  • VCF Identity Broker should be moved to the shared VM Management network before the upgrade if it is currently deployed on a different port group.
  • After upgrading SDDC Manager to version 9.1, reconfigure the online or offline depot to use an activation code from the VCF Business Services console instead of a download token.
  • Embedded VCF Identity Broker is automatically upgraded during the vCenter instance upgrade.
  • You must provide a dedicated IP range for the VCF Services Runtime. A minimum of 12 IP addresses is required.
  • After deployment, do not move the VCF management services VMs to a different resource pool or VM folder. If you move the VMs to a new resource pool or VM folder, subsequent patching, deployment, or scale out operations fail.
  • If you have VCF Identity Broker 9.0.x, identity broker 9.1 deployment is skipped and you can later upgrade. 
  • Embedded VCF Identity Broker is automatically upgraded during the vCenter instance upgrade.
  • After VCF management services are deployed, if VCF Operations is in connected mode, the license server is automatically registered and licenses are transferred to the license server.

Hope the content is helpful. Good luck with an upgrade. And post comments if you encounter new errors or if there are new lessons learned. Thank You.

Are you looking out for compute resources (CPU / Memory / Storage) to practice VMware products…? If yes, then click here to know more about our Lab-as-a-Service (LaaS).
Upgrading VMware Cloud Foundation to version 9.1: Part 2 – SDDC Manager upgrade & Inro to VCF Management Services

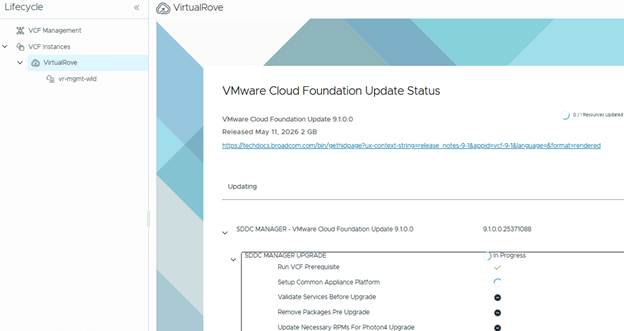
Step 3: Upgrade SDDC Manager

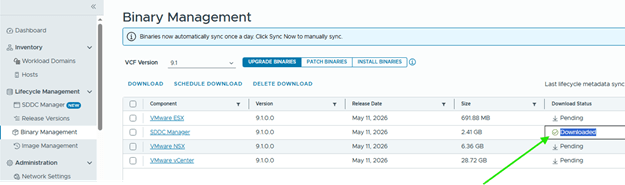
Log in to SDDC Manager and navigate to Binary Management > Upgrade Binaries. Select VCF 9.1 and download the required upgrade bundle.

You can also perform binary management from VCF Operations. Before downloading binaries, make sure the software depot is configured correctly and reachable.

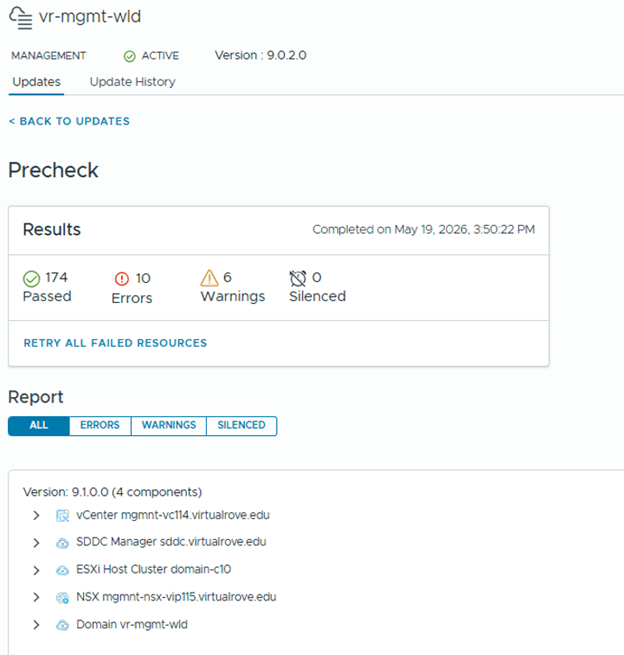
Next, run a precheck against the management workload domain from VCF Operations.

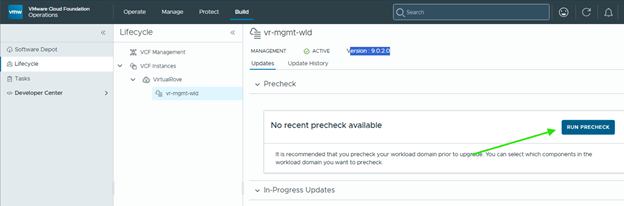
Ops> Build> Lifecycle> Select mgmnt wld under the vcf instance and click on “Run Precheck”

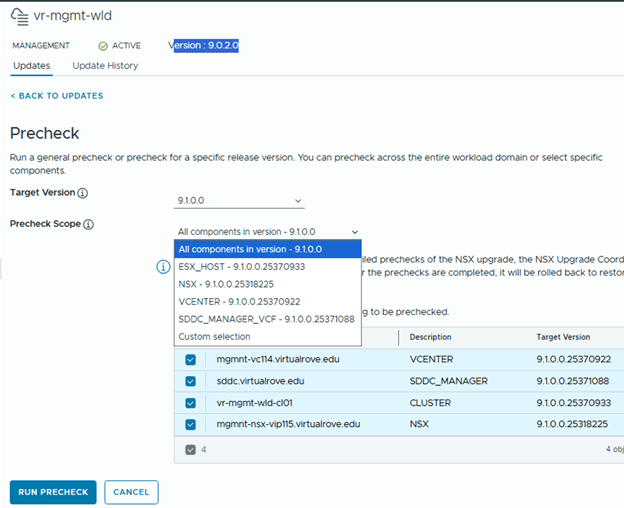
Target Version: 9.1
Precheck scope: All

Run Precheck,

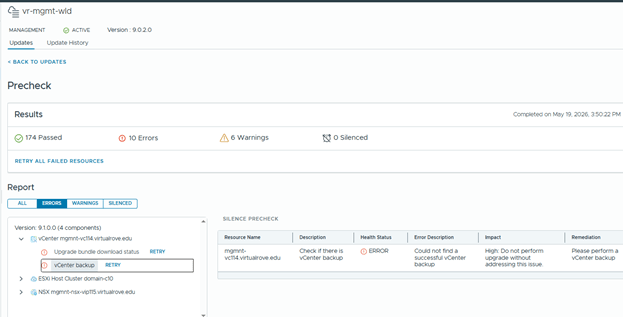
Review all failed checks and resolve them before continuing.

In my lab, I saw a few minor issues related to missing backups and support bundles. Each precheck failure included details and remediation guidance.

After resolving issues, select Retry All Failed to rerun the failed checks.

Mine came down to 6 errors from 10 after resolving some.

Note: Some warnings or errors may not block the upgrade, but you should understand each reported issue before proceeding.

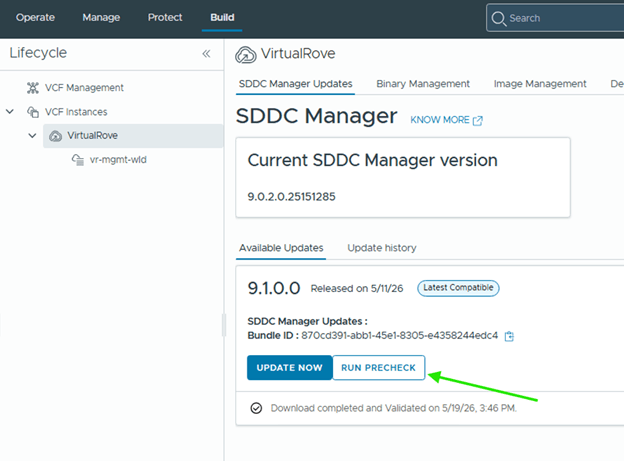
Once done, go back to the instance level, and perform prechecks against the SDDC manager again,

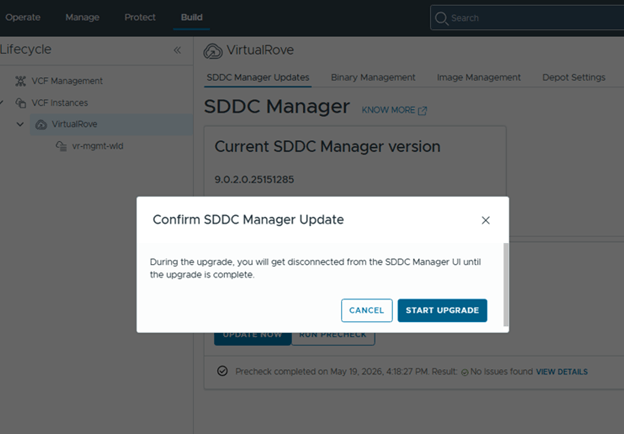
Once all required issues are addressed, start the SDDC Manager upgrade and monitor the workflow for failures.

Monitor the upgrade for any errors,

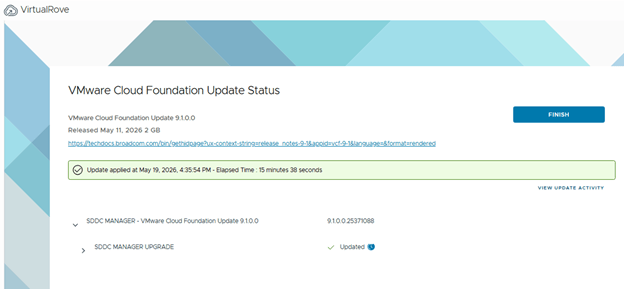
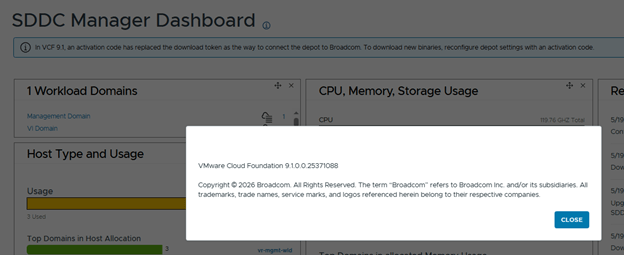
After the workflow completes successfully, SDDC Manager is upgraded to VCF 9.1.

Step 4: Reconfigure Software Depot Authentication

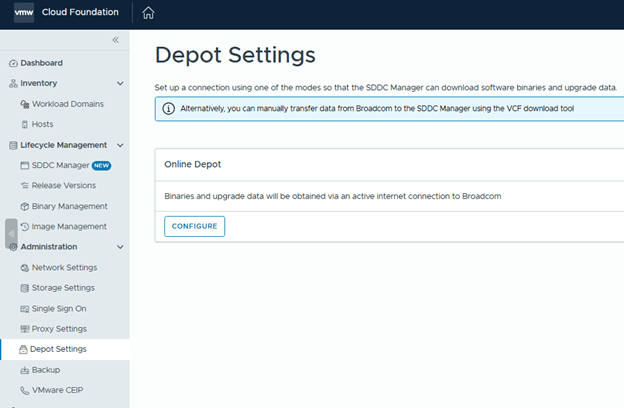
After upgrading SDDC Manager to version 9.1, log in to SDDC Manager and navigate to Administration > Depot Settings. Reconfigure your online or offline depot to use an activation code from the VCF Business Services console instead of the previous download token model.

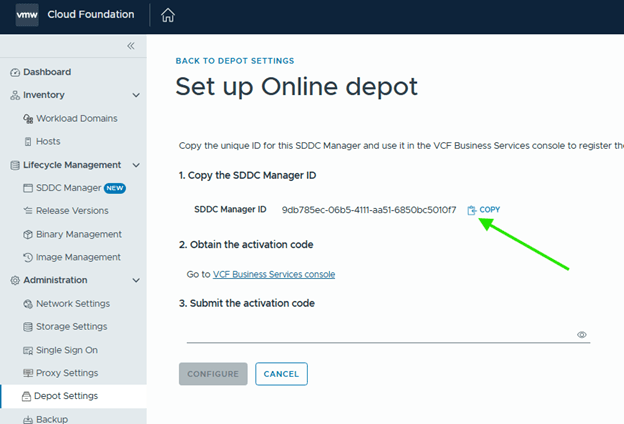
Copy the depot registration ID and log in to the VCF Business Services console.

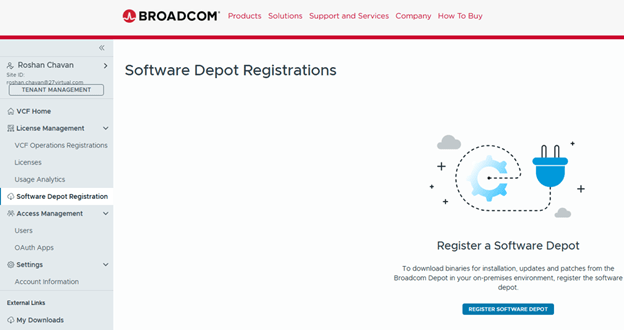
From the Business Services console (VCF Business Services), go to Software Depot Registration and register the SDDC Manager depot.

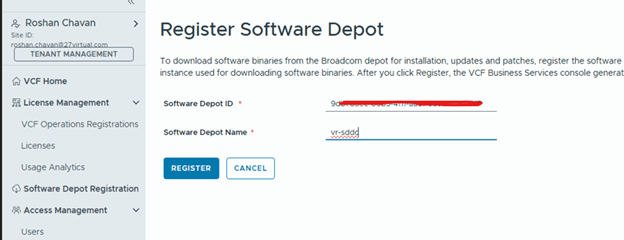
Paste the ID and Register,

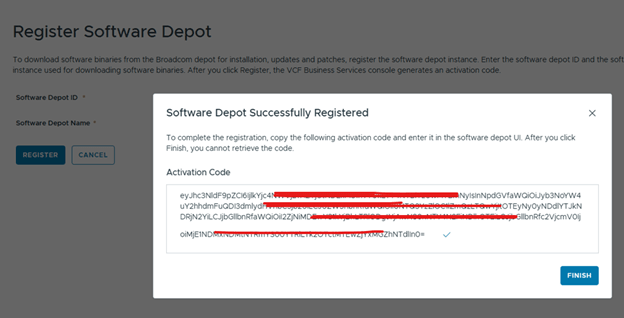
Copy the generated activation code, but do not complete the registration workflow until the code has been applied in SDDC Manager.

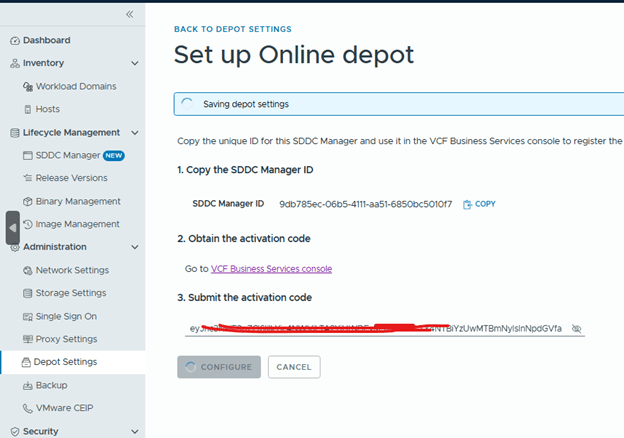
SDDC Manager> Enter the copied code and configure,

Step 5: Deploy VCF Management Services

Click on the instance level,

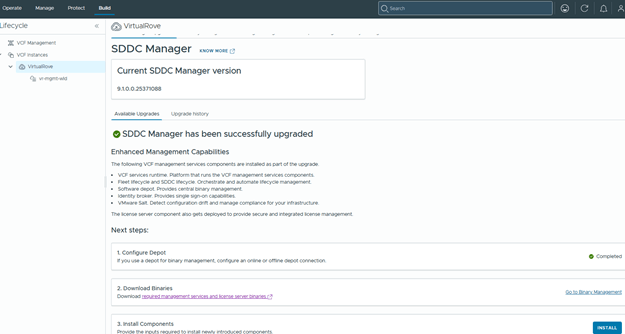
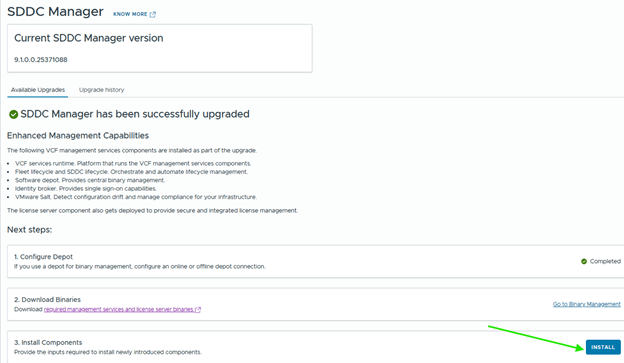
In VCF Operations, return to the instance-level upgrade workflow. The first task, Configure Depot, should now show as completed.

VCF 9.1 introduces enhanced management capabilities through a new set of VCF management services.

The following VCF management services components are installed as part of the upgrade.

  • VCF services runtime. Platform that runs the VCF management services components.
  • Fleet lifecycle and SDDC lifecycle. Orchestrate and automate lifecycle management.
  • Software depot. Provides central binary management.
  • Identity broker. Provides single sign-on capabilities.
  • VMware Salt. Detect configuration drift and manage compliance for your infrastructure.
  • The license server component also gets deployed to provide secure and integrated license management.

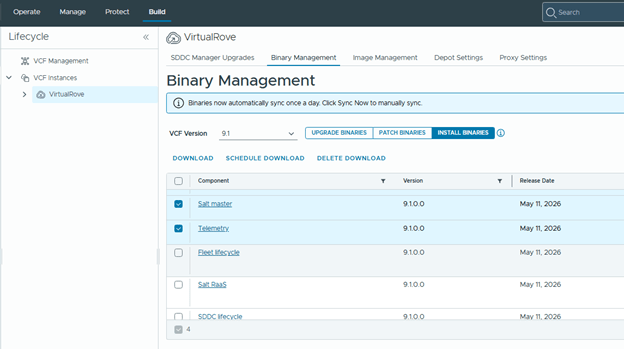
Next, download the required binaries for the additional VCF 9.1 management services.

Required Binaries:
1. Fleet Lifecycle
2. SDDC Lifecycle
3. VCF Services Runtime
4. Salt RaaS
5. Salt Master
6. VCF Identity Broker
7. Software Depot
8. Telemetry
9. License Server

Go to the Binary Management> Select the version> Install Binaries,

Select all required binaries and download it,

Once downloaded, back to upgrade page install all required components,

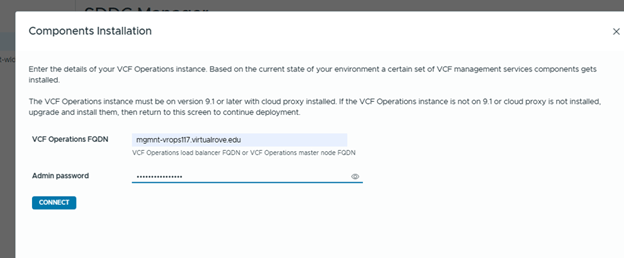
Enter the password and connect,

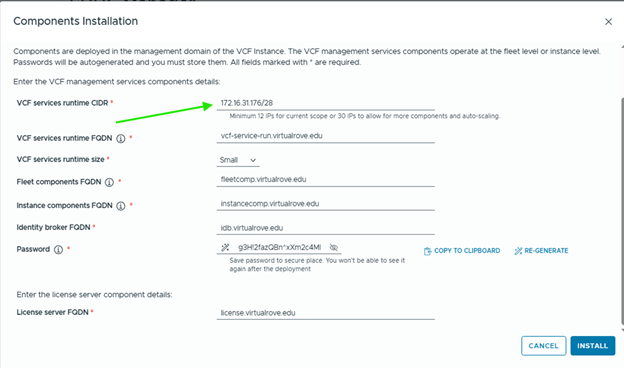
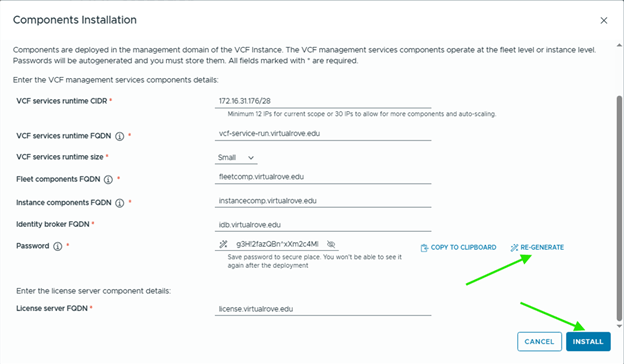
This is one of the areas where the workflow can become confusing, especially when providing the VCF Services Runtime CIDR.

VCF Servies runtime CIDR

VCF Services Runtime CIDR: Provide a dedicated IP range for the VCF Services Runtime. A minimum of 12 IP addresses is required. In my lab, I allocated 12 IP addresses from the VM Management network in CIDR format.

Create DNS records for the new management services components.
VCF Service Runtime
Fleet Components
Instance Components
Identity Broker
License Server

During the upgrade of the first VCF instance that hosts VCF Operations, the following management services are deployed.

VCF services runtime
Fleet lifecycle
SDDC lifecycle
Software depot
Identity broker
Salt RaaS
Salt master
Telemetry

Generate and copy the password for VCF Identity Broker, then start the installation.

Monitor the task from SDDC Manager. This workflow deploys the required management service appliances on the management domain vCenter.

With SDDC Manager upgraded and the new VCF Management Services deployed, the VCF 9.1 environment is now ready for the next phase of the upgrade journey. These steps are important because they establish the updated lifecycle, depot, identity, licensing, and management service foundation required for the rest of the platform upgrade.

See you in the next blogpost.

Are you looking out for compute resources (CPU / Memory / Storage) to practice VMware products…? If yes, then click here to know more about our Lab-as-a-Service (LaaS).
Upgrading VMware Cloud Foundation to version 9.1: Part 1 – Intro & VCF Operations upgrade

VMware Cloud Foundation 9.1 is an important follow-on release that builds on the architectural changes introduced in VCF 9.0 and continues the shift toward a more unified private cloud operating model. The release introduces enhancements across lifecycle management, operational services, compute, storage, Kubernetes, security, and resilience, including updated VCF management services, enhanced lifecycle workflows, centralized licensing, and new operational capabilities.

For administrators currently running VMware Cloud Foundation 9.0.2, upgrading to VCF 9.1 is more than a routine patch cycle. It is a structured platform upgrade that must be performed in the correct order, with careful attention to prerequisites, interoperability, binary management, management service deployment, licensing, and post-upgrade validation. In this blog, I’ll walk through my lab upgrade experience from VCF 9.0.2 to VCF 9.1 and highlight the key steps, gotchas, and lessons learned along the way.

High-Level Upgrade Sequence from VCF 9.0.2 to VCF 9.1

  1. Review the VCF 9.1 release notes, supported upgrade path, and target bill of materials before making any changes.
  2. Validate prerequisites such as backups, DNS/NTP health, certificate status, available capacity, component compatibility, and any third-party or adjacent integrations.
  3. Upgrade VCF Operations first, because lifecycle workflows in the VCF 9.x model begin there and additional management services are introduced as part of the newer architecture.
  4. Configure or verify access to the software depot and download the required VCF 9.1 binaries.
  5. If your environment includes dependent services such as Avi Load Balancer, recovery, or replication products, validate and upgrade those components according to the supported interoperability guidance.
  6. Upgrade SDDC Manager to version 9.1.
  7. Deploy or activate the required VCF 9.1 management services introduced during the upgrade workflow.
  8. Run upgrade planning and prechecks for the management domain.
  9. Upgrade management domain components in the supported order, typically starting with NSX, followed by vCenter, and then ESX hosts.
  10. Complete post-upgrade validation to confirm component health, service status, lifecycle inventory accuracy, and overall platform readiness before moving on to any Day-N workload domain upgrades.

Note: This walkthrough focuses specifically on upgrading from VCF 9.0.2 to VCF 9.1. If you are upgrading from VCF 5.x to VCF 9.x, review the official upgrade path and planning guidance before proceeding.

Before starting, review the VCF 9.1 Bill of Materials and confirm that every component in your environment is compatible with the target release.

Lab Environment and Pre-Upgrade Preparation

Here is the starting point for my lab environment: VMware Cloud Foundation 9.0.2.

The first step is to protect the environment before making any changes. Back up all required appliances, validate that SFTP-based backups are working where applicable, and take snapshots of supported appliances according to your operational standards. Also confirm DNS, NTP, certificate health, available capacity, and access to required credentials before beginning the upgrade.

VCF Operations Fleet Management: In my existing VCF 9.0.2 environment, the Fleet Manager appliance was deployed. With VCF 9.1, this standalone appliance is no longer required and is powered off as part of the upgrade process.

VCF Identity Broker: Starting with VCF 9.1, VCF Identity Broker becomes a required component. SSO capabilities are migrated into the containerized VCF Management Services architecture. If your existing VCF Identity Broker appliance is deployed on a port group other than the VM Management network, move it to the VM Management network before the upgrade. At a high level, the process is to back up the appliance, power it off, remove it, redeploy it with the same FQDN and certificates, and then restore the backup.

Step 1: Upgrade VCF Operations

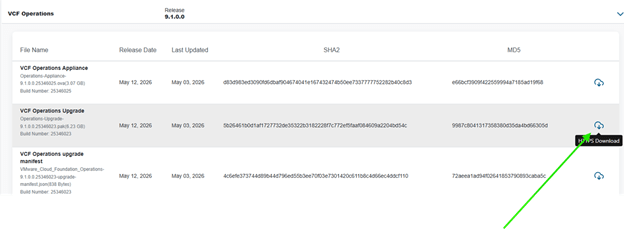
Download the VCF Operations 9.1 .pak file from the Broadcom Support Portal.

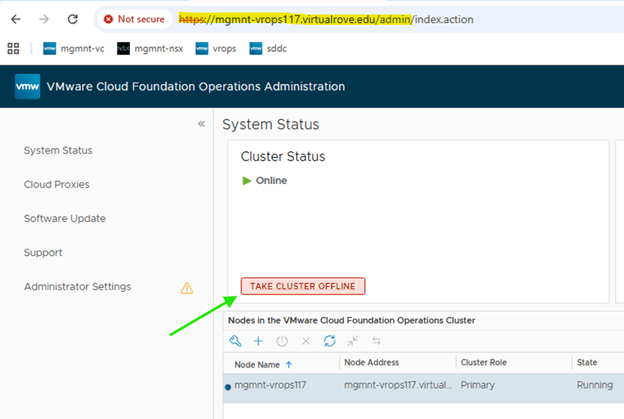
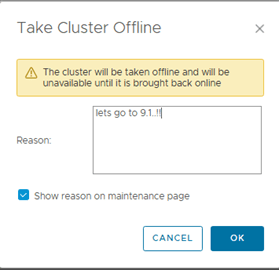
Next, log in to the VCF Operations admin console and take the cluster offline before applying the update.

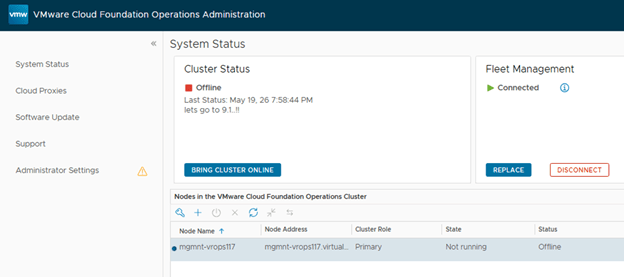
Wait for the status to be changed to offline,

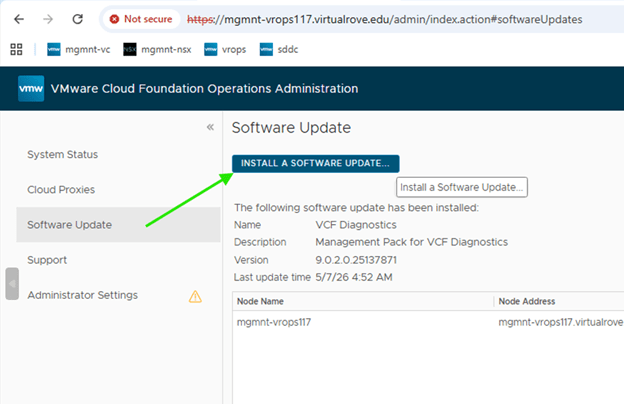
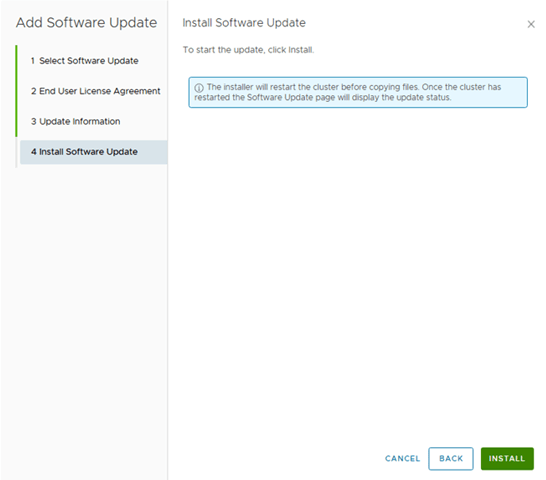
Install the software bundle,

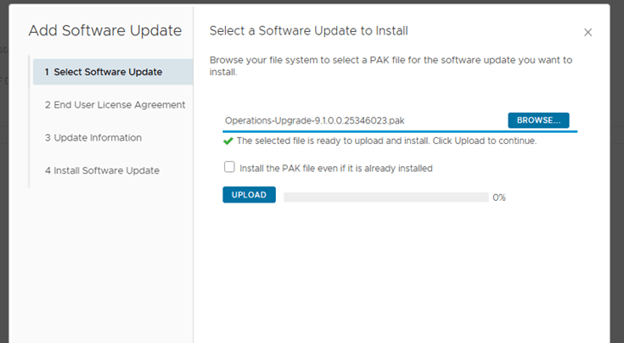
Select the downloaded .pak file and upload it to begin staging the software update.

Complete the remaining steps and upgrade.

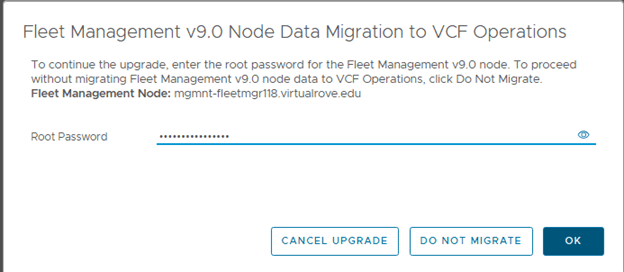
You will be prompted for root password once the upgrade process starts,

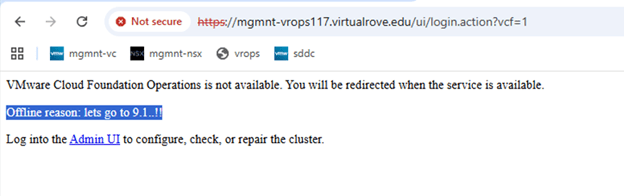
During the upgrade, the VCF Operations UI is unavailable. Users are presented with a maintenance banner until the upgrade completes.

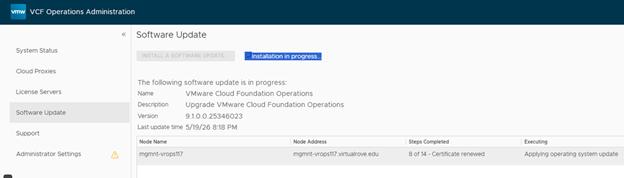
You can also monitor the upgrade from the same page,

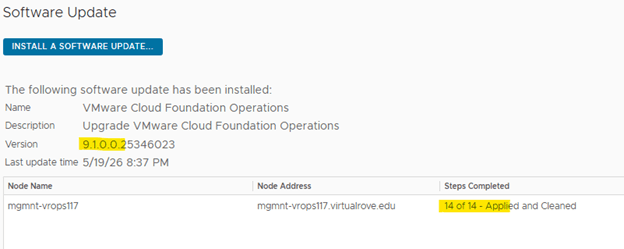
About 14 steps and VCF Operations is upgraded to version 9.1,

Important: The Fleet Collector / Cloud Proxy appliance is still required and is upgraded during this process.

At this point, the VCF Operations upgrade is complete and the environment is ready for the next phase.

Step 2: Review Adjacent Component Requirements

I do not have vSphere Replication or VMware Live Site Recovery installed in my lab environment. If these products are present in your environment, validate the supported upgrade path and follow the official product documentation (Upgrading to VMware Cloud Foundation 9.1) before continuing with the main VCF upgrade sequence.

If Avi Load Balancer is deployed, validate compatibility and upgrade Avi according to the VCF 9.1 guidance before proceeding.

That’s all for this blogpost. Next blog will consist of SDDC Manager upgrade process.

Are you looking out for compute resources (CPU / Memory / Storage) to practice VMware products…? If yes, then click here to know more about our Lab-as-a-Service (LaaS).
How to Clean Up a Failed Edge Deployment in VCF 9 which has “External Connectivity” configured.

If an Edge deployment fails in VMware Cloud Foundation (VCF) 9 because of incorrect input values or an incomplete configuration, you may need to clean up the partially created networking objects before you can try again. In this post, I walk through the cleanup process using the VCF 9.0.2 user interface and show which objects need to be removed from both NSX and vCenter.

In my case, the Edge deployment was started with incorrect values by mistake. That left behind partial configuration that prevented a clean redeployment. The goal of this cleanup is to remove all of the network objects associated with the failed deployment so the Network Connectivity workflow can be run again from the beginning.

I started the edge deployment and provided some wrong values by mistake. And now we have to delete it so that it can be redeployed using correct values.

In earlier VCF 5.x environments, this type of cleanup often required the Edge Cluster Deployment Removal Tool. In VCF 9.x with “External Connectivity” configured, most of the cleanup can be completed through the UI.

What the Failed Deployment Looks Like

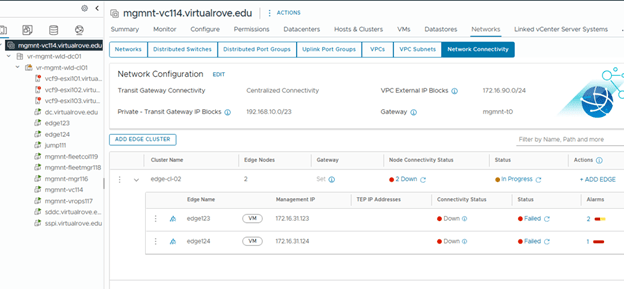
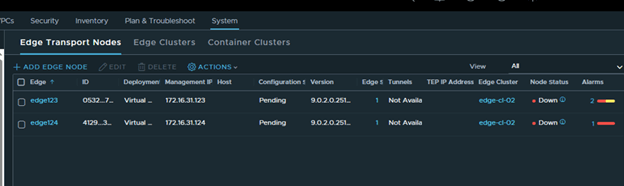
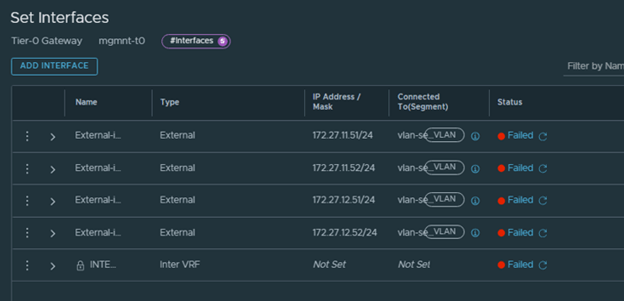
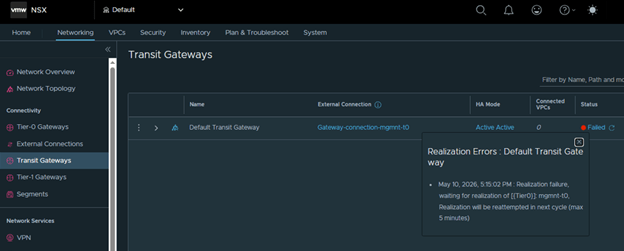
Below is an example of the failed Edge deployment as seen in the VCF workflow and in the NSX UI.

One of the most visible symptoms is that all interfaces on the Tier-0 gateway remain down, including all configured BGP neighbors. This confirms that the deployment did not complete cleanly and that the remaining objects need to be removed before retrying.

Step 1: Detach the External Connection from the Default Transit Gateway

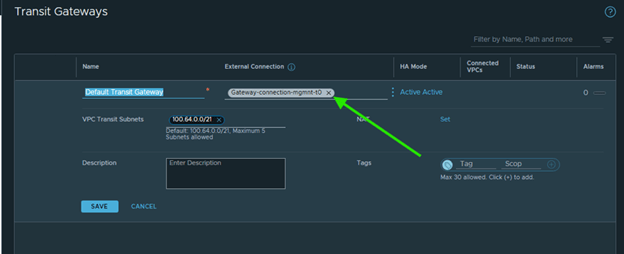
Start by removing the external connection attached to the Default Transit Gateway. This is an important first step because the downstream objects cannot always be removed cleanly while that connection is still attached.

Open the gateway configuration, edit the connection settings, and remove the attached external connection.

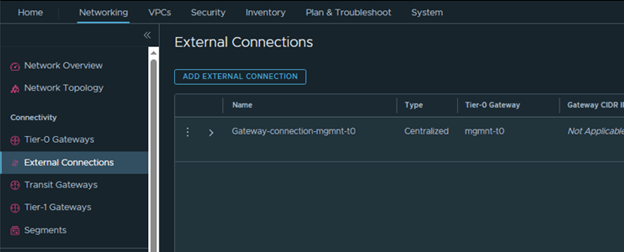
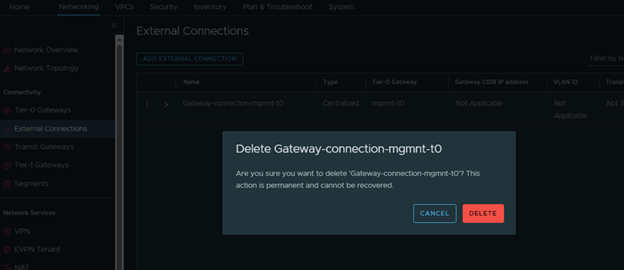
Save the change, then delete the external connection object itself so it does not remain orphaned in the environment.

Then delete the external connection.

Step 2: Delete the Auto-Created Tier-0 Gateway

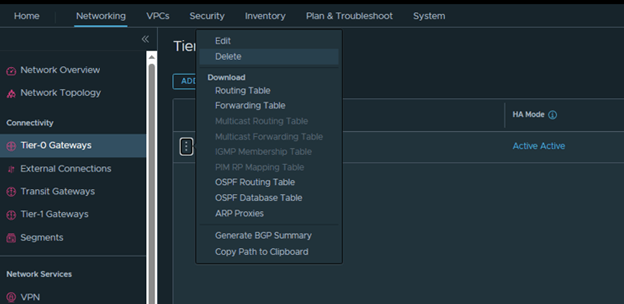
After the external connection has been removed, delete the default Tier-0 gateway that was created during the failed deployment. This clears the routing object and its associated configuration from NSX.

Step 3: Delete the Edge Cluster from vCenter

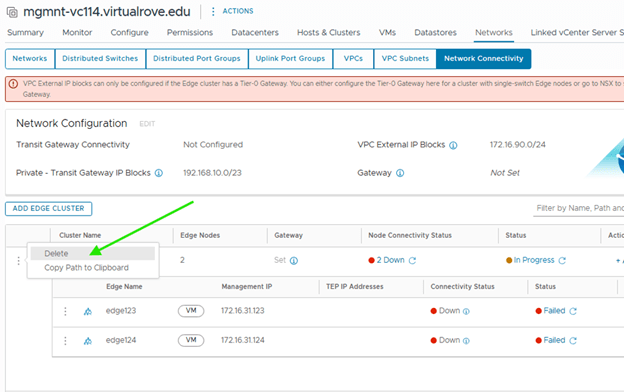
Next, remove the Edge cluster from the vCenter UI. This cleans up the cluster object from the infrastructure side, but the process is not fully complete yet.

Step 4: Manually Delete the Edge Nodes from NSX

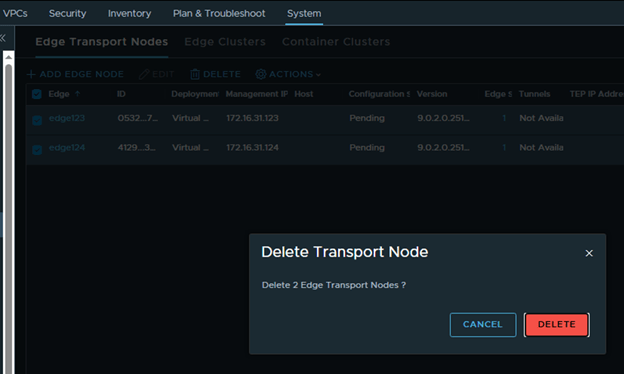
Deleting the Edge cluster in vCenter does not remove the Edge nodes from NSX. To complete the cleanup, go to the NSX UI and manually delete the Edge nodes that were created during the failed deployment.

Step 5: Remove the Auto-Created Segments

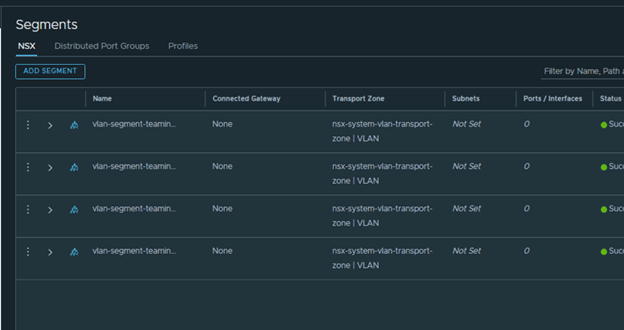
Once the Edge nodes are gone, delete any NSX segments that were automatically created during the original configuration process. Leaving these behind can cause confusion or conflicts during the next deployment attempt.

Step 6: Delete the Auto-Created Port Groups from vCenter

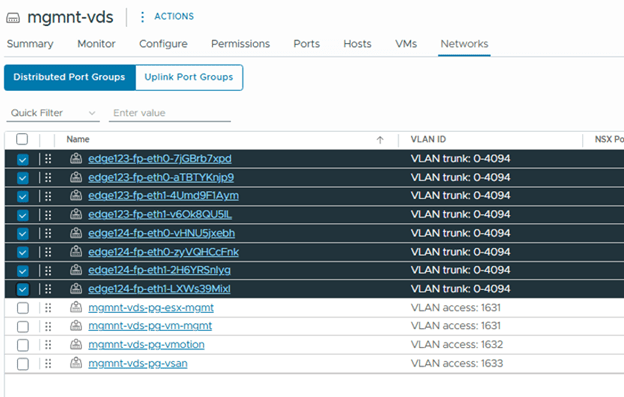
The last cleanup task is to remove any port groups that were automatically created in vCenter as part of the failed Edge deployment. This ensures the environment is fully reset before you run the workflow again.

Conclusion

After these objects are removed, the environment should be clean enough to start the Network Connectivity configuration again from the beginning. If your failed Edge deployment left behind partial NSX and vCenter objects, this sequence provides a practical way to reset the environment and redeploy using the correct values.

Here are dome reference article which would be helpful when it comes to deleting failed edge clusters,
Unable to Edit the Management IP (IPv4) of an Edge node in VCF 9
VCF NSX-T Edge Cluster Deployment Removal Tool

That’s it for now. Hope the information is helpful. Thank You.

Are you looking out for compute resources (CPU / Memory / Storage) to practice VMware products…? If yes, then click here to know more about our Lab-as-a-Service (LaaS).
VMware vCloud Foundation 9 – Licensing Part 2

In previous blog post here,

VMware vCloud Foundation 9 – Licensing Part 1

We talked about registering VCF Operations on the Broadcom Portal and applying licenses to VCF Operations. Let’s continue and apply new licenses to vCenter and VSAN.

Click on Licenses> Assign Primary License

Select the VCF license and assign,

vCenter is fully licensed,

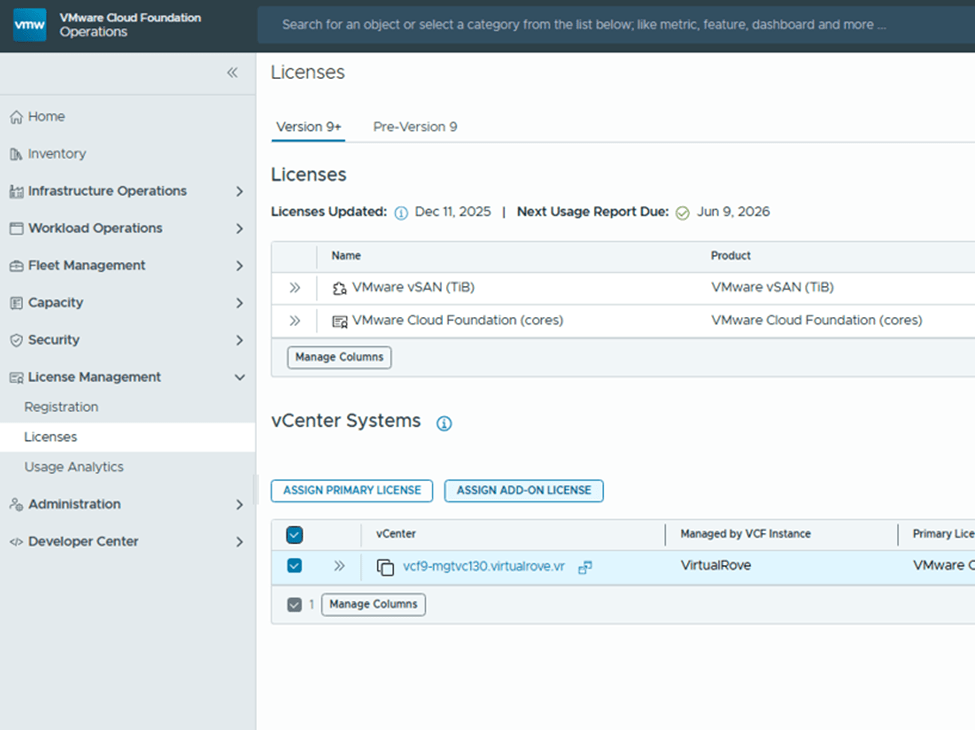
Back to licenses, Select vCenter and click on “Add-on license”

Select VSAN license and assign,

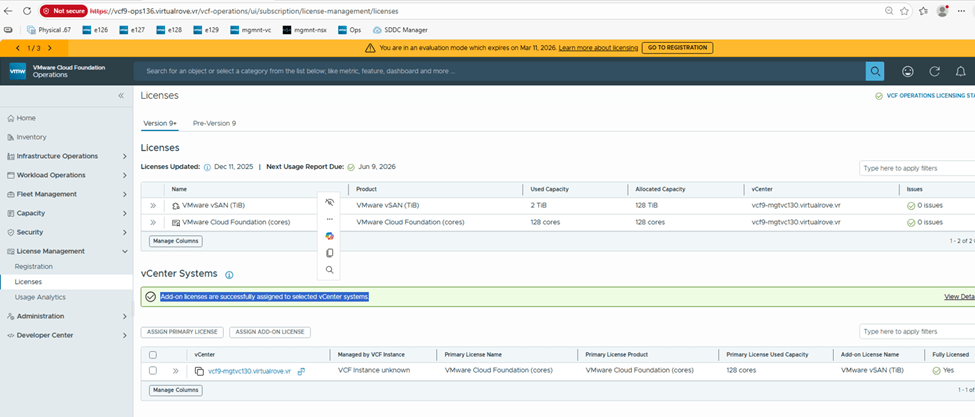
Add-on license applied successfully and vCenter is fully licensed,

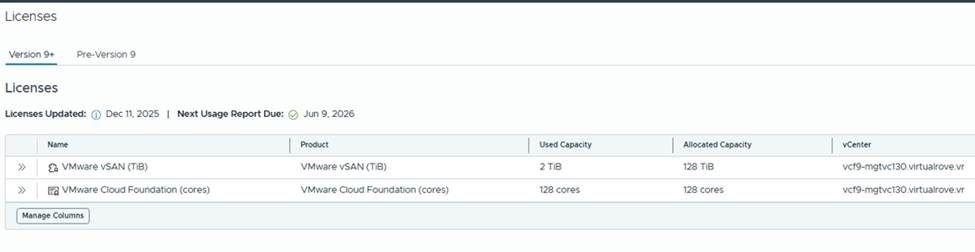
Check the “Used Capacity” in license section,

vCenter shows fully licensed,

Here is the link for official documentation on VCF 9 licensing,

Licensing

That’s it for this post. We have licensed entire VCF 9 environment. Please refer to official documentation & make sure to update license usage every 180 days. 😊

Are you looking out for compute resources (CPU / Memory / Storage) to practice VMware products…? If yes, then click here to know more about our Lab-as-a-Service (LaaS).
VMware vCloud Foundation 9 – Licensing Part 1

VCF 9 adopts a streamlined, subscription-based licensing model that simplifies management and compliance:

  • Single license file replaces multiple component-specific keys (vCenter, ESXi, NSX, etc.)
  • Licenses are version-agnostic, eliminating version-based key mismatches
  • Managed centrally through VCF Operations and the VCF Business Services (VCFBS) portal
  • Designed for both connected mode (auto-reporting) and disconnected mode (manual uploads every 180 days)

Let’s dive deeper into it. I have freshly deployed VCF 9 environment.

After you deploy the env, it operates in evaluation mode for up to 90 days. During that period, you must license your environment.

Here are details for one of the esxi from the env,

As you can see, I have 2 physical sockets on this esxi and cores per socket are 4. That sums up to 8 CPU cores. However, when it comes to license calculation, it by default calculates 16 cores per socket even if I just have 4 cores per socket.

So, total number of licensed core on this esxi would be 32 cores.

I have 4 esxi hosts in this management workload domain cluster, so the total number of licensed cores would be (4*32) 128 cores.

Primary licenses apply only to ESXi hosts by count of physical CPU cores, with a 16-core minimum per CPU.

Moving to add-on license. This applies to vSAN Capacity in TiB’s. And the formula is, 1 TiB per licensed core. In my case, I will have 128 TiB allowed storage since I have 128 cores. For storage-heavy use cases, you need to purchase additional vSAN add-on capacity license.

Maintaining license compliance now includes periodic usage reporting:
Connected Mode (Internet Connection Required): VCF Operations sends usage data automatically each day; updates required every 180 days

Disconnected Mode (Dark Site): Manually download, upload, and activate new license files every 180 days

Failure to report can place hosts into expired status—preventing workloads until remedied. Basically, all hosts gets disconnected and you cannot start any vm. ☹

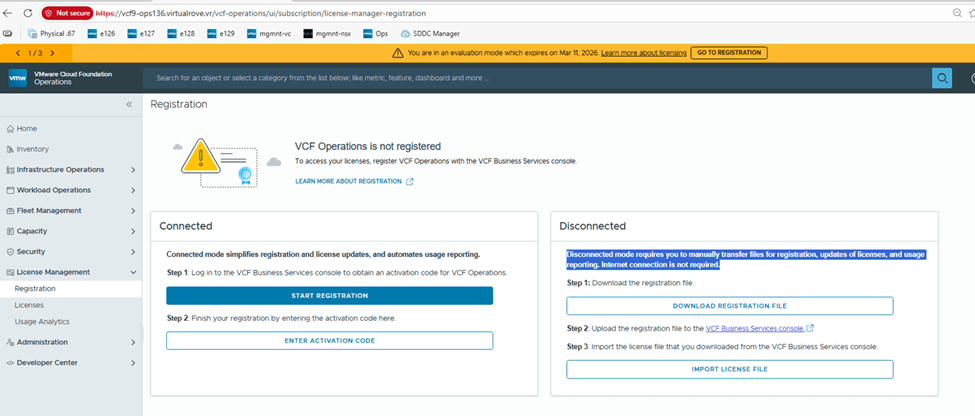
Let’s go to Ops> License Management> Registration

I will be demonstrating “Disconnected” mode for this blog.

On the vCenter, it shows evaluation mode,

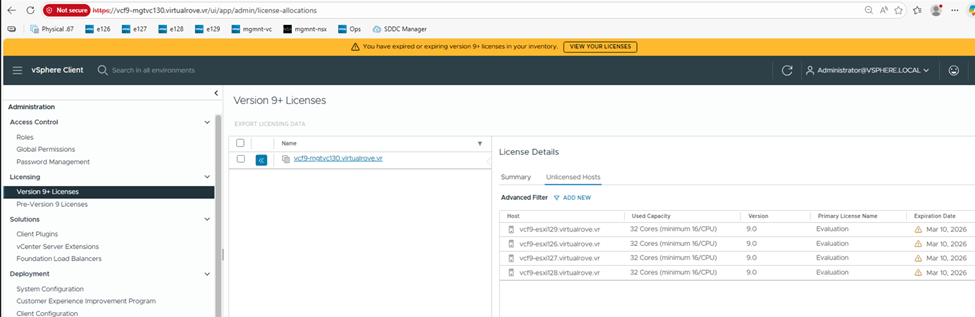
Hosts show “Unlicensed”

NSX side,

That reminds me,

As per VMware Documentation, here

Starting with version 9.0, the licensing model is the same for VCF and vSphere Foundation. You assign licenses only to vCenter instances. The other product components, including ESXi hosts, that are connected to the licensed vCenter instances, are licensed automatically.

You no longer license individual components such as NSX, HCX, VCF Automation, and so on. Instead, for VCF and vSphere Foundation, you have a single license capacity provided for that product.

For example, when you purchase a subscription for VCF, with the license you receive and assign to a vCenter instance, all components connected to that vCenter instance are licensed automatically.

Back to “Registration”

Click on “Download Registration File”

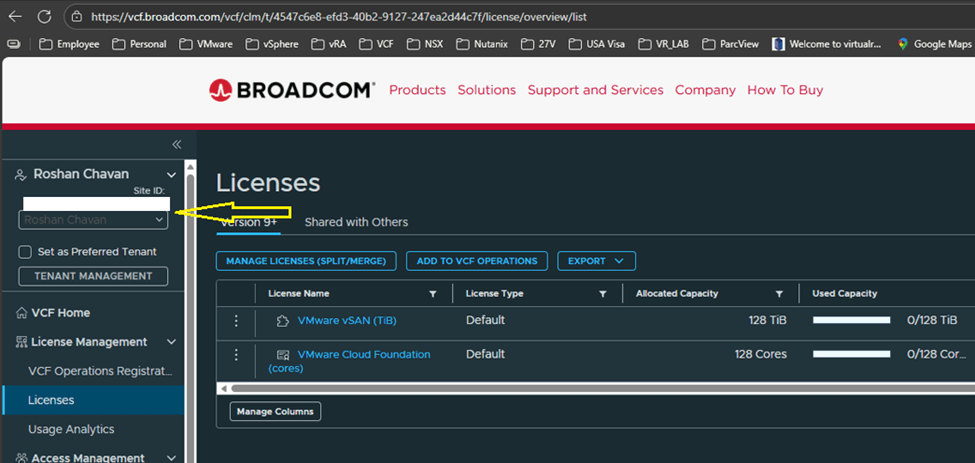
Login to https://vcf.broadcom.com with your credentials.

Switch the site ID and make sure it is correct one and click on License,

I have vmug licenses which are already showing up on the portal with my vmug entitlement.

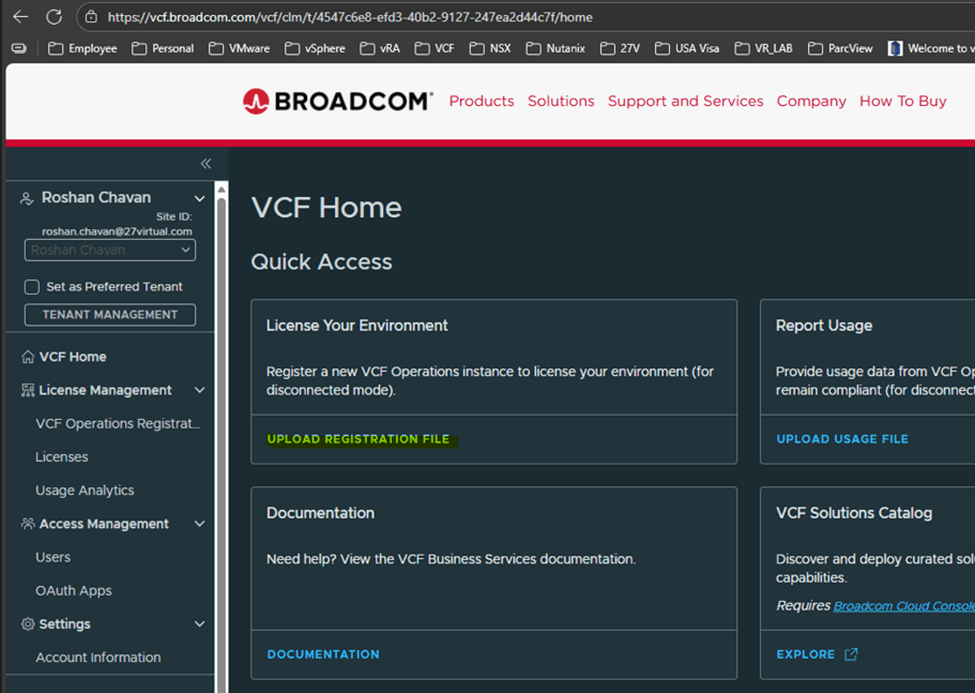
Back to VCF Home page on the portal, Click on “Upload registration file”

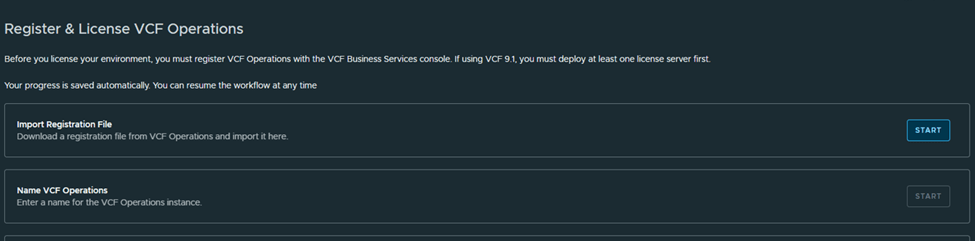
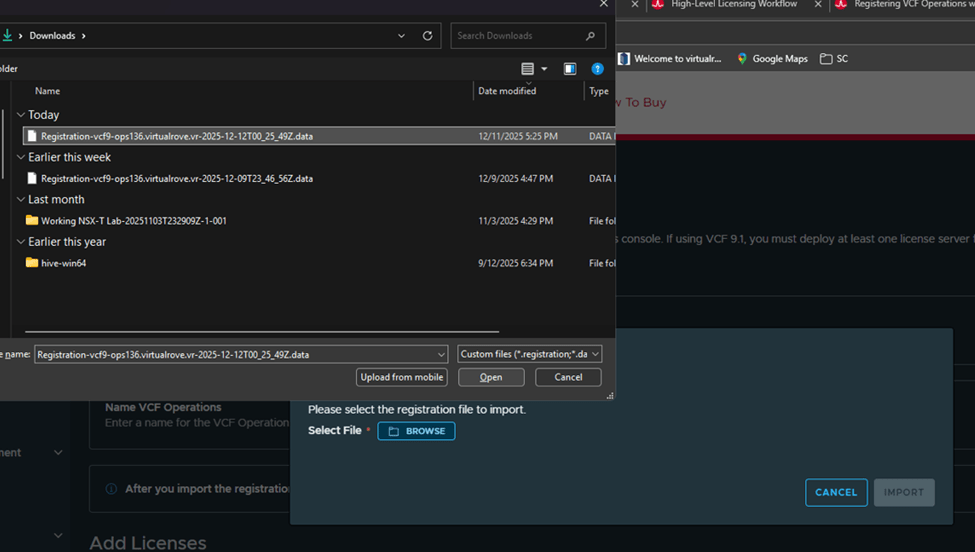
Upload the file that we downloaded earlier,

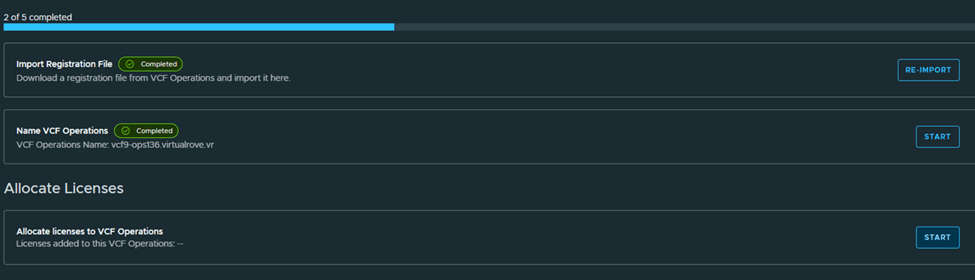
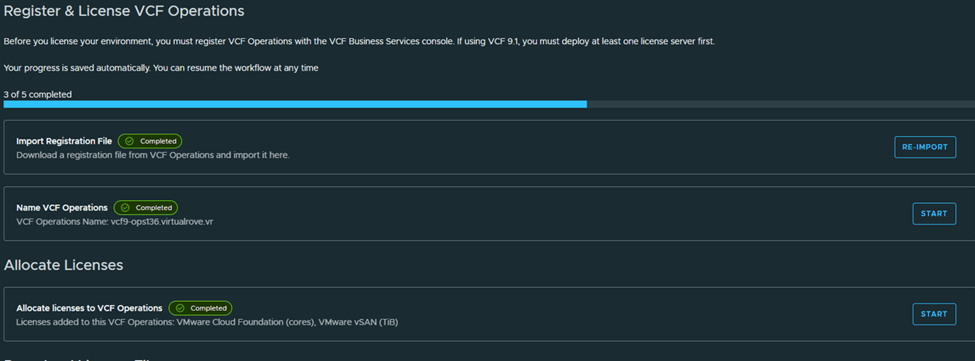
Next, Name the VCF Operations,

Next, Allocate licenses,

Next,
Download the generated licensed file and mark as completed,

We are done on this portal here,

Back to registration page shows this,

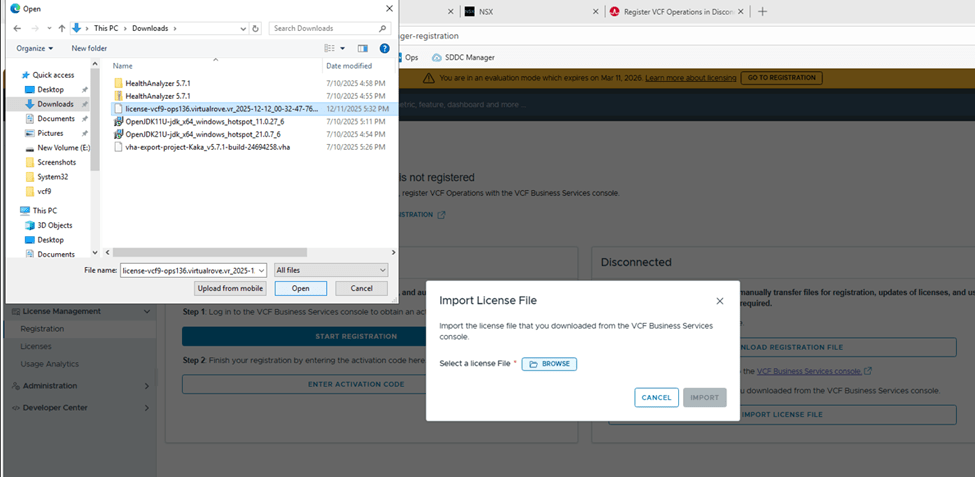
Let’s import the downloaded licensed file to our VCF operations in our environment,

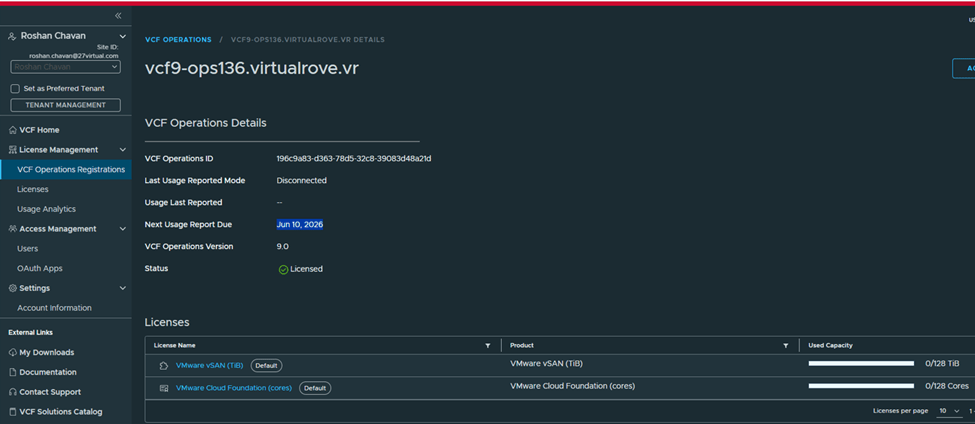
Once imported, VCF Operations shows registered,

Status: Licensed
Mode: Disconnected
Next usage date: You need to report license usage before this date, or else all hosts will be disconnected.
VCF Operations name: shows Operations instance

We have licensed our VCF Operations instance. That’s a wrap for today! Stay tuned for the next blog—where we will talk about applying those licenses to vCenter and VSAN.

Are you looking out for compute resources (CPU / Memory / Storage) to practice VMware products…? If yes, then click here to know more about our Lab-as-a-Service (LaaS).
VMware vCloud Foundation 9 – Online Depot Configuration

To manage the lifecycle of VCF fleet level Management components such as VCF Operations, VCF Operations for networks, VCF Operations for logs, VCF Automation & VCF Identity Broker, you need to use VCF Operations fleet management appliance.
And before you can perform any of these operations, VCF Operations needs to be configured either for Online or Offline depot. This is the place where all downloaded binaries will be stored, which allows you to install, upgrade or patch any of the above-mentioned components.

Let’s dive into the lab,
I have freshly installed VCF 9.0 env. Plan is to install further components in the lab,

VCF Operations> Fleet Management> Lifecycle

As you can see “MANAGE” option is only available for VCF Operations. And rest needs to be installed. If I click on ADD on any of those,

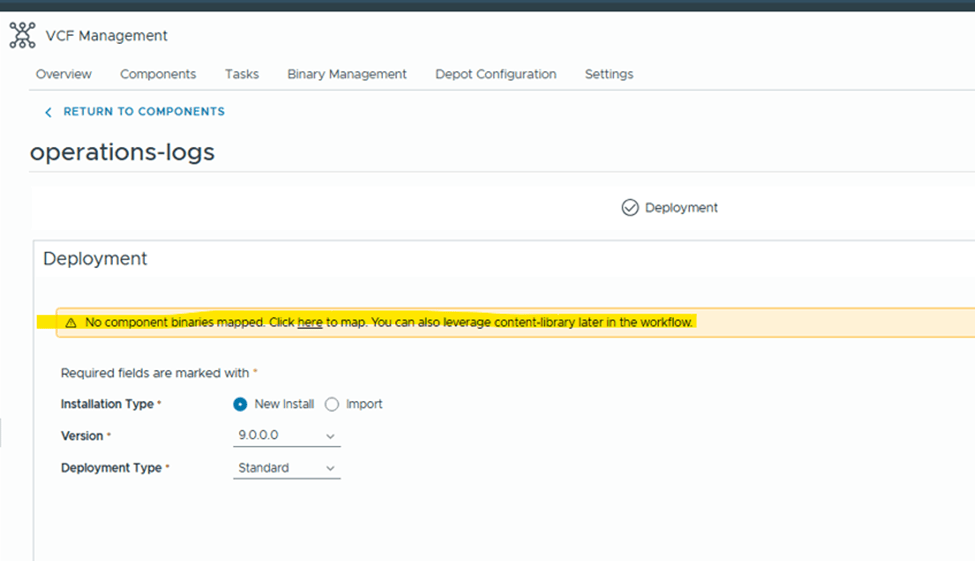
It says, NO component binaries mapped.
Under binaries management, Depot is not configured.

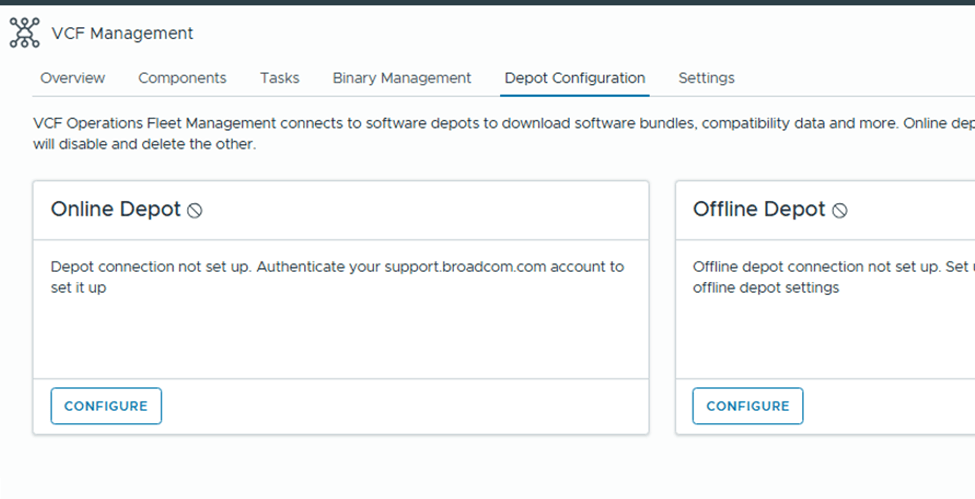
Under “Depot Config”, we have 2 options

Online Depot: Use this option if the appliance has internet connectivity and you have obtained download token from support.broadcom.com portal.

Offline Depot: This option requires you to setup either web server which has access to internet or local server where you would upload all binaries manually to.

For this example, I will be configuring “Online Depot”
Click on “Configure” under online depot,

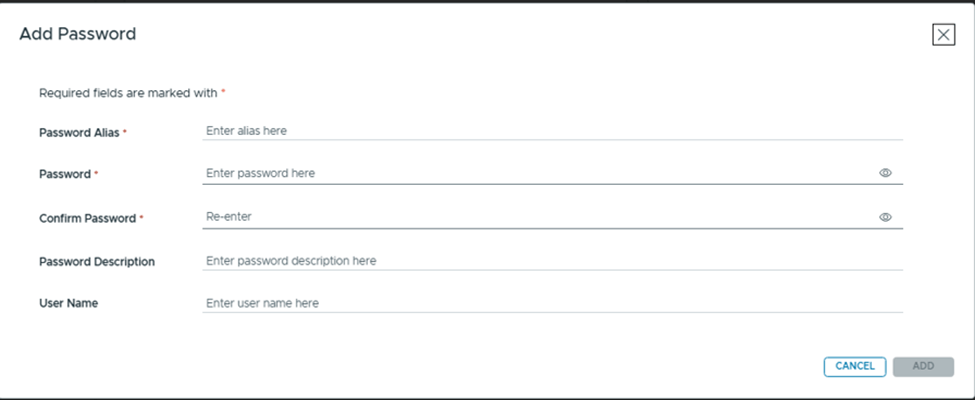
Click on the + sign on the right side,

Password Alias: Any friendly name.
Password: Paste the token from Broadcom portal. (will explain later in this article on how to generate one)
Confirm Password: Paste the same token again.
Rest two are option fields.

Select the “Download Token” that we just created,

Accept the certificate and OK.

Online depot is now active.

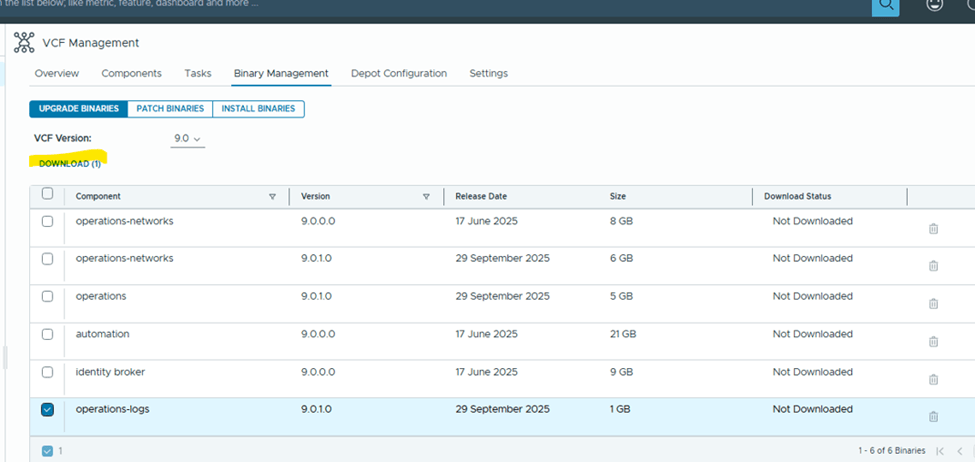
You would see all available products to download binaries for,

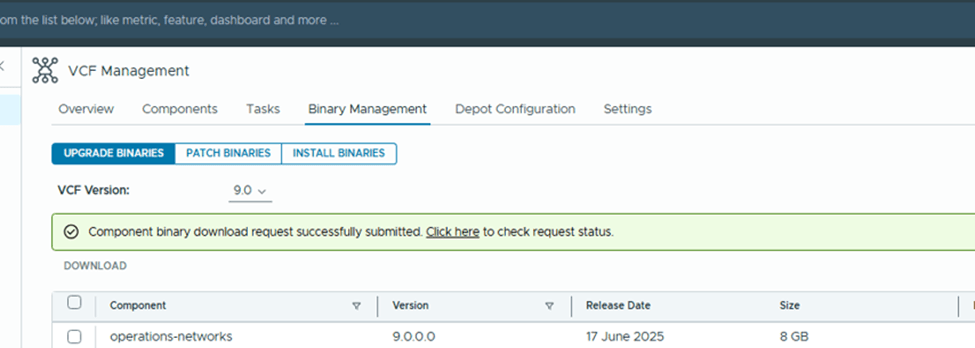
I selected “operations-logs” for testing and downloaded it,

You can monitor the status of the download under Tasks,

That’s it. You are good to download rest of the products.

To download the “Download Token”, login to https://support.broadcom.com

Select VCF from top right corner,

Scroll down to “Quick Links”

Click on “Generate Download Token”. Select your Site ID and Generate Token.
Note: You need to have proper permissions to access the site.

Check the official documentation here for any additional information,
Lifecycle Management of VCF Management Components

Hope that was helpful information. Keep learning.

Are you looking out for a lab to practice VMware products…? If yes, then click here to know more about our Lab-as-a-Service (LaaS).
VMware VCF – Delete failed tasks from SDDC Manager

VMware Cloud Foundation (VCF), deleting failed tasks is often necessary to avoid clutter in the SDDC Manager UI and free up resources. Failed tasks can also block further operations, especially credential rotation tasks. 

Deleting failed tasks can help maintain a clean and organized SDDC Manager UI, making it easier to track ongoing and successful operations. Failed tasks can consume resources, potentially leading to performance issues or conflicts with other ongoing processes. Some failed tasks, like credential rotation failures, can block further credential operations until they are resolved or removed. 

Deleting failed tasks is one of the prerequisites for rotating passwords via SDDC manager.

Let’s get into SDDC manager check failed tasks and delete them. This is typically done by using the SDDC Manager API or, if necessary, through manual SSH commands. 

I see couple of failed tasks here on the dashboard of SDDC Manager. You can also find list of all tasks at the bottom here,

Click on the hyperlink of the task name,

Copy the task ID from the browser link,

SSH to SDDC manager using VCF account and switch to root user,

Command to delete the task is,

curl -X DELETE http://localhost/tasks/registrations/95b9cdb2-f77c-4714-90af-3441c8c466b7

The highlighted part in the command is the task id. Replace it with the task id that we obtained from the browser URL,

curl -X DELETE http://localhost/tasks/registrations/cc459fab-33eb-4620-b5d8-876ddb3e8e24

Repeat the process for remaining failed tasks,

All failed tasks have been deleted from the SDDC tasks,

You should be good to perform password rotation or any other tasks that getting prevented due to failed tasks in the SDDC manager.

Are you looking out for a lab to practice VMware products…? If yes, then click here to know more about our Lab-as-a-Service (LaaS).
Leave your email address in the box below to receive notification on my new blogs.

VCF 5.1.1 – Deploy an Edge Cluster in VCF environment

In our last blog post, we added a host to the workload domain. Let’s deploy an edge cluster.

By default, VCF bring-up process configures / prepares the NSX env for VLAN backed segment and it does not include edges / edge cluster. You must deploy and edge cluster for software define routing and network services.

Lets get some pre-requisites in place before we start,
We need couple of vlans configured on TOR to achieve an overlay networking,
Host Overlay Vlan – Host TEP
Edge Overlay Vlan – Edge TEP
2 Edge Uplink Vlans – To pair it with TOR for redundancy purposes.

Following is vlan configuration on TOR,

Lets verify it on TOR,

Next,

Prepare the deployment parameters in an excel sheet,

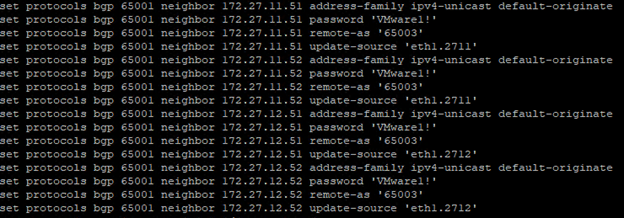
Next, Configure BGP on TOR,

Make sure to create a DNS record for edges and start the deployment,

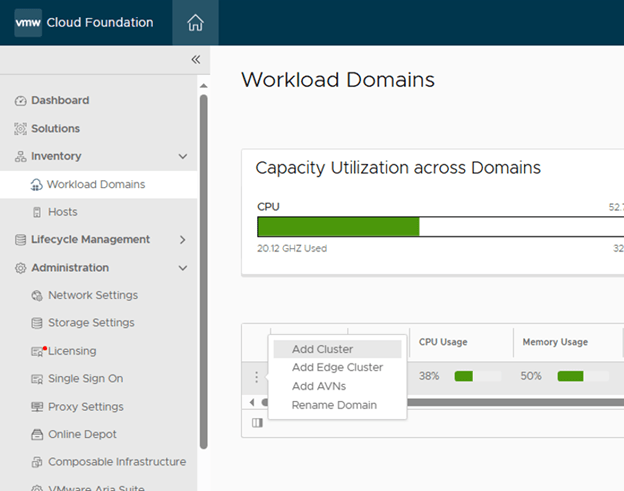
SDDC Manager > Workload Domains> Click on 3 dots besides the name and “Add Edge Cluster”

Check all Pre-requisites again and Begin,

Fill all the required details from parameters sheet that we created,

Additional cluster settings,

Kubernetes – Workload Management to create an NSX Edge cluster that complies with the requirements for deploying vSphere with Tanzu.

Application Virtual Networks to create an NSX Edge cluster that complies with the requirements deploying vRealize Suite components.

Custom if you want an NSX Edge cluster with a specific form factor or Tier-0 service high availability setting.

I have selected AVN here. You can select as per your use case.

Then the edge node settings, Type each edge node information and click “ADD EDGE NODE”at the end.

Verify the information on next page,

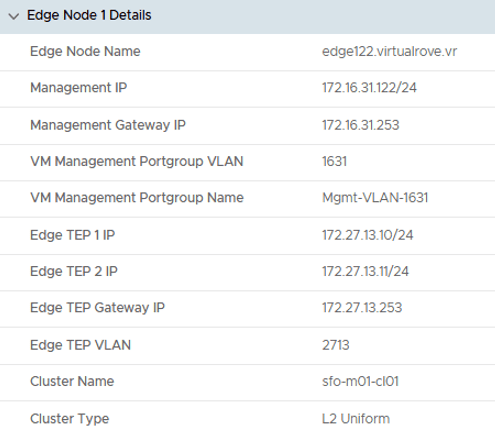
Node 1 details,

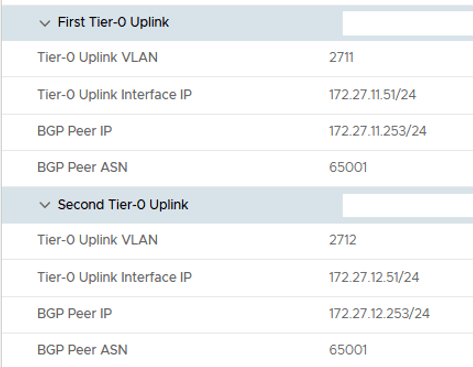
Node 1, Uplink details,

Node 2 details,

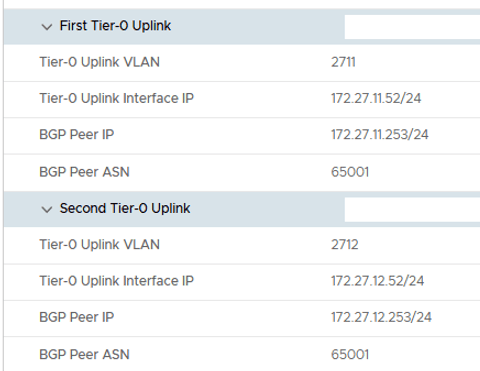
Node 2, Uplink details,

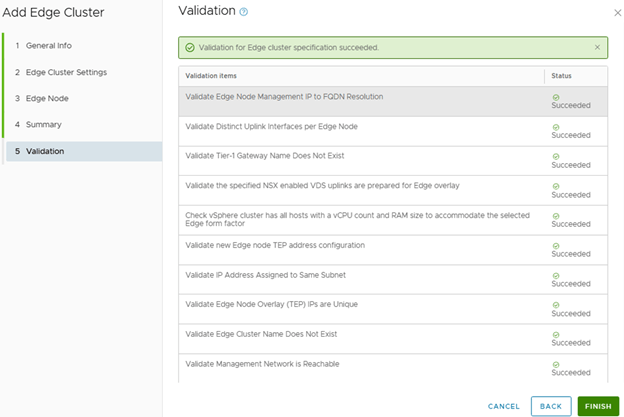
Review and fix any issues reported by validation and Finish,

Monitor the “Adding edge cluster vr-edge-cluster-01” in SDDC task details,

Task is successful and we see the edge cluster in SDDC UI,

On a high level, this workflow configures following…

Created 2 uplink port groups on vCenter VDS,

Two edges have been deployed,

Edge Cluster is created,

Transport Zone for edge vlan have been created,

Edge uplink profile have been created,

Both nodes have all these settings configured,

Active-Active Tier-0 gateway has been deployed,

VLAN Backed uplink segments has been deployed to use it in interfaces configuration,

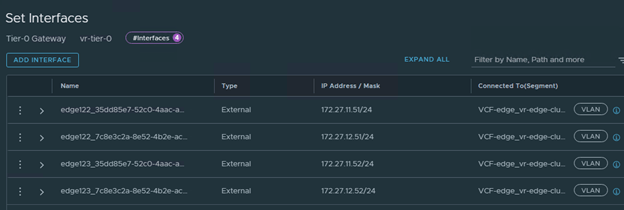
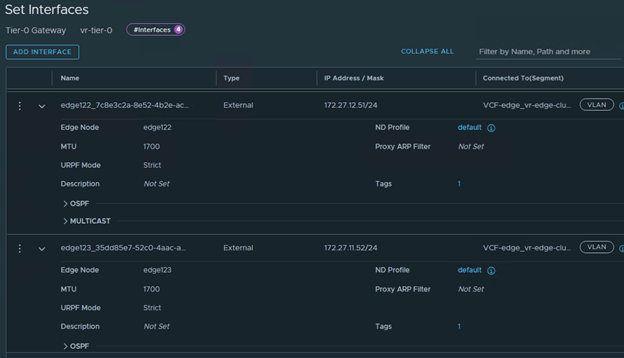
All interfaces looks good,

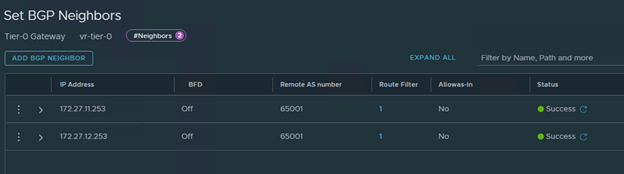
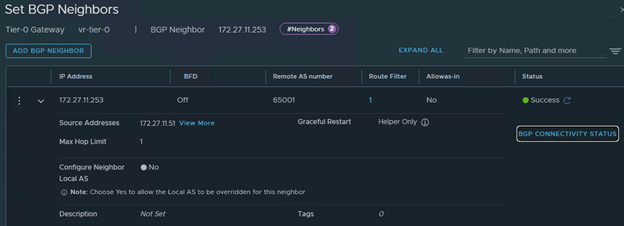
BGP is tuned on and 2 Neighbors configured,

Check the BGP Connectivity status, Shows Established for both edges,

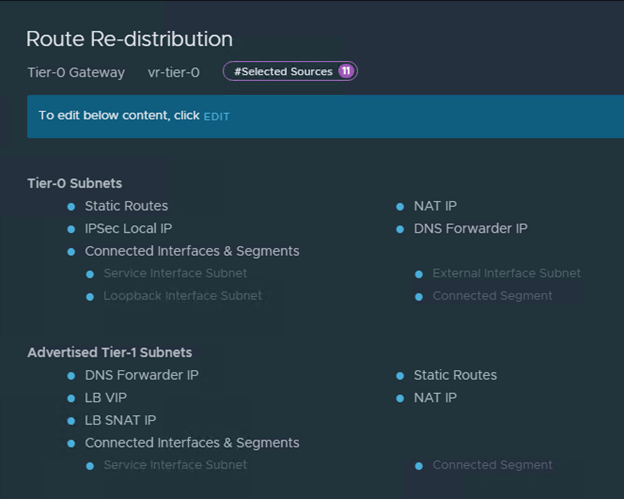
Route-Redistribution is in place,

And it has also deployed a Tier-1 gateway and connected to T-0,

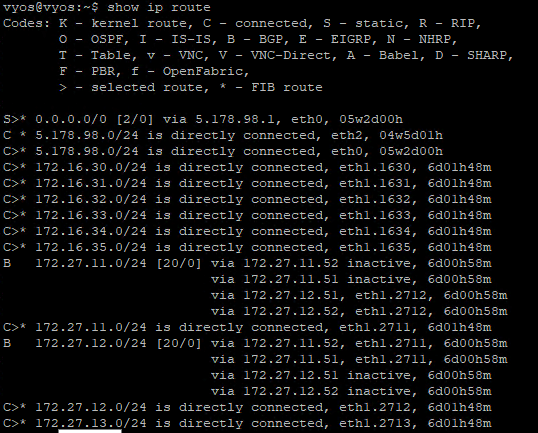
Wow, everything looks good. Lets check the BGP routes on the TOR,

All 4 BGP Neighbors shows up on the TOR,

BGP Routes looks good,

Nice.

Let’s create a test segment with 192.168.X.X CIDR and check if it appears in BGP route on TOR,

New segment has been created,

And we see the new route on TOR,

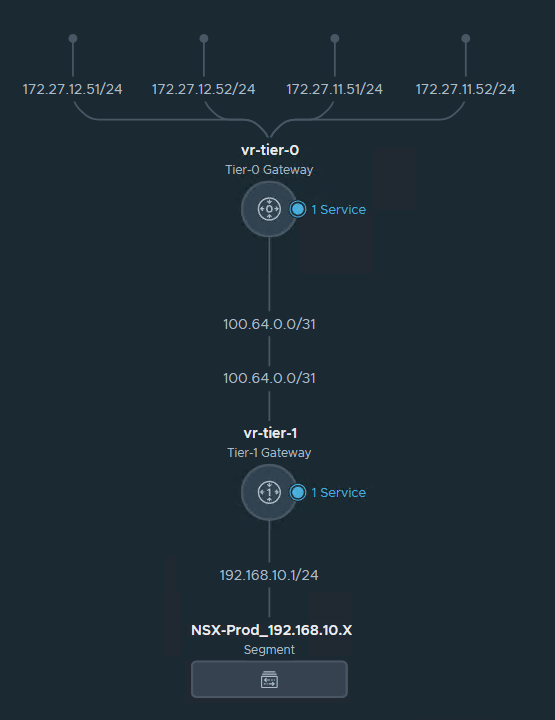
Here is how my network topology looks in NSX,

Hurray…!!!

All looks good. We are good to attach new VM’s to this overlay backed segment and it would get the connectivity to rest of the world.

That concludes the adding edge cluster task.

Are you looking out for a lab to practice VMware products…? If yes, then click here to know more about our Lab-as-a-Service (LaaS).
Leave your email address in the box below to receive notification on my new blogs.

VCF 5.1.1 – Add a new host to an existing Workload Domain

Let’s get started with some documentation around adding / commissioning new host in an existing workload domain.

Add a Host to a vSphere Cluster Using the SDDC Manager UI

Verify that a host is available in the SDDC Manager inventory. For information on commissioning hosts, see Commission Hosts.

Commission Hosts

  • Hosts that use vSAN storage can only be used with vSAN-based workload domains.
  • Hosts that use NFS storage can only be used with NFS-based workload domains.
  • Hosts that use VMFS on FC storage can only be used with VMFS on FC-based workload domains.
  • Hosts that use vVols storage can only be used with vVols-based workload domains.

Ensure that a network pool supports the storage type you select for a host (vSAN, NFS, VMFS on FC, vVols).

Commissioning a host adds it to the VMware Cloud Foundation inventory. The host you want to commission must meet the checklist criterion below.

Ensure that each host you are commissioning meets the following criteria:

  • Hosts for vSAN-based workload domains are vSAN-compliant and certified on the VMware Hardware Compatibility Guide.
  • Hosts for NFS-based workload domains are certified on the VMware Hardware Compatibility Guide.
  • Hosts for VMFS on FC-based workload domains are certified on the VMware Compatibility Guide. In addition, the hosts must have supported FC cards (Host Bus Adapters) and drivers installed and configured. For compatible FC cards, see the VMware Compatibility Guide.
  • Hosts for vVols-based workload domains are certified on the VMware Hardware Compatibility Guide.
    • For vVols on FC-based workload domains, ensure that all ESXi hosts have access to the FC array before launching the workflow.
    • For vVols on NFS-based workload domains, ensure that all ESXi hosts must be able to reach the NFS server from the NFS network assigned in the IP pool.
    • For vVols on iSCSI-based workload domains, ensure that the iSCSI software initiator must be enabled on each ESXi host and the VASA provider URL must be listed as the dynamic target.
  • Two NIC ports with a minimum 10 Gbps speed. One port must be free, and the other port must be configured on a standard switch. This switch must be restricted to the management port group.
  • Host has the drivers and firmware versions specified in the VMware Hardware Compatibility Guide.
  • A supported version of ESXi is installed on the host. See the VMware Cloud Foundation Release Notes for information about supported versions.
  • DNS is configured for forward and reverse lookup and FQDN.
  • Host name must be same as the FQDN.
  • Self-signed certificate regenerated based on FQDN of host.
  • Management IP address is configured on the first NIC port.
  • Host has a standard switch and configured with 10 Gbps speed default uplinks starting with vmnic0 and increasing sequentially.
  • Hardware health status is healthy without any errors.
  • All disk partitions on HDD and SSD are deleted.
  • Network pool must be created and available before host commissioning.
  • Hosts for the vSAN-based workload domain must be associated with the vSAN enabled network pool.
  • Hosts for the NFS-based workload domain are associated with the NFS enabled network pool.
  • Host is configured with an appropriate gateway. The gateway must be part of the management subnet.

Before we get started, Here is new host config that will get added to existing management vi workload domain.

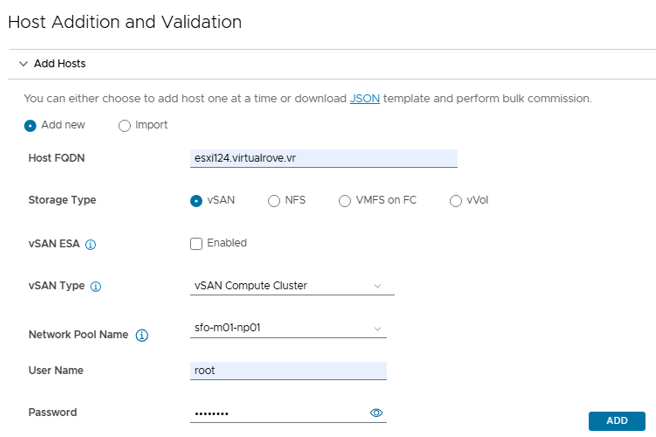
Hostname: esxi124.virtualrove.vr
Memory: 16 GB
pNICS: 2
Disks: 20gb 100gb 100gb , Total 220 RAW storage which will get added to existing VSAN storage.
VM network vlan changed to VLAN 1630
NTP settings updated to use NTP server as “172.16.31.110”
SSH and NTP service configured to “Start and Stop with the host”
And regenerated self-sign certs for esxi. I have listed steps to regenerate in my previous blogs.

Login to SDDC Manager > Hosts > Commission Hosts,

Make sure all pre-requisites are met, Select All,

Next,
Enter the required information and click on ADD

I have unchecked vSAN ESA, since am not using VSAN ready nodes as well as NO vLCM images.
vSAN ESA is only supported in workload domains that use vLCM images.

vSAN Type is vSAN Compute Cluster.

Also, Select the existing “Network Pool” from the drop-down menu for vMotion & VSAN network,

Same can be verified on on SDDC manager under “Network Settings”

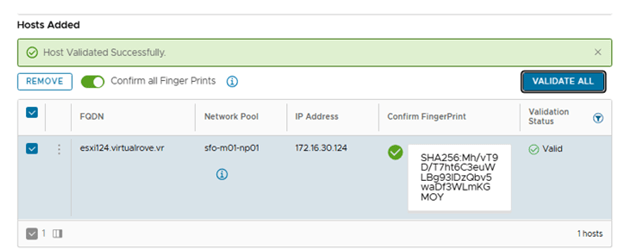
Once the host has been added, Turn on the radio button “Confirm All Finger Prints” and “VALIDATE ALL”

Review & Finish,

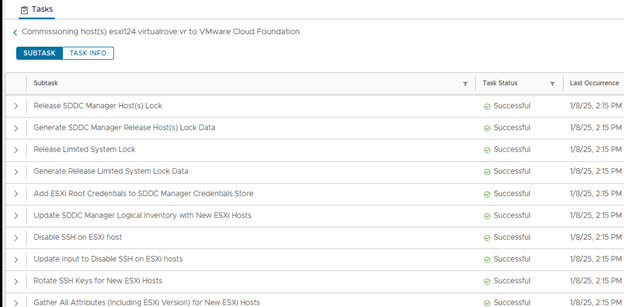
Monitor “ Commissioning host(s) esxi124.virtualrove.vr to VMware Cloud Foundation” task in SDDC task list,

Once finished, host will appear in the “UNASSIGNED HOSTS”

Lets get the new host added to the existing management vi domain after commissioning it,
SDDC UI > Select Management Workload Domain > Clusters Tab > Click 3 dots to “ADD Hos”

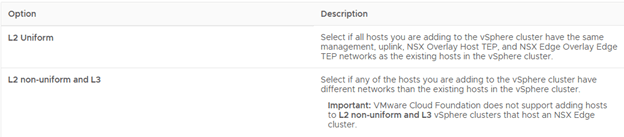
Select the commissioned host and select “L2 Uniform”

Important: VMware Cloud Foundation does not support adding hosts to L2 non-uniform and L3 vSphere clusters that host an NSX Edge cluster.

Finish.

Monitor the “Adding new host(s) to cluster” in SDDC task list,

On a high level, following steps are performed in “Adding new host to cluster”,

After initial validation, it adds the host to the cluster,
Adds host to VDS
Configures all vmknics
Removes STD switch
Configures HA
Adds it to NSX by adding required transport zone as per the TNP and prepares it for NSX.
And finally makes it available for workload migration / new workload.

Let’s review the environment after adding the host.

Host & Clusters view with all vmknics,

VSAN Storage added to existing cluster,

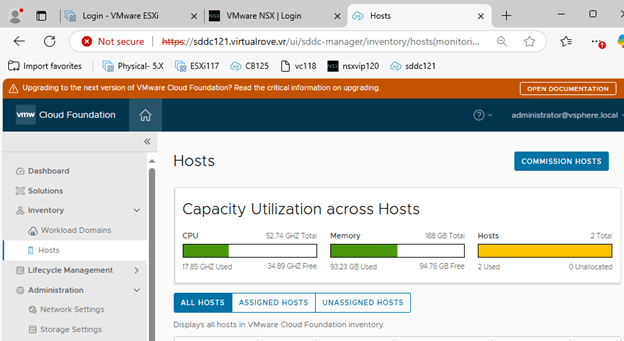
Hosts on SDDC Manager,

Workload domain host view,

New host has been prepared for NSX and ready for vlan backed segment,

That’s it for this post. Hope that it was helpful. We will add an edge cluster in our next blog.

Are you looking out for a lab to practice VMware products…? If yes, then click here to know more about our Lab-as-a-Service (LaaS).
Leave your email address in the box below to receive notification on my new blogs.