We often get into the situation where we need to apply VMware licenses to test VMware products. And most of them are not aware that, VMware provides 60 days trial period for most of the products. For, VMware vCenter Server & ESXi gets the default trial period as soon as you install it. However, for some products you have to ask VMware to provide evaluation license key to test the product. It is easy and simple to get trial licenses for VMware Products.
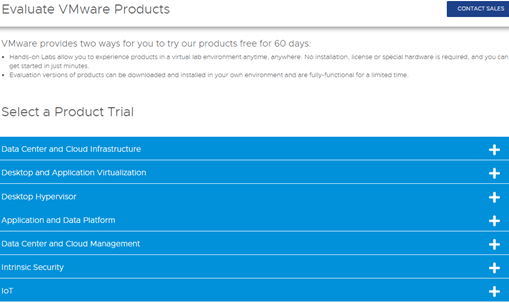
Check the following link to know the products that are available for trial period license.
We often get into the situation where we need to apply VMware licenses to test VMware products. And most of them are not aware that, VMware provides 60 days trial period for most of the products. For, VMware vCenter Server & ESXi gets the default trial period as soon as you install it. However, for some products you have to ask VMware to provide evaluation license key to test the product. It is easy and simple to get trial licenses for VMware Products.
Check the following link to know the products that are available for trial period license.
Further click on (+) sing to see available products…
Lets assume that You want to test VMware NSX-T Data Center product… Click on Download Free Trial >> Next, enter the account information if you have one. If not, then you get an option to create it…
Once you login, clickon ‘License & Download’ and click on ‘Register’
Fill out all the details and click on ‘START FREE TRIAL’
Home screen will show following msg…
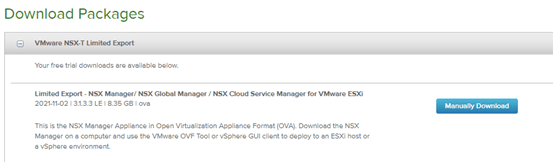
And you should see the eval license key under ‘License & Download’ with expiration date.
On the same page, you get an option to download the ova / iso file for the product.
That was easy. 😊 Check out other products available on try-vmware page and enjoy the product evaluation.
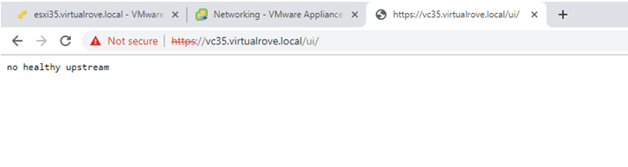
You might encounter ‘no healthy upstream’ error message on newly installed vCenter. This is because of some unexpected parameters while deploying vCenter. I was not able to find the exact root cause for this error, however I knew the resolution from our discussion with technical experts long back.
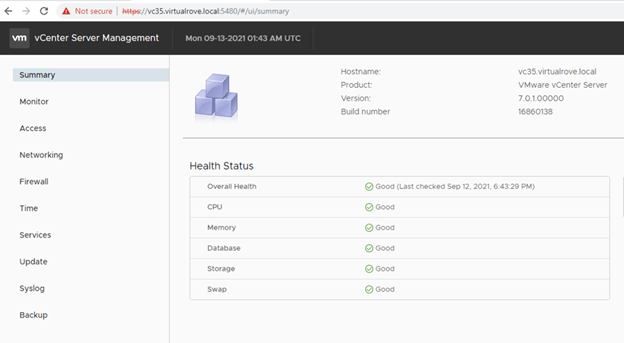
To start with, here is how it looks on the vCenter when you try to access web client.
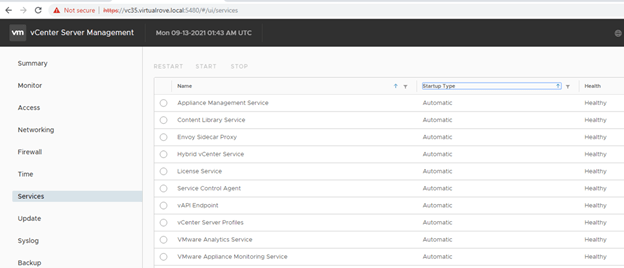
You will be able to access vCenter Server Appliance Management Interface at port 5480. Check the services here…
All services show as healthy. In fact, on the summary page shows health status as Good.
Everything looks fine but you can not access web client. I tried restarting vCenter server multiple times with no luck. Tried restarting all services from management interface. Nothing works.
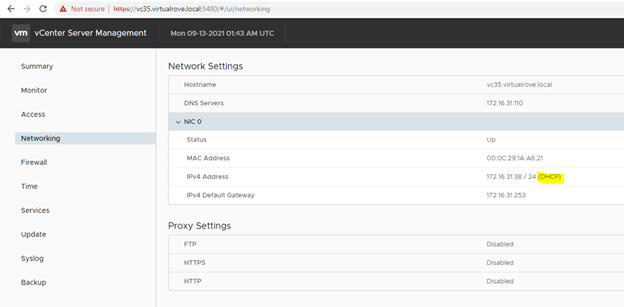
Solution is to change network settings from vCenter Server Appliance Management Interface.
Click on networking & expand nic0. Notice that the IP address shows as DHCP even if it was given as static.
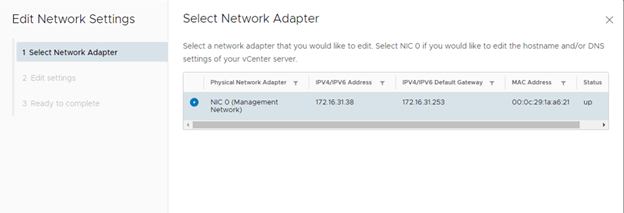
Click on Edit at top right corner to edit the network settings & select your nic.
Expand the nic0 here and notice that IPv4 shows automatic. Change this to manual.
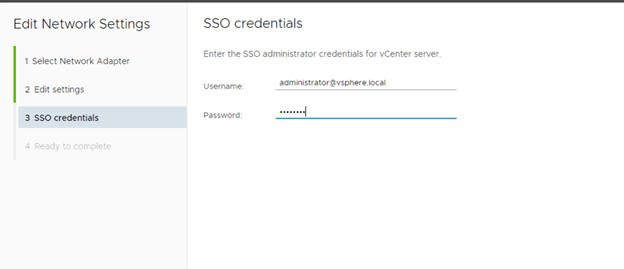
Provide credentials on the next page.
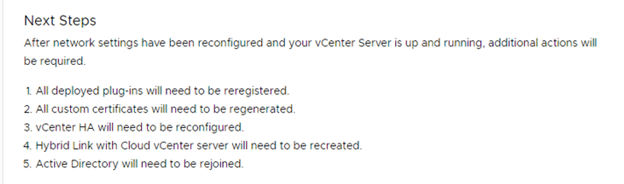
Acknowledge the change. Take backup of vCenter if necessary. It also recommends to unregister extensions before you save this.
Also, check the next steps after settings are saved successfully.
Click on Finish and you should see the progress.
Access web client once this is finished. You should be able to access it.
Go back to vCenter Server Appliance Management Interface to verify. You should the ip as static.
The issue has been resolved. This is definitely because of some unexpected parameters while deploying the vCenter, since it does not show this error for every deployment. Anyways, wanted to write small blog on it to help techies to resolve the issues just in case if anyone see this error. Thank you for reading.
Here is a small writeup on resetting the root account password for vCenter / Cloud Builder VM.
I was deploying VCF enf and the root account for Cloud Builder account got locked out. So thought of writing a small blog on it. You can find my VCF posts here. https://virtualrove.com/vcf/
Let’s get started.
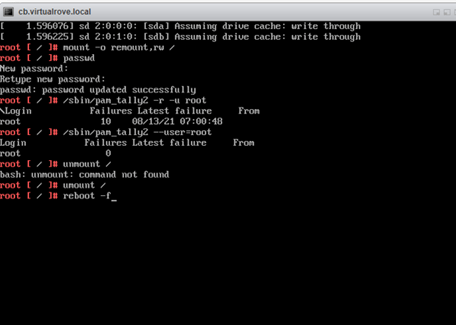
Reboot the “Cloud Builder” VM / vCenter and press the ‘e’ key to enter the GNU GRUB Edit Menu. Locate the 3rd row which starts with ‘linux’ at the beginning.
Write following at the end of the line and press F10
rw init=/bin/bash
You will get to command line after this. Run following commands.
mount -o remount,rw / ::: To mount the root partition passwd ::: To enter new password, then re-type new password. /sbin/pam_tally2 –user=root –reset ::: To unlock the locked root account. Run this twice. umount / ::: To unmount the partition reboot -f ::: Reboot the VM
Thats it. You should be able to get in with the new password for root account after the reboot. Short & Simple. 😊
Hello Friends, This article will help you to install & configure VMware vSphere 7.0 environment and test features like vMotion, HA & DRS. Like my other posts, even this post will focus on practical instead of theory. Detailed VMware official information can be found here.
Since it’s a base vSphere setup, I have taken pictures of it while doing the configuration and converted into a video. There is no explanation in this video. I have marked my comments in the pic wherever necessary.
These videos are for newbies, who has just started learning VMware, have little understanding of VMware vSphere product and wants to see configuration in GUI. I highly recommend checking VMware documentation side by side. The video is divided into multiple parts due to the restrictions of number of images. I will be happy answer your questions. You can change the speed of the video, so that it plays faster and change resolution to 720 for better image quality. Please leave your questions in comments section at the end of this blog.
I have configured the environment on one single physical ESXi server. The entire setup is nested. Let me explain the setup.
Physical ESXi has following VM’s.
Domain Controller – For Authentication JumpBox – To access the nested environment. VyOS1 – Virtual router which acts as a TOR. VyOS2 – 2nd TOR.
The exact setup can be created on VMware Workstation too without using TOR. You will have to keep same network for all portgroups. Check my previous blog for physical ESXi and TOR setup.
Hers is the sequence of the setup which is explained in the video.
Create 4 new ESXi hosts (as a VM on physical host). Install & Configure ESXi 7.0 hypervisor. Connect to 1st ESXi from JumpBox and configure necessary settings. Convert HDD of 1st ESXi to SSD for 1 node VSAN configuration (this is for initial setup only). Download and Deploy vCenter 7.0 on 1st ESXi host. Connect to vCenter rename Datacenter and Cluster names. Add remaining 3 ESXi hosts to the cluster. Create new VDS and add all 4 hosts to it. Delete standard switch. Create vMotion and VSAN VMkernel (vmk) ports. Configure VSAN. Test vMotion. Enable HA and DRS on the cluster. The End
VMware vSphere 7.0 Step by Step – Part 1
VMware vSphere 7.0 Step by Step – Part 2
VMware vSphere 7.0 Step by Step – Part 3
VMware vSphere 7.0 Step by Step – Part 4
VMware vSphere 7.0 Step by Step – Part 5
VMware vSphere 7.0 Step by Step – Part 6
VMware vSphere 7.0 Step by Step – Part 7
VMware vSphere 7.0 Step by Step – Part 8
VMware vSphere 7.0 Step by Step – Part 9
That’s it for this post. I hope that all videos are informational. DO leave your comment if you have any questions.
Configure and Install VyOS virtual router for vSphere Lab
To successfully build and test functionalities / features of VMware vSphere, we need following networks in place. This will enable you to test features like vMotion, High Availability & VSAN.
Management Network vMotion Network VSAN Network Uplink Network for North South communication
Since we do not have physical router to connect to, we will use VyOS open source router. This router will act as a TOR for our vSphere environment. In this blog, we will discuss step by step VyOS open source router configuration for VMware lab. This router will be used in all my VMware labs. To start with, I have a single physical ESXi host with following configuration…
By default, An ESXi will have standard vSwitch0 with VM & Management Network port groups. No need to make any changes here. Create one more standard switch name ‘VyOS’ with NO uplink.
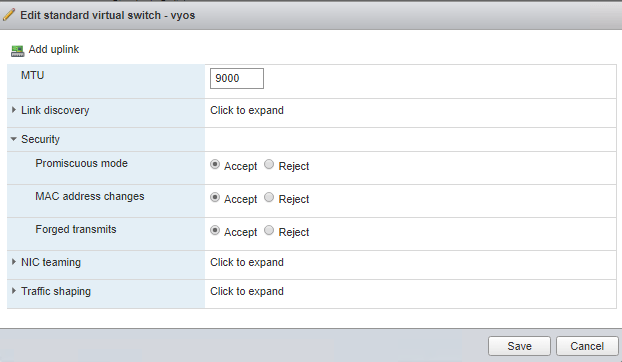
Edit switch properties as follows…
Promiscuous Mode – Accept MAC change – Accept Forged Transmits – Accept MTU can remain 1500 or can be changed as per your requirement.
Checkout VMware documentation for more information on switch properties.
Next step is to create VM port groups on newly created standard switch. The number of port groups will depend on the number of networks you want in nested lab. I wanted to build this lab vCloud Foundation, hence I created following port groups on VyOS router.
This is how it looks in physical ESXi.
One additional network called “Trunk” with VLAN ID 4095. This will act as a trunk port for all my nested ESXi hosts. A VLAN ID of 4095 represents all trunked VLANs. This will allow all VLAN traffic to and from nested ESXi.
At this stage, we are ready to install and configure VyOS router. Download VyOS router ISO from https://downloads.VyOS.io/ OR from any other trusted sources.
Installing VyOS is straight forward like you create any other VM on an ESXi. Create a VM- Name – OS Type – Storage Type- Attach ISO.
For networks, we need to add multiple network interfaces according to number of networks we want in our nested lab environment. Here is how it looks like after adding multiple interfaces. We don’t need to add interface for Trunk port group here, since it will be used by our ESXi severs.
Power On the VM and open console for further configuration. Login with default user name “VyOS” and default password “VyOS”.
Install image on local disk so that we don’t loose the configuration upon reboot.
Type Yes
Type Auto and continue
Install image on SDA.
Type Yes & Hit Enter for default size option to start the installation.
Name the router and hit enter for Copy option.
Enter the new password for this router and default boot partition.
Installation complete. Power off the VM.
Detach the VyOS ISO from the VM and power it on again. Log in with new credentials and we are good to configure the router.
Check the interfaces on the router. “show interfaces”
This will be equal to network interfaces that you added while creating a VM. We need to configure these interfaces.
Note: VyOS starts routing between all connected interfaces as soon as you configure them. There is no need of any additional configuration.
Get into configuration mode using ‘config’ command and set your interfaces.
set interfaces ethernet eth0 address 172.16.31.253/24 set interfaces ethernet eth1 address 172.16.32.253/24 set interfaces ethernet eth2 address 172.16.33.253/24 set interfaces ethernet eth3 address 172.16.34.253/24 set interfaces ethernet eth4 address 172.27.11.253/24 set interfaces ethernet eth5 address 172.27.12.253/24 set interfaces ethernet eth6 address 172.27.13.253/24
Set the description and & MTU of the interface.
set interfaces ethernet eth0 description VLAN-1631 set interfaces ethernet eth1 description VLAN-1632 set interfaces ethernet eth2 description VLAN-1633 set interfaces ethernet eth3 description VLAN-1634 set interfaces ethernet eth4 description VLAN-2711 set interfaces ethernet eth5 description VLAN-2712 set interfaces ethernet eth6 description VLAN-2713
set interfaces ethernet eth0 mtu 9000 set interfaces ethernet eth1 mtu 9000 set interfaces ethernet eth2 mtu 9000 set interfaces ethernet eth3 mtu 9000 set interfaces ethernet eth4 mtu 9000 set interfaces ethernet eth5 mtu 9000 set interfaces ethernet eth6 mtu 9000
Make sure to commit and save the configuration.
Check interfaces after configuration.
We have configured 7 networks here and .253 will act as a gateway in respective subnet in our nested environment. We are done with the basic configuration of the router here. This router will act as a TOR for our vSphere Environment.
Additional configuration needed for Internet Access in these networks…
Add one more network interface to VyOS (eth7), this interface will be connected to the ‘VM Network’ on ‘vSwitch0’ and NOT on the additional switch that we created. I will assign “151.100.100.100/29” network to eth7, since my physical ESXi is configured with this network and it has internet connectivity. And “151.100.100.233” as a gateway, since it is a gateway of my ISP as well as my physical ESXi.
Steps to configure on VyOS…
configure set interfaces ethernet eth7 address 151.100.100.100/29 set interfaces ethernet eth7 description Internet commit save set protocols static route 0.0.0.0/0 next-hop 151.100.100.233 distance 1 commit save set nat source rule 101 outbound-interface eth7 set nat source rule 101 source address ‘172.16.31.0/24’ set nat source rule 101 translation address masquerade commit save
This will enable internet access for all VM’s that gets connected to 172.16.31.0 network.
I will post more configuration commands in my upcoming posts. I hope this was helpful for you. Feel free to post comments if you find any difficulties in configuration.