We have prepared the environment for VCF deployment. Its time to move to CB and discuss the “Deployment Parameters” excel sheet in detail. You can find my earlier blog here.
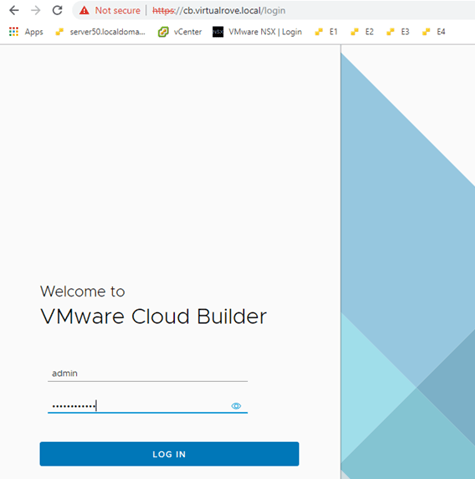
Login to Cloud Builder VM and start the deployment process.
Select “vCloud Foundation” here,
The other option “Dell EMC VxRail” to be used when your physical hardware vendor is Dell.
VxRail is hyper-converged appliance. It’s a single device which includes compute, storage, networking and virtualization resources. It comes with pre-configured vCenter and esxi servers. Then there is a manual process to convert this embedded vCenter into user manage vCenter, and that’s when we use this option. If possible, I will write a small blog on it too.
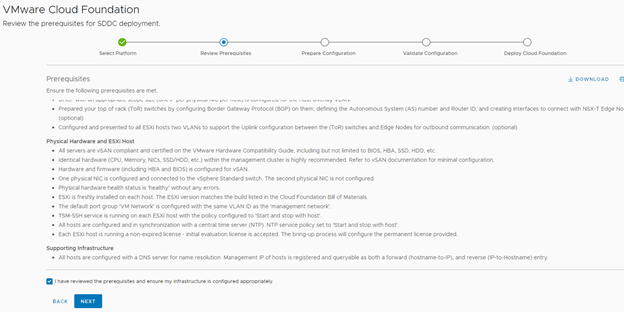
Read all prereqs on this page and make sure to fulfill them before you proceed.
Click on “Download” here to get the “Deployment Parameter” excel sheet.
Let’s dig into this sheet and talk in detail about all the parameters here.
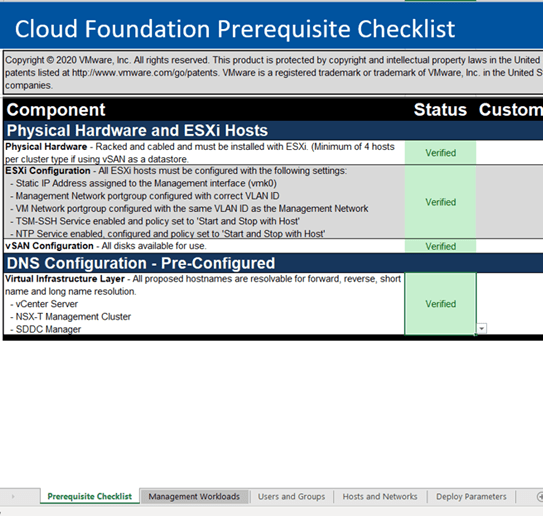
“Prerequisites Checklist” sheet from the deployment parameter. Check all line items one by one and select “Verified” in the status column. This does not affect anywhere; it is just for your reference.
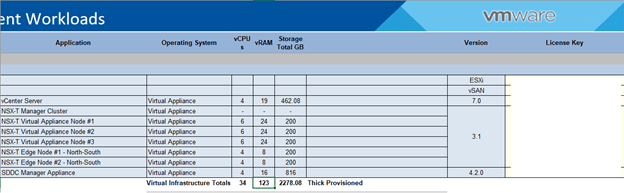
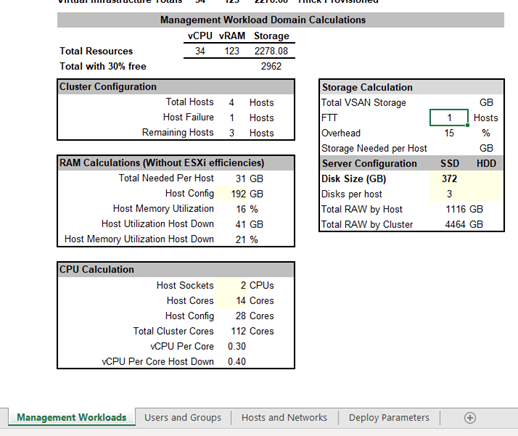
“Management Workloads” sheet.
Place your license keys here.
This sheet also has compute resource calculator for management workload domain. Have a look and try to fit your requirements accordingly.
“Users and Groups”: Define all passwords here. Check out the NSX-T passwords, as the validation fails if it does not match the password policy.
Moving on to next sheet “Hosts and Networks”.
Couple of things to discuss here,
DHCP requirement for NSX-T Host TEP is optional now. It can be defined manually with static IP pools here. However, if you select NO, then DHCP option is still valid.
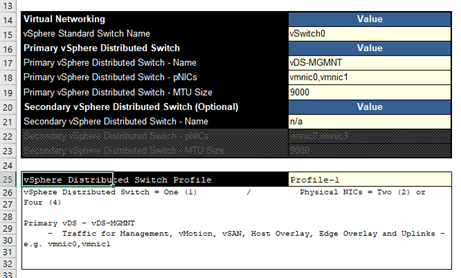
Moving onto “vSphere Distributed Switch Profile” in this sheet. It has 3 profiles. Earlier VCF version had only one option to deploy with 2 pnics only. Due to high demand from customer to deploy with 4 pnics, this option was introduced. Let’s talk about this option.
Profile-1
This profile will deploy a single vDS with 2 or 4 uplinks. All network traffic will flow through the assigned nics in this vDS. Define the name and pNICs at row # 17,18 respectively.
Profile-2
This one deploys 2 VDS. You can see that the first vDS will carry management traffic and the other one is for NSX. Each vDS can have 2 or 4 pnics.
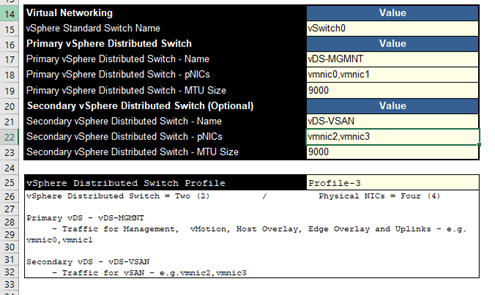
Profile-3
This one also deploys 2 vDS, just that the VSAN traffic is segregated instead of NSX in earlier case.
Select the profile as per your business requirement and move to next step.
Next – “Deploy Parameters”
Define all parameters here carefully. If something is not good, the cell would turn RED. I have selected VCSA size as small since we are testing the product.
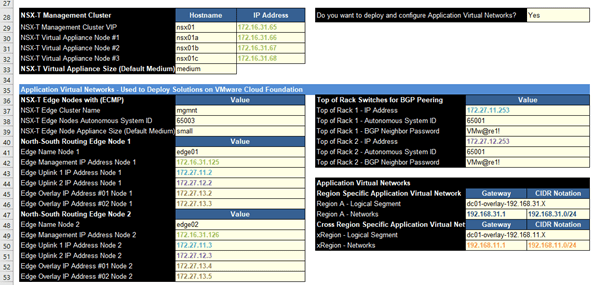
Move to NSX-T section. Have a look at the AVN (Application Virtual Networking). If you select Yes here, then you must specify the BGP peering information and uplinks configuration. If it’s NO, then it does not do BGP peering.
TOR1 & TOR2 IPs interfaces configured on your VyOS. Make sure to create those interfaces. We will see it in detail when we reach to that level in the deployment phase.
We are all set to upload this “Deployment Parameter” sheet to Cloud Builder and begin the deployment. That is all for this blog. We will do the actual deployment in next blog.
Finally, after a year and half, I got a chance to deploy latest version of vCloud Foundation 4.2.1. It has been successfully deployed and tested. I have written couple blogs on earlier version (i.e. version 4.0), you can find them here.
Let’s discuss and understand the installation flow,
Configure TOR for the networks that are being used by VCF. In our case, we have VyOS router. Deploy a Cloud Builder VM on stand alone source ESXi or vCenter. Install and Configure 4 ESXi Servers as per the pre-reques. Fill the Deployment Parameters excel sheet carefully. Upload “Deployment Parameter” excel sheet to Cloud Builder. Resolve the issues / warning shown on the validation page of CB. Start the deployment. Post deployment, you will have a vCenter, 4 ESXi servers, NSX-T env & SDDC manager deployed. Additionally, you can deploy VI workload domain using SDDC manager. This will allow you to deploy Kubernetes cluster. Also, vRealize Suite & Workspace ONE can be deployed using SDDC manager.
You definitely need huge amount of compute resources to deploy this solution. This entire solution was installed on a single ESXi server. Following is the configuration of the server.
Dell PowerEdge R630 2 X Intel(R) Xeon(R) CPU E5-2650 v3 @ 2.30GHz 256 GB Memory 4 TB SSD
Let’s prepare the infra for VMware vCloud Foundation.
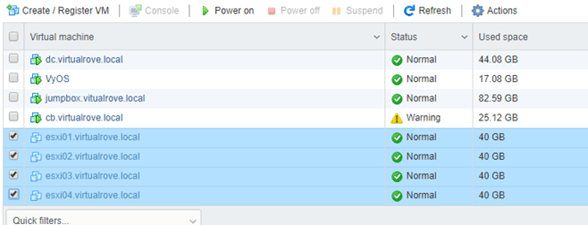
I will call my physical esxi server as a base esxi in this blog. So, here is my base esxi and VM’s installed on it.
dc.virtaulrove.local – This is a Domain Controller & DNS Server in the env. VyOS – This virtual router will act as a TOR for VCF env. jumpbox.virtaulrove.local – To connect to the env. ESXi01 to ESXi 04 – These will be the target ESXi’s for our VCF deployment. cb.virtaulrove.local – Cloud Builder VM to deploy VCF.
Here is a look at the TOR and interfaces configured…
Network Requirements: Management domain networks to be in place on physical switch (TOR). Jumbo frames (MTU 9000) are recommended on all VLANs or minimum of 1600 MTU.
And a VLAN 1634 for Host TEP’s, which is already configured on TOR at eth3.
Following DNS records to be in place before we start with the installation.
With all these things in place, out first step is to deploy 4 target ESXi servers. Download the correct supported esxi version ISO from VMware downloads.
VMware ESXi
7.0 Update 1d
4-Feb-21
17551050*
If you check VMware downloads page, this version is not available for download.
Release notes says, create a custom image to use it for deployment. However, there is another way to download this version of ESXi image. Let’s get the Cloud Builder image from VMware portal and install it. We will keep ESXi installation on hold for now.
We start the Cloud Builder deployment once this 19 GB ova file is downloaded.
Cloud Builder Deployment:
Cloud Builder is an appliance provided by VMware to build VCF env on target ESXi’s. It is one time use VM and can be powered off after the successful deployment of VCF management domain. After deployment, we will use SDDC manager for managing additional VI domains. I will be deploying this appliance in VLAN 1631, so that it gets access to DC and all our target ESXi servers.
Deployment is straight forward like any other ova deployment. Make sure to you choose right password while deploying the ova. The admin & root password must be a minimum of 8 characters and include at least one uppercase, one lowercase, one digit, and one special character. If this does not meet, then the deployment will fail which results in re-deploying ova.
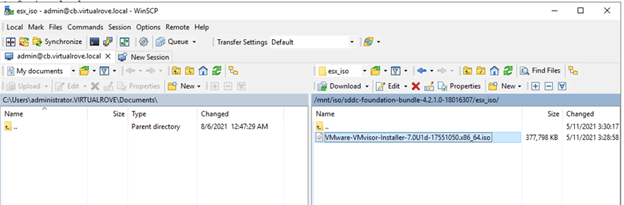
Once the deployment is complete. Connect to CB using winscp and navigate to ….
Click on Download to use this image to deploy our 4 target ESXi servers.
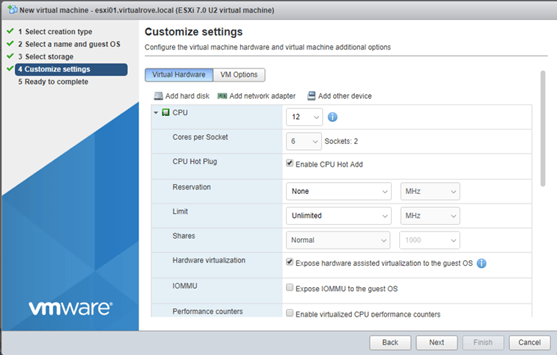
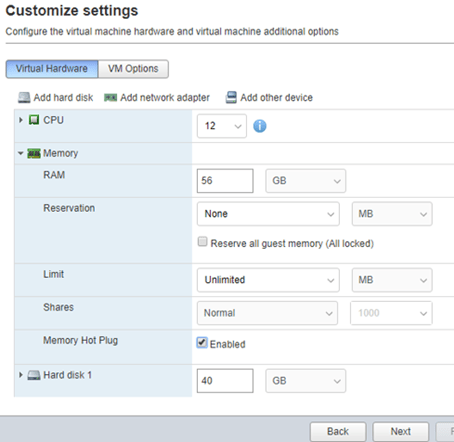
Next step is to create 4 new VM’s on base physical ESXi. These will be our nested ESXi where our VCF env will get install. All ESXi should have identical configuration. I have following configuration in my lab.
vCPU: 12 2 Sockets, 6 cores each. CPU hot plug: Enabled Hardware Virtualization: Enabled
And 2 network cards attached to Trun_4095. This will allow an esxi to communicate with all networks on the TOR.
Map the ISO to CD drive and start the installation.
I am not going to show ESXi installation steps, since most of you know it already. Let’s look at the custom settings after the installation.
DCUI VLAN settings should be set to 1631.
Crosscheck the DNS and IP settings on esxi.
And finally, make sure that the ‘Test Management Network’ on DCUI shows OK for all tests.
Repeat this for all 4 esxi.
I have all my 4 target esxi severs ready. Let’s look at the ESXi configuration that has to be in place before we can utilize them for VCF deployment.
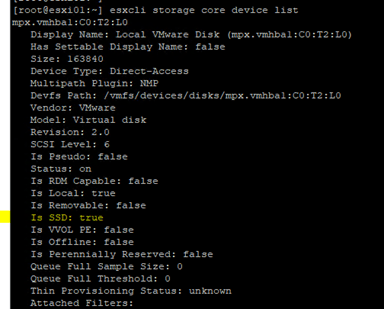
All ESXi must have ‘VM network’ and ‘Management network’ VLAN id 1631 configured. NTP server address should be in place on all ESXi. SSH & NTP service to be enabled and policy set to ‘Start & Stop with the host’ All additional disks to be present on an ESXi as a SSD and ready for VSAN configuration. You can check it here.
If your base ESXi has HDD and not SSD, then you can use following command to mark those HDD to SSD.
You can either connect to DC and putty to ESXi or open ESXi console and run these commands.
Once done, run ‘esxcli storage core device list’ command and verify if you see SSD instead of HDD.
Well, that should complete all our requisites for target esxi’s.
Till now, we have completed configuration of Domain controller, VyoS router, 4 nested target ESXi & Cloud Builder ova deployment. Following VM’s have been created on my physical ESXi host.
I will see you in next post, where we talk about “Deployment Parameters” excel sheet in detail.