It’s been a while since I wrote my last blog on NSX-T. Recently, I had several discussions with one of the customer to setup a NSX-T Logical Load Balancer. Hence, wanted to write a small blog with generic example. This will give you basic understanding of the NSX-T load balancer and how it is setup.
Let’s check on some theory part.
The NSX-T Data Center logical load balancer offers high-availability service for applications and distributes the network traffic load among multiple servers. The load balancer distributes incoming service requests evenly among multiple servers. You can map a virtual IP address to a set of pool servers for load balancing. The load balancer accepts TCP, UDP, HTTP, or HTTPS requests on the virtual IP address and decides which pool server to use.
Some key points to keep in mind before we proceed.
- Logical load balancer is supported only on the tier-1 gateway.
- One load balancer can be attached only to a tier-1 gateway.
- Load balancer includes virtual servers, server pools, and health checks monitors. It can host single or multiple virtual servers.
- NSX-T LB supports Layer 4 (TCP,UDP) as well as Layer 7 (HTTP,HTTPS).
- Using a small NSX Edge node to run a small load balancer is not recommended in a production environment.
- The VIP (Virtual IP) for the server pool can be placed in any subnet.
Load balancers can be deployed in either inline or one-arm mode.
Inline Topology
In the inline mode, the load balancer is in the traffic path between the client and the server. Clients and servers must not be connected to the same tier-1 logical router. LB-SNAT is not required in this case.
One-Arm Topology
In one-arm mode, the load balancer is not in the traffic path between the client and the server. In this mode, the client and the server can be anywhere. LB-SNAT is always required in this case.
Health check monitors is another area of discussion, which is used to test whether each server is correctly running the application, you can add health check monitors that checks the health status of a server.
Let’s get started with setting up the simple example of NSX-T Logical Load Balancer.
Here is the background of the lab. I have an NSX-T environment already running in the LAB. For demo purpose, I have already done following configuration.
New NSX-T logical segment called ‘LB_1680’ (Subnet: 172.16.80.253/24)
Installed and configured 2 test Web servers. (OS: Centos7 with web server role and added sample html file)
Connected 2 new web severs to LB_1680 segment.
Verify that you can access the web severs and web page is displayed.
1st Web Server. (172.16.80.10)

2nd Web Server. (172.16.80.11)

That was all background work. Lets start configuring the Logical NSX-T Load Balancer.
We have to configure the Server Pool first and then move on to next configuration.
Login to NSX-T and navigate to Networking> Load Balancing> Server Pools> Add Server Pool
Name: WevServerPool
Algorithm: Round Robin (To distribute the load in pool members)
SNAT Translation Mode: Automap (leave it to default)
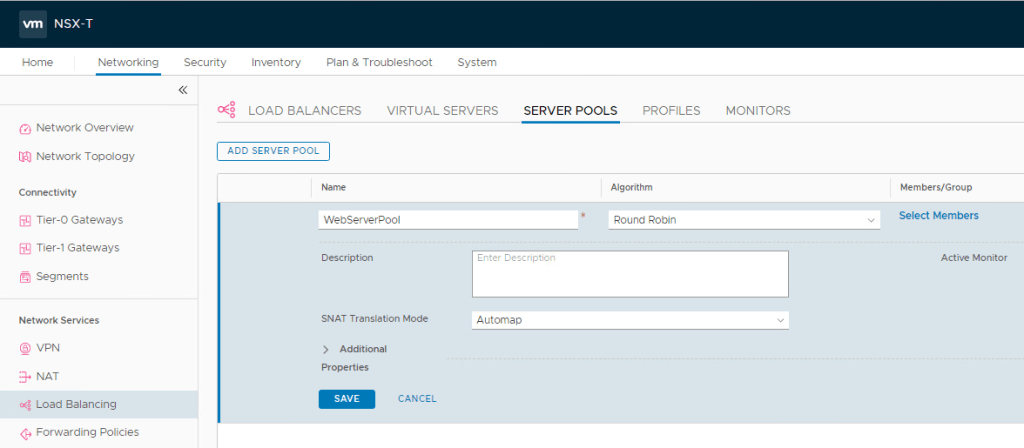
Next, Click on Select Members> Add members & enter the information for the 1st web server.

Follow the same procedure again for the 2nd web server.
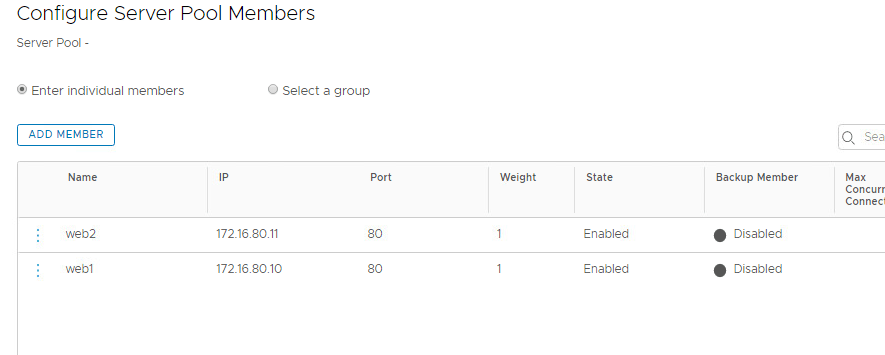
Click on Apply and Save.
Make sure that the status is Success.

Next, Click on Virtual Server and ADD L7 HTTP

Name: WebVirtualServer
IP: 192.168.10.15 (This IP can be in any subnet & We will use this IP add to access the Web Server)
Port: 80
Server Pool: WebServerPool (Select the pool that you created in earlier step)
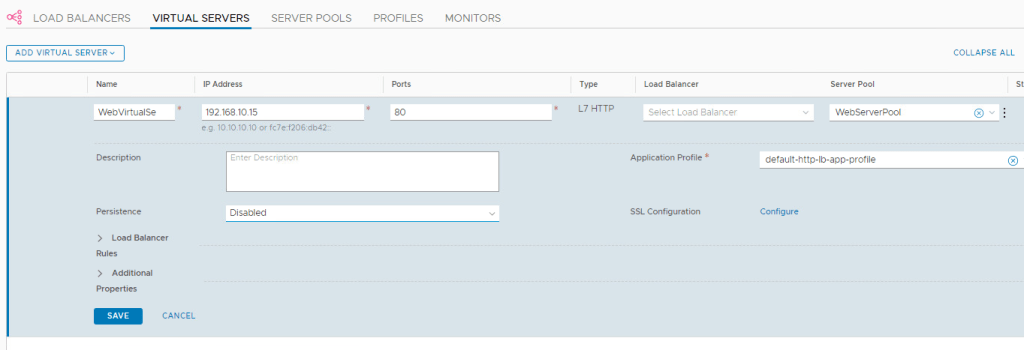
Save & Make sure that the status is Success.

Let’s move to Load Balancer tab and click on Add Load Balancer.
Name: Web-LB
Size: Small (note the sizing information at the point)
Attachment: Select your existing Tier-1 gateway.
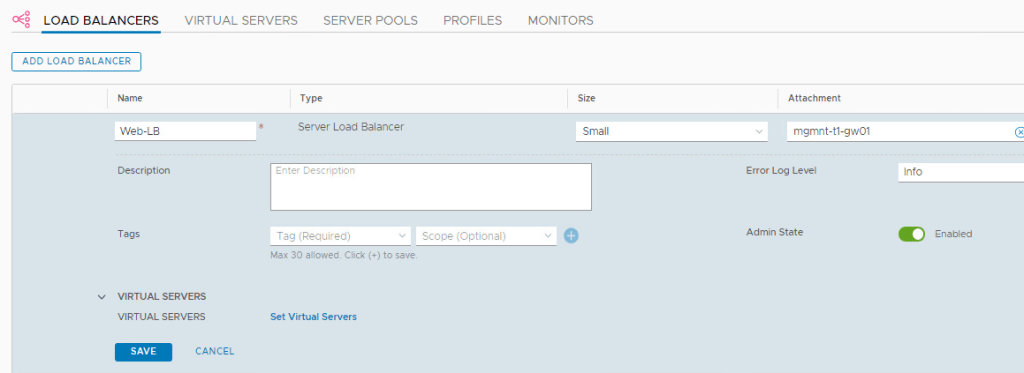
Click on Save and then click on NO to complete the configuration.
Now, we have to attach this Load Balancer to Virtual Server that we created in earlier step.
Go back to ‘Virtual Servers’ and click on Edit.

Under the LB, select the LB that we just created and Save.

Make sure that the status is Success for LB, Virtual Server & Server Pools.
That’s It. We are done with the configuration of NSX-T Load Balancer. Its time to test it.
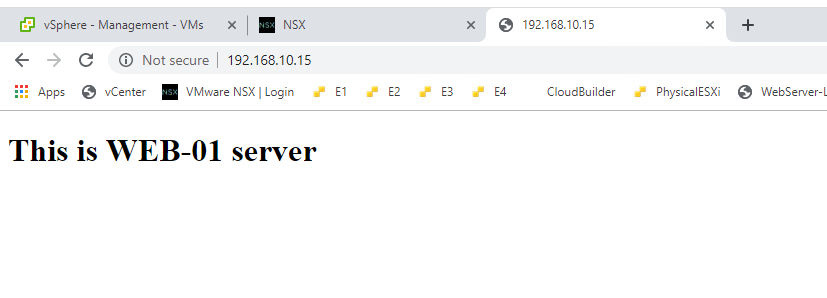
Try to access the VIP (192.168.10.15), This ip should load the web page either from Web-1 server or Web-2.

The VIP is hitting to my 2nd Web Server. Try to refresh the page.
Couple of refresh will route the traffic to 2nd Web Server. You might have to try in different browser or try Ctrl+F5 to refresh the page.
Hurray…!! We have just configured NSX-T LB.
This is how my network topology looks. Web-LB is configured at tier-1 gateway.

Remember, there is much more than this when it comes to customer production environment. We must take several other things into consideration (health monitors, SNAT, LB rules etc…), and it is not that easy as it sounds. This blog was written to give you basic understanding of NSX-T LB.
I hope that the blog has valuable information. See you all in next post.
Are you looking out for a lab to practice VMware products..? If yes, then click here to know more about our Lab-as-a-Service (LaaS).
Leave your email address in below box below to receive notification on my new blogs.
