In the previous blogpost, we discussed on Compute Manager and NSX VIP. Please find the links below for all posts in this series.
NSX 4.0 Series Part1-NSX Manager Installation
NSX 4.0 Series Part2-Add a Compute Manager & Configure the NSX VIP
NSX 4.0 Series Part3-Create Transport Zones & Uplink Profiles
NSX 4.0 Series Part4-Prepare Host Transport Nodes
NSX 4.0 Series Part5-Migrate workload from VDS To NSX
This post will focus on Transport Zones & Uplink Profiles.
It is very important to understand Transport Zones and Uplink Profiles to configure NSX env.
Transport Zone:
All types of hypervisors (that get added to NSX env) as well as EDGE VM are called transport nodes and these transport nodes needs to be a part of transport zones to see particular networks. Collection of transport nodes that define the maximum span for logical switches. A transport zone represents a set of similarly provisioned hypervisors and the logical switches that connect VMs on those hypervisors. It also has been registered with the NSX management plane and has NSX modules installed. For a hypervisor host or NSX Edge to be part of the NSX overlay, it must be added to the NSX transport zone.
There are two types of Transport Zones. Overlay and Vlan Transport Zones. I have already written a blog on previous versions of NSX and explained Transport Zones here…
There is already a lot of information on the web regarding this topic. You can also find VMware official documentation here…
In this blogpost, we will be only focusing on VLAN backed segments. NO overlay, No Edge, No BGP / OSPF routing.
Visit my NSX-T 3.0 blogpost series below if you are looking to configure Overlay, Edge and BGP Routing.
Let’s get the VLAN backed env in place. It’s simple and easy to understand. Here is the small design that explains what we are trying to accomplish here…

Time to configure VLAN Transport Zone,
Login to NSX VIP and navigate to System> Transport Zones> ADD Zone
Enter the name and select VLAN under traffic type,
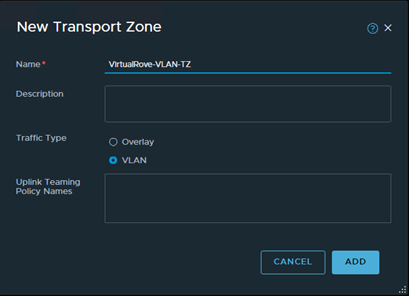
Verify that the TZ is created,

Time to configure Uplink Profile,
An uplink profile defines how you want your network traffic to go outside of NSX env. This helps with the consistent configuration of the network adaptors.
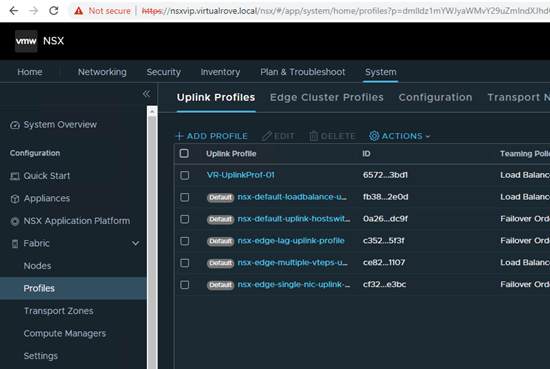
Navigate to System > Fabric> Profiles > Uplink Profile,
> Add Profile,
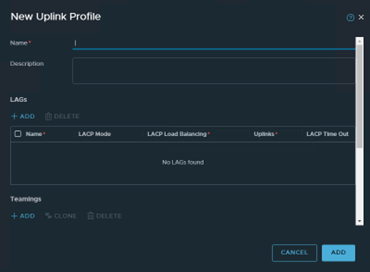
Enter the name and description. Leave the LAG’s section for now. I will write another small blog explaining the LAG configuration in NSX env. Scroll down to Teamings,

Select the default policy to “Load Balance Source”
Type “U1,U2” in Active Uplink field. Input keywords really does not matter here, you can type any name comma separated.
Transport VLAN value to remain 0 in our case.
Teaming Policy Options:
Failover Order: Select an active uplink is specified along with an optional list of standby uplinks. If the active uplink fails, the next uplink in the standby list replaces the active uplink. No actual load balancing is performed with this option.
Load Balance Source: Select a list of active uplinks. When you configure a transport node, you can pin each interface of the transport node to one active uplink. This configuration allows use of several active uplinks at the same time.
A teaming policy defines how C-VDS (Converged VDS) uses its uplink for redundancy and traffic load balancing. Wait, what is C-VDS now…?
N-VDS (NSX Managed VDS): In earlier versions (prior to version 3.0), NSX used to install an additional NSX Managed Distributed Switch. So, one VDS (or VSS) for vSphere traffic and one N-VDS for NSX-T traffic. So, technically speaking, you need 2 more additional pnics for an additional N-VDS switch.
C-VDS (Converged VDS): NSX now uses existing VDS for NSX traffic. However, C-VDS option is only available when you use NSX-T 3 or higher with vSphere 7 along with the VDS version 7.0. You do not need additional pnics in this case.
We are done with the Uplink Profile configuration. More information on Uplink Profiles can be found here,
Check to make sure that the Uplink Profile has been created.

That’s all for this post. We are all set to prepare esxi host transport nodes.I hope that the blog has valuable information. See you all in the next post.
Are you looking out for a lab to practice VMware products…? If yes, then click here to know more about our Lab-as-a-Service (LaaS).
Leave your email address in the box below to receive notification on my new blogs.
