In earlier post, we discussed Part1 from the NSX-T 3.0 series. This post will focus on Part2 of the series.
NSX-T 3.0 Series: Part1-NSX-T Manager Installation
NSX-T 3.0 Series: Part2-Add additional NSX-T Mangers & Configure VIP
NSX-T 3.0 Series: Part3-Add a Compute Manager (vCenter Server)
NSX-T 3.0 Series: Part4-Create Transport Zones & Uplink Profiles
NSX-T 3.0 Series: Part5-Configure NSX on Host Transport Nodes
NSX-T 3.0 Series: Part6-Depoy Edge Transport Nodes & Create Edge Clusters
NSX-T 3.0 Series: Part7-Add a Tier-0 gateway and configure BGP routing
NSX-T 3.0 Series: Part8-Add a Tier-1 gateway
NSX-T 3.0 Series: Part9-Create Segments & attach to T1 gateway
NSX-T 3.0 Series: Part10-Testing NSX-T Environment
We have completed NSX-T manager installation in my previous post. Let’s add an additional NSX-T manager for high availability.
Log in to NSX-T manager and navigate to System >Appliances and click on Add Appliance.

Enter the appliance information. Make sure that the DNS record is created.

Enter the DNS as well as NTP server. Choose the deployment form factor & click Next.

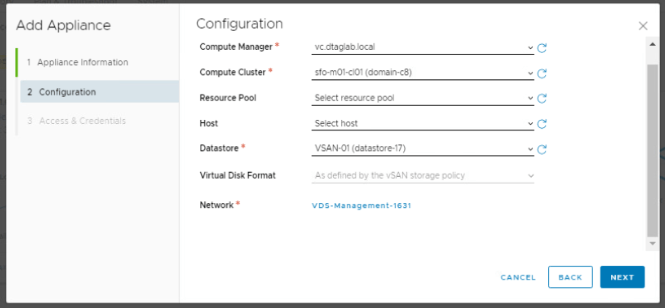
Compute information and network.
Enable SSH & Root. Enter the password as per the password policy. And install the appliance.

Check the status of the appliance in UI once it is up and running.
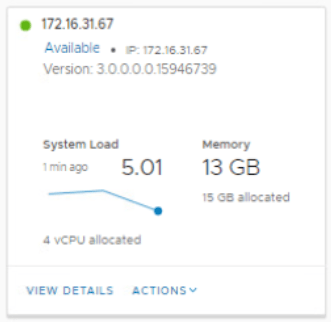
Click on View Details and make sure that everything shows UP here.

Follow the same procedure for 3rd (nsx01c.dtaglab.local) appliance.
Next, Set the VIP (Virtual IP) for the cluster. NSX-T Managers Cluster offer a built-in VIP for high availability. The VIP will be connected automatically to the active NSX Manager and rest two will be on stand by.
Enter the IP add >Save.

Create a DNS records for the VIP too.
Check the cluster status. It should show stable with all 3 appliances up and running.

Let’s check it on CLI.
SSH to VIP or any NSX-T manager IP and run few commands.
‘get managers’

‘get cluster config’
All 3 nodes should show up here with the node status as ‘JOINED’

‘get cluster status’
Overall status: Stable
All 3 members status: UP

‘get cluster status verbose’ This command will give you detailed information on each node.
We are done with the NSX-T configuration here. Will move further in my next post. Thank you for checking, I hope it was informational.
Share it if you like it.
Are you looking out for a lab to practice VMware products..? If yes, then click here to know more about our Lab-as-a-Service (LaaS).
Subscribe for my latest blogs…
