NSX-T 3.0 Series: Part3-Add a Compute Manager (vCenter Server)

We have covered 2 parts till now, let’s get to the Part 3 of the series.

NSX-T 3.0 Series: Part1-NSX-T Manager Installation
NSX-T 3.0 Series: Part2-Add additional NSX-T Manger & Configure VIP
NSX-T 3.0 Series: Part3-Add a Compute Manager (vCenter Server)
NSX-T 3.0 Series: Part4-Create Transport Zones & Uplink Profiles
NSX-T 3.0 Series: Part5-Configure NSX on Host Transport Nodes
NSX-T 3.0 Series: Part6-Depoy Edge Transport Nodes & Create Edge Clusters
NSX-T 3.0 Series: Part7-Add a Tier-0 gateway and configure BGP routing
NSX-T 3.0 Series: Part8-Add a Tier-1 gateway
NSX-T 3.0 Series: Part9-Create Segments & attach to T1 gateway
NSX-T 3.0 Series: Part10-Testing NSX-T Environment

Unlike NSX-V (one to one relation with vCenter), you can add multiple compute managers to your NSX-T environment. NSX-T polls all compute managers to detect changes such as new hosts, clusters etc. You can also add standalone ESXi hosts as well as KVM hypervisor. Here is the list of standalone hosts that can be added to NSX-T env.

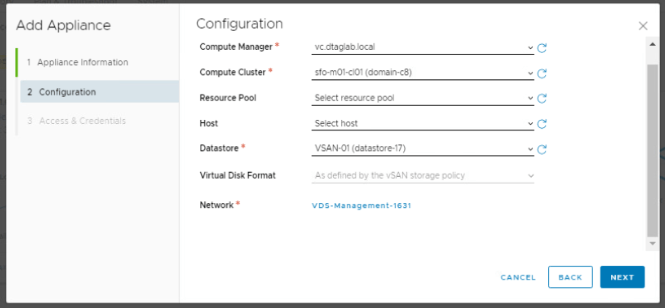
Log into NSX-T VIP and navigate to System >Fabric >Compute Managers and click on ADD

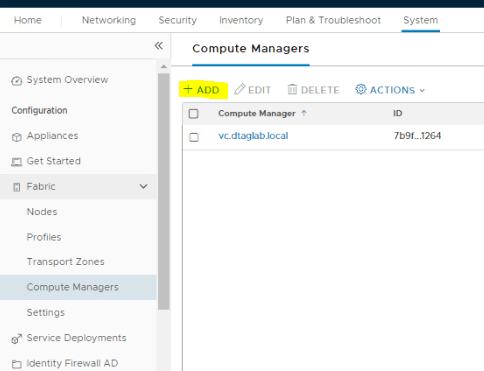
Fill out the required information and click on Save.

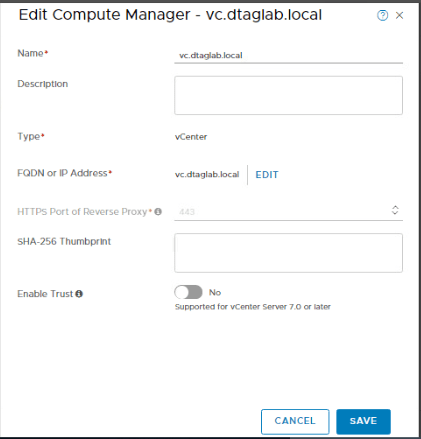
If you left the thumbprint value blank, you are prompted to accept the server provided thumbprint.

After you accept the thumbprint, it takes a few seconds for NSX-T Data Center to discover and register the vCenter Server resources.

It takes some time for NSX-T to register the vCenter and pull all the objects. Make sure to check the status as ‘Registered’ and connection status as ‘UP’.

All hosts from compute manager (vCenter) appears in ‘Host Transport Nodes’. You should also see all clusters from the vCenter. Let’s verify the same.

System >Fabric >Nodes >Host Transport Nodes

Change the ‘Managed by’ drop down to your vCenter.

Verify all clusters and hosts.

We are good here.

Change the ‘Managed by’ drop down to ‘None: Standalone Hosts’ to add standalone ESXi hosts and KVM hypervisors.

That’s it. We have added a compute manager to NSX-T env. Will continue the configuration in my next blog.

Hope the blog was information. Thank you.

Are you looking out for a lab to practice VMware products..? If yes, then click here to know more about our Lab-as-a-Service (LaaS).

Subscribe for my latest blogs…

NSX-T 3.0 Series: Part2-Add additional NSX-T Mangers & Configure VIP

In earlier post, we discussed Part1 from the NSX-T 3.0 series. This post will focus on Part2 of the series.

NSX-T 3.0 Series: Part1-NSX-T Manager Installation
NSX-T 3.0 Series: Part2-Add additional NSX-T Mangers & Configure VIP
NSX-T 3.0 Series: Part3-Add a Compute Manager (vCenter Server)
NSX-T 3.0 Series: Part4-Create Transport Zones & Uplink Profiles
NSX-T 3.0 Series: Part5-Configure NSX on Host Transport Nodes
NSX-T 3.0 Series: Part6-Depoy Edge Transport Nodes & Create Edge Clusters
NSX-T 3.0 Series: Part7-Add a Tier-0 gateway and configure BGP routing
NSX-T 3.0 Series: Part8-Add a Tier-1 gateway
NSX-T 3.0 Series: Part9-Create Segments & attach to T1 gateway
NSX-T 3.0 Series: Part10-Testing NSX-T Environment

We have completed NSX-T manager installation in my previous post. Let’s add an additional NSX-T manager for high availability.

Log in to NSX-T manager and navigate to System >Appliances and click on Add Appliance.

Enter the appliance information. Make sure that the DNS record is created.

Enter the DNS as well as NTP server. Choose the deployment form factor & click Next.

Compute information and network.

Enable SSH & Root. Enter the password as per the password policy. And install the appliance.

Check the status of the appliance in UI once it is up and running.

 Click on View Details and make sure that everything shows UP here.

Follow the same procedure for 3rd (nsx01c.dtaglab.local) appliance.

Next, Set the VIP (Virtual IP) for the cluster. NSX-T Managers Cluster offer a built-in VIP for high availability. The VIP will be connected automatically to the active NSX Manager and rest two will be on stand by.

Enter the IP add >Save.

Create a DNS records for the VIP too.

Check the cluster status. It should show stable with all 3 appliances up and running.

Let’s check it on CLI.

SSH to VIP or any NSX-T manager IP and run few commands.

‘get managers’

‘get cluster config’

All 3 nodes should show up here with the node status as ‘JOINED’

‘get cluster status’

Overall status: Stable

All 3 members status: UP

‘get cluster status verbose’ This command will give you detailed information on each node.

We are done with the NSX-T configuration here. Will move further in my next post. Thank you for checking, I hope it was informational.

Share it if you like it.

Are you looking out for a lab to practice VMware products..? If yes, then click here to know more about our Lab-as-a-Service (LaaS).

Subscribe for my latest blogs…

NSX-T 3.0 Series: Part1-NSX-T Manager Installation

VMware NSX-T 3.0 is a newly launched product version of NSX-T. It is highly scalable network virtualization platform. Unlike NSX-V, it can be configured for multi-hypervisor & workloads running in public could. This blog is divided into series of parts, which will help you to successfully install and configure NSX-T 3.0 environment. Like my other blogs, even this blog will focus on practical with limited theoretical information. Here is the VMware official documentation for your reference.

https://docs.vmware.com/en/VMware-NSX-T-Data-Center/index.html

With that lets get started…

I have nested vSphere 7 and VSAN 7 configured in my existing setup. I will use this lab to deploy and configure NSX-T env.

This series of NSX-T 3.0 includes following parts.

NSX-T 3.0 Series: Part1-NSX-T Manager Installation
NSX-T 3.0 Series: Part2-Add additional NSX-T Manger & Configure VIP
NSX-T 3.0 Series: Part3-Add a Compute Manager (vCenter Server)
NSX-T 3.0 Series: Part4-Create Transport Zones & Uplink Profiles
NSX-T 3.0 Series: Part5-Configure NSX on Host Transport Nodes
NSX-T 3.0 Series: Part6-Depoy Edge Transport Nodes & Create Edge Clusters
NSX-T 3.0 Series: Part7-Add a Tier-0 gateway and configure BGP routing
NSX-T 3.0 Series: Part8-Add a Tier-1 gateway
NSX-T 3.0 Series: Part9-Create Segments & attach to T1 gateway
NSX-T 3.0 Series: Part10-Testing NSX-T Environment

Let’s start with Part1-NSX-T Manager Installation.

NSX Manager provides a web-based UI to manage your NSX-T env. Let’s check the NSX Manager VM form factor and its compute requirements.

Procedure:

Obtain NSX-T Data Center OVA file from VMware downloads and deploy it into your vSphere env.

Upload the downloaded OVA file here.

Select appropriate name and location of the VM.

Select the form factor here.

Storage

Select your management network here.

Enter the password for Root and Admin user. Make sure your password meets the complexity rule or the deployment will fail.

Fill out network and DNS info. Make sure to create a DNS record for your FQDN. Leave the Role name to default.

No need to fill anything here.

Next & Finish.

Browse to the NSX Manager FQDN once it is up and running. We are good to configure it further. That’s it for this post.

Share it if you like it.      

Are you looking out for a lab to practice VMware products..? If yes, then click here to know more about our Lab-as-a-Service (LaaS).

Subscribe for my latest blogs…