I recently came across a situation where the NSX-T Edge vm in an existing cluster was having issues while loading its parameter. Routing was working fine and there was no outage as such. However, when a customer was trying to select an edge vm and edit it in NSX UI, it was showing an error. Support from VMware said that the edge in question is faulty and needs to be replaced. Again, routing was working perfectly fine.
Let’s get started to replace the faulty edge in the production environment.
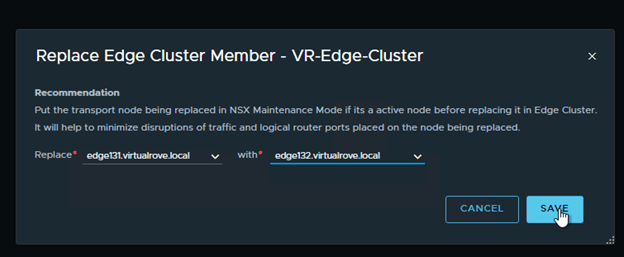
Note: If the NSX Edge node to be replaced is not running, the new NSX Edge node can have the same management IP address and TEP IP address. If the NSX Edge node to be replaced is running, the new NSX Edge node must have a different management IP address and TEP IP address.
In my lab env, we will replace a running edge. Here is my existing NSX-T env…
Single NSX-T appliance,
All hosts TN have been configured,
Single edge vm (edge 131) attached to edge cluster,
One test workload overlay network. Segment Web-001 (192.168.10.0/24)
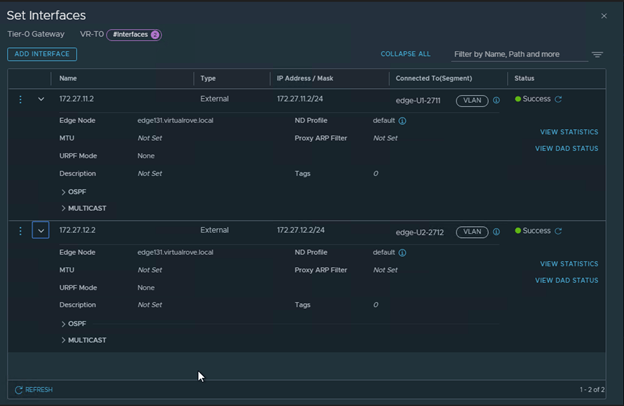
A Tier-0 gateway,
Note that the interfaces are attached to existing edge vm.
BGP config,
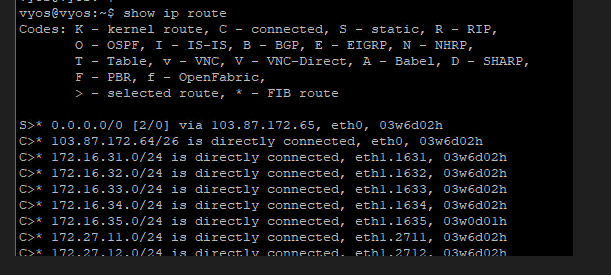
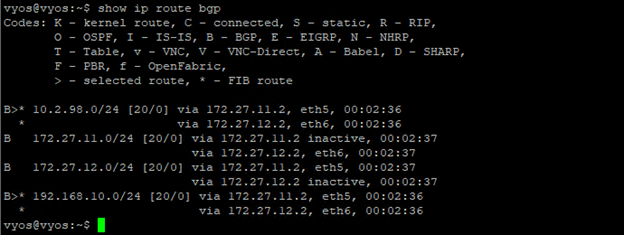
Lastly, my VyOS router showing all NSX BGP routes,
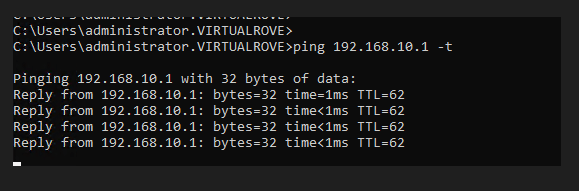
Start continuous ping to NSX test overlay network,
Alright, that is my existing env for this demo.
We need one more thing before we start the new edge deployment. The new edge vm parameters should match with the existing edge parameters to be able to replace it. And the existing edge showing an error when we try to open its parameters in NSX UI. The workaround here is to make an API call to existing edge vm and get the configuration.
Please follow the below link to know more about API call.
Let’s get started to configure the new edge to replace it with existing edge. Here is the link to the blogpost to deploy a standalone edge transport node.
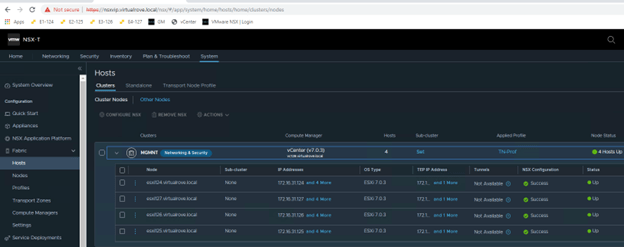
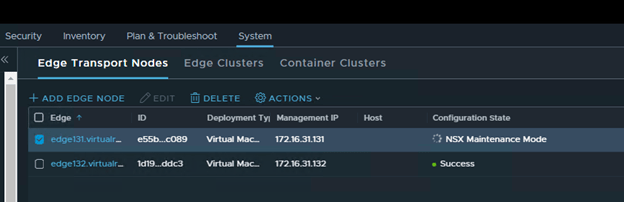
New edge vm (edge132) is deployed and visible in NSX-T UI,
Note that the newly deployed edge (edge132) does not have TEP IP and Edge cluster associated with it. As I mentioned earlier, The new edge vm parameters should match with the existing edge parameters to be able to replace it.
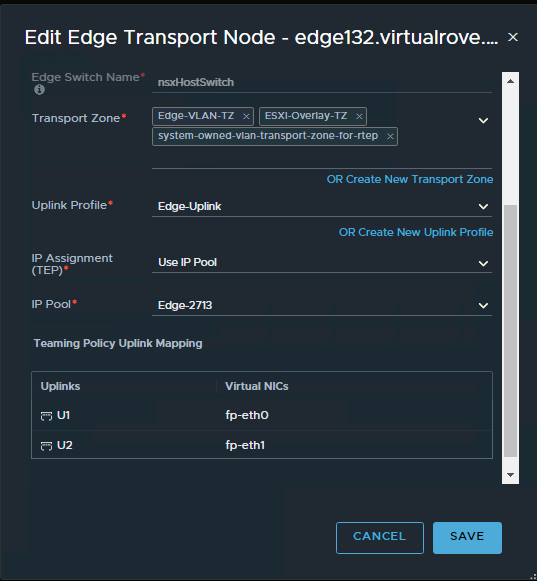
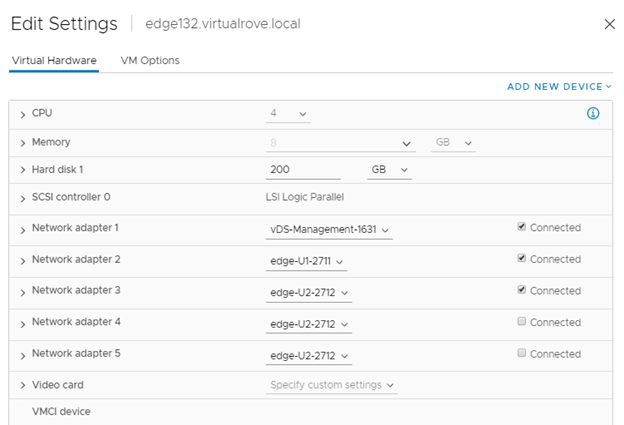
Use the information collected in API call for faulty edge vm and configure the new edge vm the way you see it in the API call. Here is my new edge vm configuration looks like,
Make sure that the networks matches with the existing non working edge networks.
You should see TEP ip’s once you configure the new edge.
Click on each edge node and verify the information. All parameters should match.
Edge131
Edge132
We are all set to replace the faulty edge now.
Select the faulty edge (edge131) and click on actions,
Select “Enter NSX Maintenance Mode”
You should see Configuration State as “NSX Maintenance Mode” in the UI.
And you will lose connectivity to your NSX workload.
No BGP route on the TOR
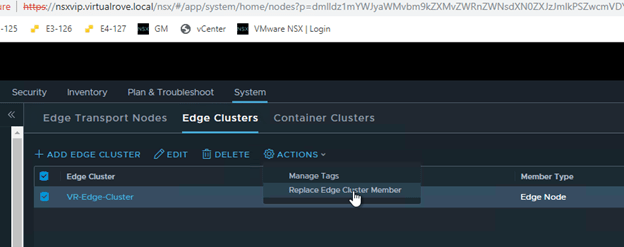
Next, click on “Edge Clusters”, Select the edge cluster and “Action”.
Choose “Replace Edge Cluster Member”
Select appropriate edge vm’s in the wizard and Save,
As soon as the faulty edge have been replaced, you should get the connectivity to workload.
BGP route is back on the TOR.
Interface configuration on the Tier-0 shows new edge node.
Node status for faulty edge shows down,
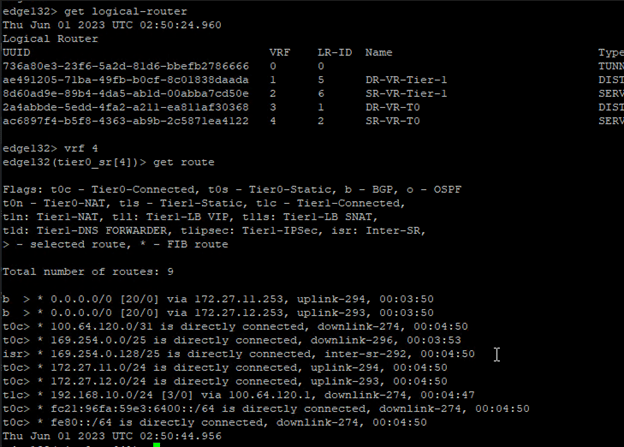
Let’s get into the newly added edge vm and run “get logical-router” cmd,
All service routers and distributed routers have been moved to new edge.
Get into the SR and check routes to make sure that it shows all connected routes too,
We are good to delete the old edge vm.
Lets go back to edge transport node and select the faulty edge and “DELETE”
“Delete in progress”
And its gone.
It should disappear from vCenter too,
Well, that was fun.
That’s all I had to share from my recent experience. There might be several other reasons to replace / delete existing edge vm’s. This process should apply to all those use cases. Thank you for visiting. See you in the next post soon.
Welcome back techies. This is going to be the short one. This article describes the steps to make an API call to NSX edge transport node vm to get the edge configuration. At the time of writing this blog, I had to collect this information to replace the faulty edge node vm in the env.
There can be multiple reasons to deploy nsx-t edge vm via ova instead of deploying thought nsx-t manager. At the time of writing this blog, I had to deploy edge vm via ova to replace faulty edge vm in nsx-t env. You may be deploying one to create a Layer 2 Bridge between nsx-v and nsx-t env to migrate workload.
Alright. Let’s start deploying an edge vm without using nsx-t manager UI.
To begin with, you need to manually download edge vm ova from VMware downloads page here…
Make sure to match the version with your existing NSX-T env.
Once downloaded, login to vSphere web client and start deploying an ova template. It’s straightforward like any other generic ova deployment. Make sure to select the exact same networks that are attached to your existing faulty edge vm.
In my case, 1st vmnic is attached to management network and next 2 are attached to uplink1 & uplink2 network respectively. Rest all nic cards remains unchecked.
Next, you will need to enter the NSX-T manager information in “Customize Template” section of the deployment.
Enter the Manager IP & Credentials. NO need to enter “Node ID”.
You also have an option to leave this blank and join it to NSX-T control plane once the appliance is up and running. For now, I am entering all these details. Will also discuss on manually attaching edge vm to nsx-t manager control plane.
To get the NSX-T manager thumbprint. SSH to NSX-T manager and run following command,
get certificate api thumbprint
You can also get the thumbprint from the following location in the UI.
Login to NSX-T manager and click on view details,
Enter remaining network properties in the deployment wizard and finish.
Once the VM is up and running, you will see it in NSX-T UI here,
You will not see newly added edge vm here If you did not enter NSX-T thumbprint information in the deployment wizard. To manually join newly created edge vm to nsx-t manger control plane, run following command on the newly created edge vm.
Next, the newly created edge vm will not have N-VDS, TEP or Tranport Zones configuration. Further configuration will be specific to individual use case.
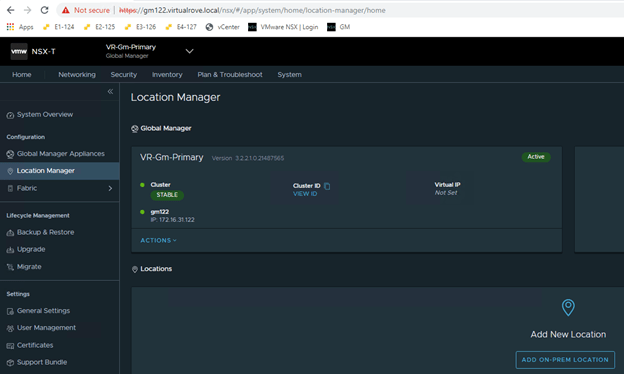
This is short one, but someone might spend good amount of time to search for possible solution. If you have 3 local mangers cluster and VIP has been set already. Then you realized that there was a typo and the VIP address needs to be changed.
NSX-T GUI does not allow cluster VIP to be changed or removed.
The possible solution that anyone can think of is API call. However, its simpler than that. You need to login to one of the Local Manager in a cluster to change or remove the VIP. 😊
We ran into a situation where we had to remove the Local Manager from Global Manager. I replicated this in the lab env. It’s straightforward. However, there are couple of points that need to be addressed before you delete / remove the Local Manager from Global Manager.
Removing location from GM removes all objects created from GM.
Here is what my existing config looks like,
I have one Tier-1 gateway created from global manager, which is specific to Site-A
A segment which is attached to above Tier-1 GW.
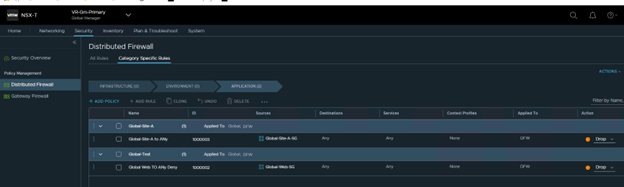
Some rules and policies created on the global level.
Notice that all globally created rules get a Rule ID starting from one million.
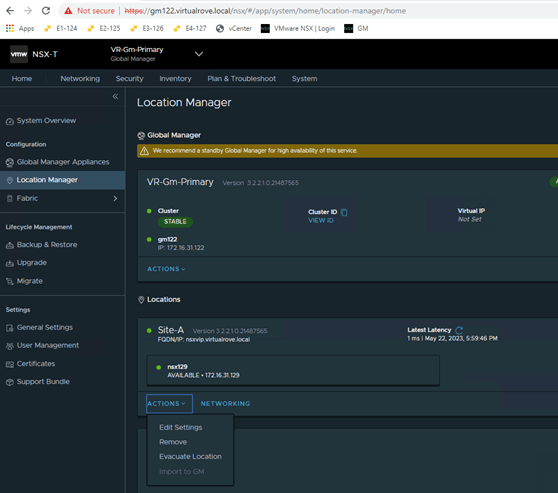
Navigate back to location manager, Click on ‘Action’ for the site to be removed and then ‘Remove’
Check the prompt,
Note: If you have any location-specific configurations created from the Global Manager for this location — such as Tier-0 gateways — you must first remove these configurations manually before proceeding.
Error: Error: Site can not be offboarded due to references [/global-infra/domains/Site-A/groups/Global-Site-A-SG/attributes/Global-Site-A-SG, /global-infra/tier-1s/Global-T1/locale-services/Site-A, /global-infra/tier-1s/Global-T1/security-config, /global-infra/domains/Site-A/groups/Global-Site-A-SG, /global-infra/segments/GM-Web-Seg_, /global-infra/tier-1s/Global-T1]. (Error code: 530024)
Basically, you want to make sure that all objects that are created from GM are deleted before you perform this operation.
I deleted all T-1’s and Segments from GM. Also, deleted region level rules and its associated groups before deleting the site.
That was easy.
However, what if Global Manager has been deleted before you take out Local Manager from it. 😊
In this case, all your LM’s would continue to try to reach out to GM for configuration sync. No worries, VMware has solutions to every possible problem / situation for its product.
Run the following API at all local mangers in the env to remove the objects,
In this last post of NSX-T backup & restore, we will perform the DR test and post tasks after the restore is complete. Just in case if you have missed, here are links to previous posts.
We move to next step by deploying an additional NSX-T manager.
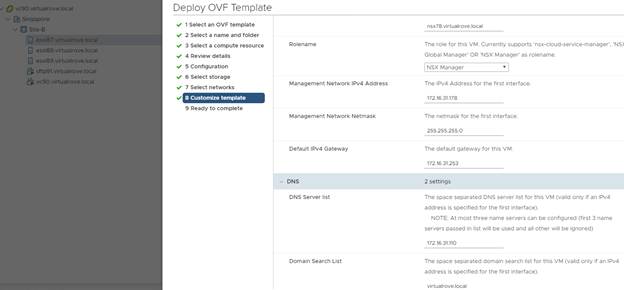
Deploy the new nsx-t manger on the DR site. Make sure to deploy same node for which last successfully backup was taken on the primary site. In my case, last successful backup was for ‘nsx78’ node. I have reserved the new ip address (172.16.31.178) for this node. Remember, we do not need to create DNS record for new node at this point. I am deploying the new nsx-t manager at Site-B (Singapore). Review the deployment parameters here…
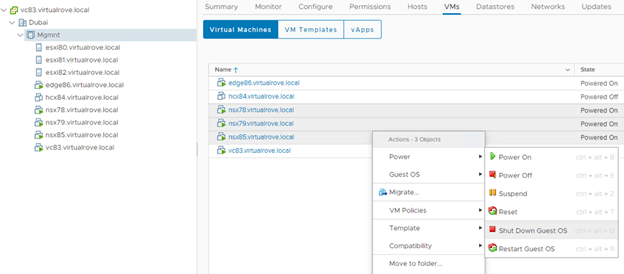
Next, Its time to shutdown the primary site nsx-t managers. Ideally, in DR scenario, NSX-T managers on the primary site will be already down. And that’s when we start performing the restore process.
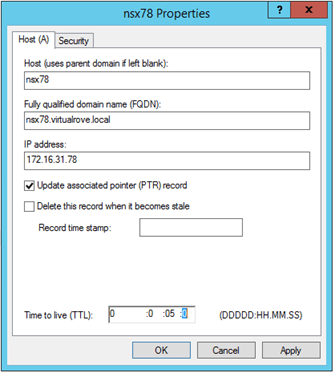
Next, We need to change the DNS records for primary site NSX-T managers to new IP’s from the secondary site. In production env, you might have different subnet on the DR site. I have the same subnet with different IP’s.
Login to the DC and update the DNS records.
Existing IP’s on DNS server.
Update to new IP’s.
All 4 DNS records have been updated.
Next, we need to configure newly deployed NSX-T manger for FQDN using the API call.
Configure the SFTP server on newly deployed NSX-T manger and check for recent backup that has been discovered by the appliance.
Note that we are getting EULA prompt. We get this prompt only on the newly deployed NSX-T manager.
Navigate to Backup config and enter sftp server details.
Note that the newly deployed appliance now discovers all successful backups.
Next,
Upon selecting recent backup, you should see ‘Restore’ option highlighted. If you do not see ‘Restore’ option, you will have to re-check all steps provided in this article.
Quick Tip here, if you do not see restore option, scroll down and select the backup where it lists the Appliance FQDN as your newly deployed appliance FQDN. 😊 We found this behavior while troubleshooting at customer location. And it does make sense too. That is why I mentioned earlier in this blog that, deploy the new appliance for which you see last successful backup for.
Note that we do not see any Tier-0 or segments in the newly deployed appliance.
Let’s begin the restore process,
Select the recent backup and restore… You should see a prompt…
Restoring NSX Managers
If you are running NSX on Virtual Distributed Switch (VDS) and are attempting to perform a Restore operation to a backup file that contains N-VDS switches, then the restore operation might fail. Please
Please read the following steps carefully before you proceed:
Step 1: Power Off.
Power off all NSX Manager appliances that may be running from the earlier deployment.
Step 2: Restore NSX Manager appliances.
Restore NSX Manager appliances from the backup.
Note: During the restore process, your deployment will be in read-only mode and the UI will be inaccessible. Automatic backups will be disabled.
Step 3: Go to the Backup & Restore page.
After the restore process ends, log in to your NSX Manager appliance and visit the Backup & Restore page to continue.
NOTE: If the restore fails, you must install a new NSX Manager appliance and try the restore process again.
Review and click Continue. Restore process begins…
The restore process should start and you will lose the connectivity to new nsx-t manger after 10-15 mins. Since the restore has started, you will have to re-login to new nsx-t manager with your old password from your primary site.
It would take significant amount of time to come back online. Once up, login to NSX-T manager and navigate the backup again. You should see prompt.
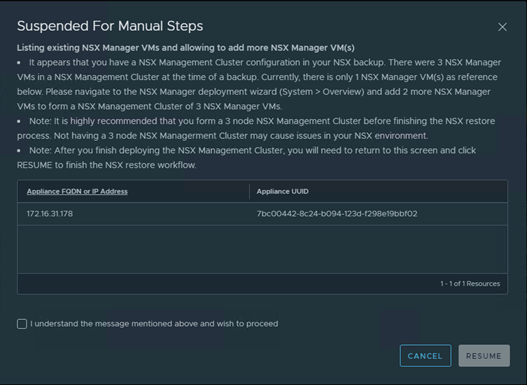
“It appears that you have a NSX Management Cluster configuration in your NSX backup. There were 3 NSX Manager VMs in a NSX Management Cluster at the time of a backup. Currently, there is only 1 NSX Manager VM(s) as reference below. Please navigate to the NSX Manager deployment wizard (System > Overview) and add 2 more NSX Manager VMs to form a NSX Management Cluster of 3 NSX Manager VMs.”
Since we had 3 NSX-T managers on the primary site, backup is prompting us to install remaining 2 nsx-t managers before the restore can be proceed.
Note: After you finish deploying the NSX Management Cluster, you will need to return to this screen and click RESUME to finish the NSX restore workflow.
Before you install an additional nsx-t mangers, make sure to set the VIP of the cluster to new ip address…
Change the VIP from 172.16.31.77 to 172.16.31.177…
It will take around 10 mins to bring back services and to be able to access new VIP.
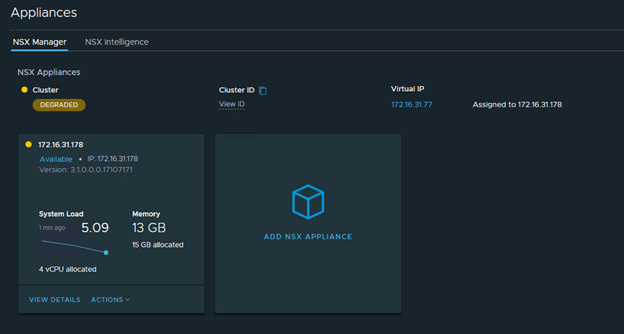
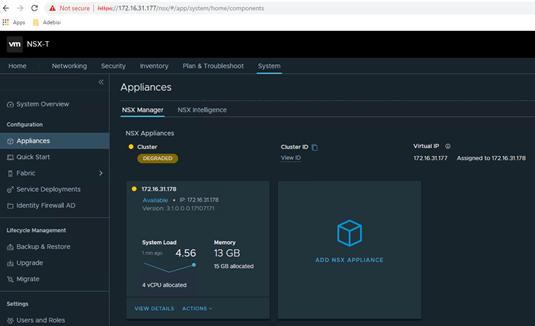
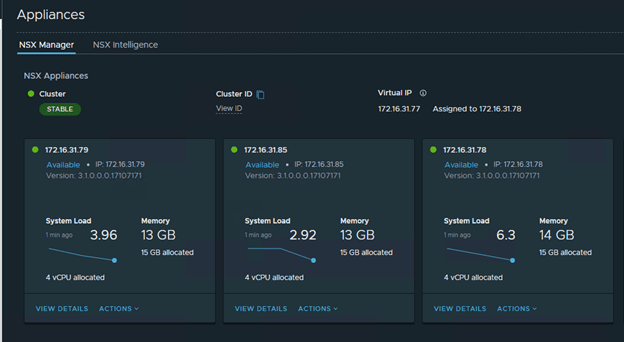
Deploy the 2nd nsx-t manager once the VIP is accessible. And then followed by 3rd NSX-T manager. Please note that the Cluster Status shows as ‘Degraded’ in the entire process.
Login to the VIP once it is up and running.
Next, we deploy an additional NSX-T managers.
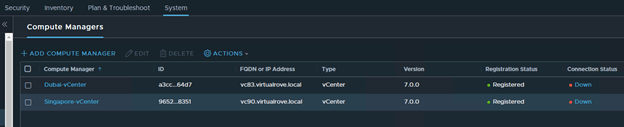
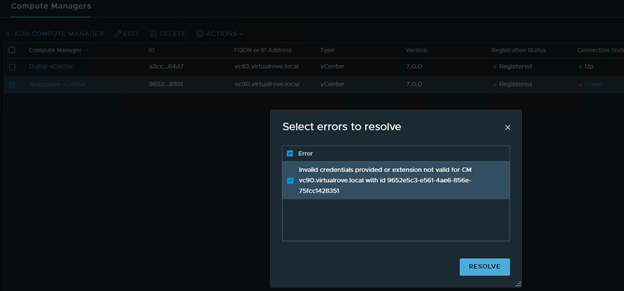
On the next page, Compute Managers were not listing. Cancelled the wizard and checked compute managers. It shows as ‘Down’
Click on ‘Down’ to check the error msg.
“Plugin for compute manager is not running.”
And ‘Resolve’ option was grayed out. Looks like something wrong with the vCenter Server Extensions. Anyways, since it is a lab env, I would not worry much to deploy an additional NSX-T manager. However, we did not receive this error while doing the production DR at customer site.
Let’s go back to backup and resume the operation.
The restore process moved to 62%…
Next, It prompts to check the CM/VC connectivity. (Compute Managers / vCenter). We move on by clicking Resume here.
Then the backup process stops again and prompt to check all listed fabric node connectivity. We can ignore this, since it says that, ‘These nodes might eventually discover the NSX Manager’
Restore process continues to 96%
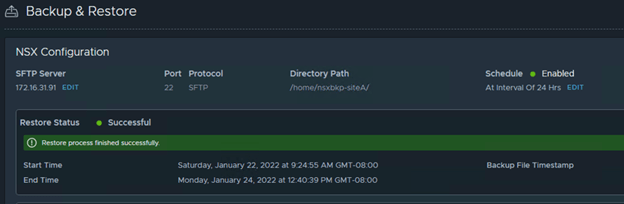
And finally restore was successful. 😊
Logout and re-login to NSX-T VIP. You should see a msg.
However, it does stop here. We need to make sure that all nodes are connected to new NSX-T manager. You can also deploy an additional NSX-T mangers if needed at this stage, however I skipped it due to compute capacity in the lab.
Couple of tasks after the Restore process… Navigating to host transport node, it shows couple of error and the same time it gives an option to ‘Resolve’ it.
One of the compute managers shows ‘Down’. Let’s try Resolve option.
It’s UP now.
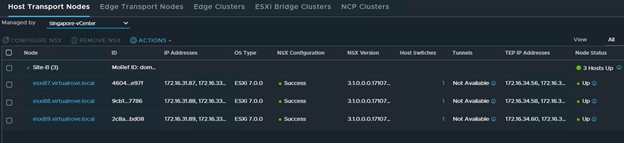
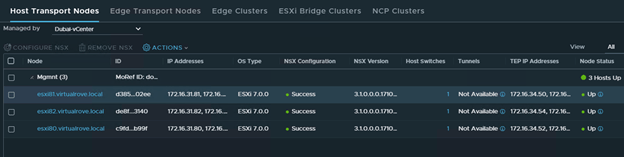
Dubai-vCenter transport nodes are UP.
Singapore-vCenter transport nodes are UP.
In an actual DR scenario, primary site (Dubai) will show as down since the site itself went down and that’s when we started this restore process.
Edge transport node shows ‘Failed’ Host configuration: Failed to send the HostConfig message.
Surprisingly, putting the edge node in ‘NSX Maintenance Mode’ and Existing from it resolved the error.
We had to reboot all EDGE VM’s at customer location to resolve this issue.
Let’s check the BGP routes on the TOR.
All looks good here.
The DATA plane did not get affected in this entire activity at all. All workload VM’s had connectivity to the TOR.
Note: vMotion of any VM as well as Snapshot revert or any network related changes to VM will end up losing connectivity to the VM until NSX-T mangers are up & running.
Next, We had already verified routing. For testing purpose, we moved couple of test VM’s from primary site to dr site and it was all good. All newly connected VM’s were able to reach TOR. To move the workload from SiteA to SiteB, customer can opt for SRM (Site Recovery Manager) or any third party VMware compatible product.
We have successfully restored NSX-T manager on the DR site. The entire activity took 2.5 hours at the customer site. You will definitely face multiple issues while performing the DR and it is difficult to get this to success level at first run. At the same, you really don’t want to get used to this DR process. 😀
Thank you for reading the post. I hope this post has added some value to perform successful DR. Good Luck. Leave your comments if you face any issues and I should be able to give you some inputs.
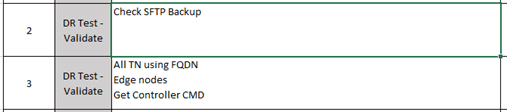
There are couple of validation steps from DR point of view. Let’s start with the DR Validation Phase. I have bullet point in excel sheet. Will discuss them one by one with screen captures.
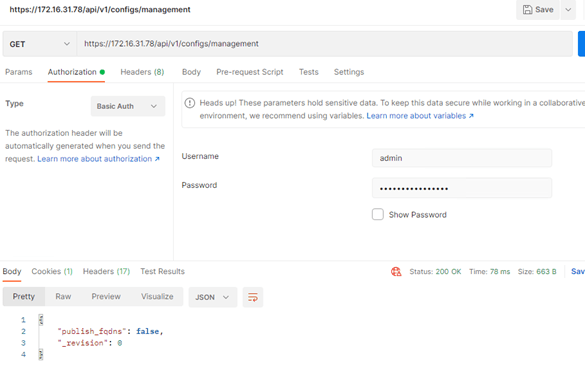
We need to make sure that the publish fqdn is set to ‘true’ in all nsx-t managers using the API call.
Here is the Get API call followed by PUT for all 3 NSX-T managers…
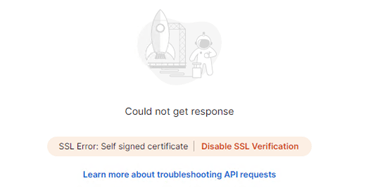
Paste the above command, change the Authorization type to ‘Basic Auth’, enter the credentials and send. You might get SSL error if it is not disabled already.
Click on Settings and disable SSL verification here…
and send the call again.
Note that the ‘publish_fqdns’ value is false. We need change this to ‘true’
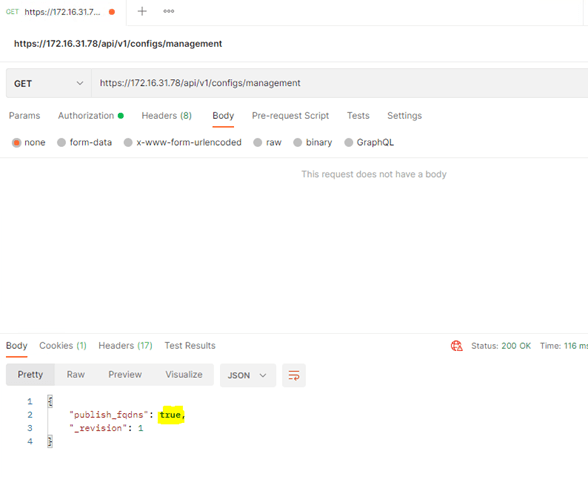
Change GET to PUT, copy 4 lines, Click on ‘Body’ change the radio button to ‘raw’ and select JSON from the drop down box at the end.
Paste copied 4 lines and change the value to ‘true’ and send it again.
Make sure to see the status as 200 OK.
Use the GET command again to verify…
Make sure that you see this value to ‘true’ on all 3 nsx-t managers.
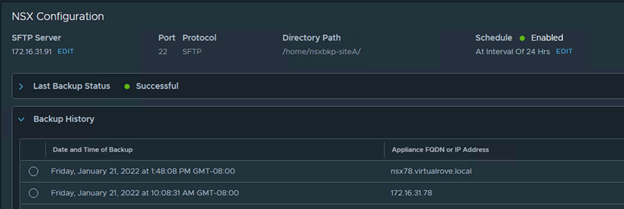
Let’s go back to NSX-T and run the backup again. Note that the ‘Appliance FQDN’ now lists the FQDN instead of an IP address.
All good till here. Move to next step in the excel sheet.
Next step is to verify that all transport nodes in the env using FQDN instead of an IP address.
Run ‘get controller’ command on each edge node. Note that the “Controller FQDN” lists the actual FQDN instead of an IP.
Next,
All good here. Move to next action item…
Change the TTL value from 1 hr to 5 mins of all NSX-T managers in DNS records properties.
We have completed all validation steps for DR test. We now move to actual DR test in the next part of this blog series. Thank You.
Hello Techies, This post will focus on NSX-T Disaster Recovery of the production env that I recently did for one of the customer. Post talks about my own experience and the procedure may differ as per your NSX-T design.
Here is the official VMware documentation which was referred while doing the activity.
To put the screenshots in this post, I have recreated the env in my lab. All captures in this post are from the lab that I created for testing purpose.
To set the right expectations, This DR was performed to backup and restore the Management Plane of NSX-T and not the Data Plane. Let me explain the existing env to understand the reason for doing Management Plane recovery only.
NSX-T Multisite Env
Both sites are active and configured with respective BGP routing to local Top of the Rack (TOR) switches.
Primary Site hosts the NSX-T Manager cluster
Backup of the NSX-T manager configured on SFTP server which sits at DR site.
Both sites have a vCenter, Edge VM’s and ESXi nodes.
Inter-Site link has jumbo frames enabled.
Both Sites hosts active workload. Also, Load Balancer, VPN as well as micro-segmentation is in place.
3rd Party solution is already configured to Migrate / Restart the VM’s on the DR site in case of disaster.
Since both sites are independent and have sperate EDGE VM’s and routing in place, only Management Plane needs to be restored. The 3rd party backup solution will restore the VM’s on the DR site in case of disaster.
Important Note: Data Plane (i.e. host transport nodes, edge transport nodes…) does not get affected even if you loose the NSX-T manager cluster for any reason. Routing and Connectivity to all workload VM’s works perfectly fine. In short, During the loss of Management Plane, Data Plane is still running as far you do not add any new workload. Also, keep in mind that the vMotion of any VM will end up in loosing the connectivity of that VM if it’s connected to NSX-T Overlay Network. So, it would be a good idea to disable DRS until you bring back the NSX-T manager cluster on the DR site.
The other disadvantage is you cannot make any configuration changes in NSX-T since the UI itself is not available.
Here are some additional bullet points…
You must restore to new appliances running the same version of NSX-T Data Center as the appliances that were backed up.
If you are using an NSX Manager or Global Manager IP address to restore, you must use the same IP address as in the backup.
If you are using an NSX Manager or Global Manager FQDN to restore, you must use the same FQDN as in the backup. Note that only lowercase FQDN is supported for backup and restore.
In most of the cases, FQDN is configured in the env which involves additional steps while restoring the backup. We will discuss more about it in detail. Let’s focus on configuring the backup.
Check my following post for configuring the backup for NSX-T env.
To begin this post, let’s have a look at the existing env architecture…
List of servers in the env with IP’s.
Here is the screen capture from the env…
Site A vCenter – Dubai
Site B vCenter – Singapore
As I said earlier, we are going to perform Management Plane recovery and not Data Plane, hence I did not configure edge, tier-0 etc on the Site-B. However, customer env had another edge cluster for site B and so the Tier-0. (as shown in the above diagram)
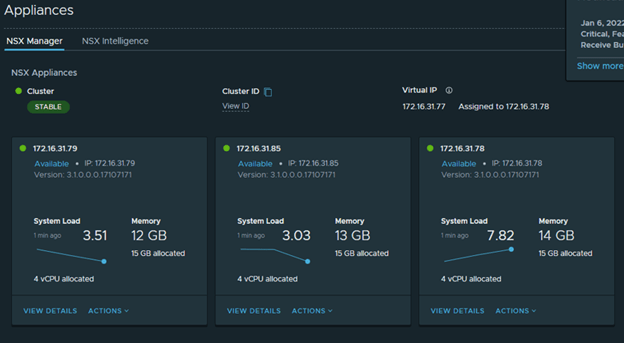
Stable NSX-T manager cluster, VIP assigned to 172.16.31.78
Dubai vCenter host transport nodes
Singapore vCenter host transport nodes
Just a single Edge Transport node deployed at primary site.
BGP Neighbors Configuration…
Note the source addresses. We should see them on TOR as neighbors.
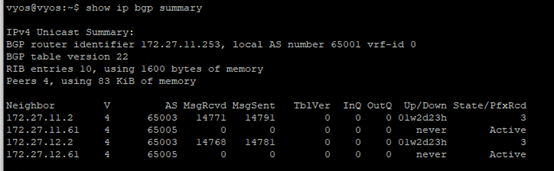
Let’s have a look at the TOR…
Established 172.27.11.2 & 172.27.12.2 neighbors.
BGP routes on the TOR.
Let’s create a new segment and to see if the new routes appears on the TOR.
We should see 10.2.98.X BGP route on the TOR.
Perfect. We have everything in place to perform the DR test and check the connectivity once we bring the NSX-T manager cluster UP in the DR site.
That’s it for this post. We will discuss further process in the next part of this blog series.
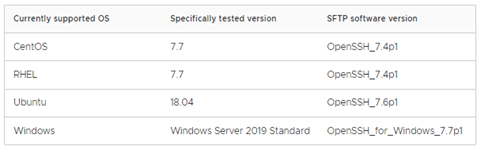
For NSX-T 3.1, following are supported operating systems as per the VMware documentation, however it also says that other software versions might work. SFTP is the only supported protocol for now.
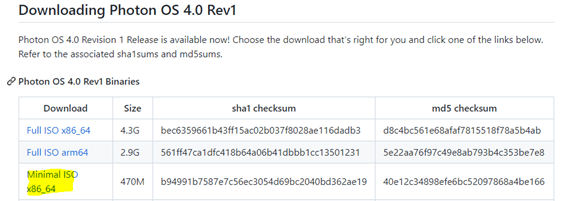
I remember having discussion with someone using VMware Photon OS for NSX-T backup. It is based on Linux OS and lightweight too. Does not consume many resources. Available for download at following location…
Installation is straight forward. Just mount an ISO on a VM and follow the instructions to install it. Then we just run couple of commands to setup the VMware Photon OS.
Here is the screen capture of the commands that has been run to setup the sftp server.
Add the sftp user… root@VirtualRove [ ~ ]# useradd siteA
Add a group… root@VirtualRove [ ~ ]# groupadd bkpadmin
Add a user in the group… root@VirtualRove [ ~ ]# groupmems -g bkpadmin -a siteA
Set the password for user root@VirtualRove [ ~ ]# passwd siteA
New password: Retype new password:
passwd: password updated successfully
The chown command changes user ownership of a file, directory, or link in Linux chown USER:[GROUP NAME] [Directory Path] root@VirtualRove [ ~ ]# chown siteB:bkpadmin /home/nsxbkp-siteB/ root@VirtualRove [ ~ ]#
And that completes the configuration on Photon OS. We are good to configure this directory as backup directory in NSX-T.
Couple of things… The Photon OS is not enabled for ICMP ping by default. You must run following commands on the console to enable ping. iptables -A OUTPUT -p icmp -j ACCEPT iptables -A INPUT -p icmp -j ACCEPT
Also, Root account is not permitted to login by default. You need to edit the ‘sshd_config’ file located at ‘/etc/ssh/sshd_config’ You can use any editor to edit this file…
vim /etc/ssh/sshd_config
Scroll it to the end of the file and change following value to enable ssh for root account…
Change the value from ‘no’ to ‘yes’ and save the file. You should be able to SSH to photon OS.
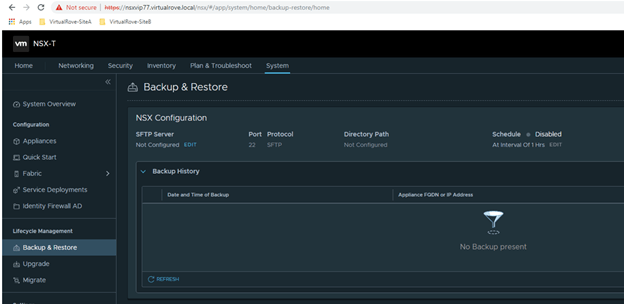
Let’s move to NSX-T side configuration. Login to NSX-T VIP and navigate to System> Backup & Restore…
Click on Edit for SFTP server and fill in all required information. FQDN/IP : is your sftp server Port : 22 Path : We created this in our above steps. Username, Password & Passphrase.
Save
It will prompt to add for Fingerprints.
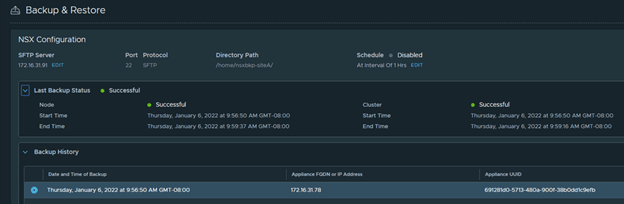
Click on ‘Start Backup’ once you save it.
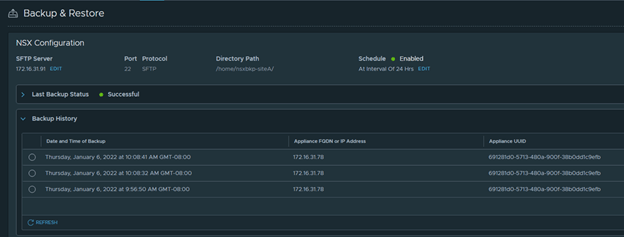
You should see successful backup listed in the UI.
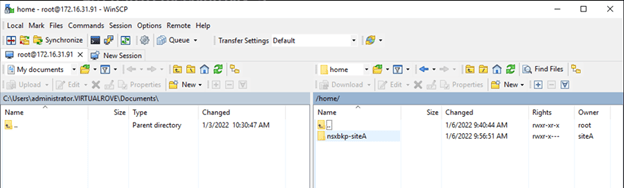
Additionally, you can use WinSCP to login to photon and check for backup directory. You should see recent backup folders.
You also want to set an interval to backup NSX-T configuration as pe the mentioned schedule. Click on ‘Edit’ from NSX-T UI backup page and set an interval.
I preferred everyday backup, so I set it up to 24 hrs interval.
Check your manager cluster to make sure its stable.
And take a backup again manually.
That’s it for this post.
We have successfully configured SFTP server for our NSX-T environment. We will use this backup to restore it at DR site in case of site failure or in case of NSX-T manager failure for any reason.