In the previous blogpost, we discussed Transport Zones & Uplink Profiles. Please find the links below for all posts in this series.
NSX 4.0 Series Part1-NSX Manager Installation
NSX 4.0 Series Part2-Add a Compute Manager & Configure the NSX VIP
NSX 4.0 Series Part3-Create Transport Zones & Uplink Profiles
NSX 4.0 Series Part4-Prepare Host Transport Nodes
NSX 4.0 Series Part5-Migrate workload from VDS To NSX
In this blogpost, I will configure the host transport node for NSX. Basically, in this process, NSX vibs are installed on the ESXi node via NSX Manager. They are also referred to as kernel module. You can see the number of installed vibs on esxi by running following command,
Open up a putty session to one of the esxi and run this command,
esxcli software vib list

Filter the one for NSX by running following command,
esxcli software vib list | grep nsx

We don’t see any since we have not configured this host for NSX yet. Let’s revisit this after the NSX installation.
Note: Preparing ESXi host for NSX does not need host reboot.
Before we prep an esxi host for NSX, check the name of VDS,
vCenter> Click on ESXi host> Configure> Virtual Switches,
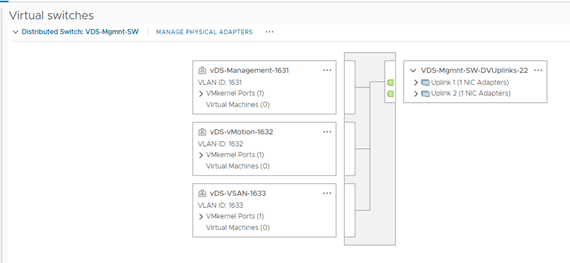
Note the VDS name. We will revisit here after NSX vibs installation.
Login to NSX VIP & navigate to System >Nodes >Host Transport Nodes.
Change the “Managed by” drop down to vCenter. Notice that the ‘NSX Configuration’ column shows ‘Not Configured’.
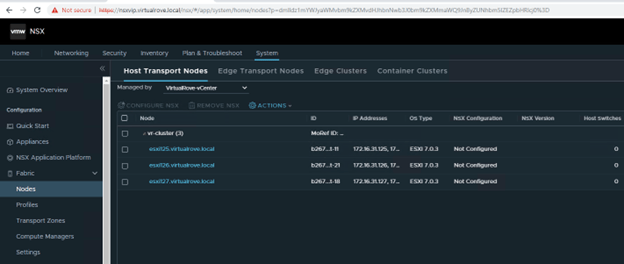
Select the first host & click on ‘Configure NSX’
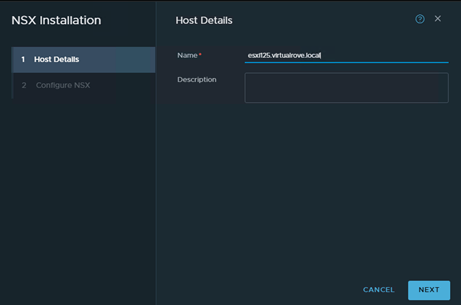
Next,

Mode: Standard
Name: Select appropriate VDS from vCenter
Transport Zone: Select VLAN TZ that we created earlier.
Uplink Profile: VR-UplinkProf-01
Scroll down to Teaming policy uplink mapping,

Select Uplink1 & Uplink2 respectively.

Here, you are mapping vCenter VDS uplinks to NSX.
Click Finish to begin the installation.
Monitor the progress.

I got an error message here,

Failed to install software on host. Failed to install software on host. esxi127.virtualrove.local : java.rmi.RemoteException: [InstallationError] Failed to create ramdisk stagebootbank: Errors: No space left on device cause = (272, ‘Cannot reserve 272 MB of memory for ramdisk stagebootbank’) Please refer to the log file for more details.
Not sure why this came up. I have enough of compute resources in that cluster. Clicked on “Resolve”

And it was a success. 😊
Next, I see another error.

“The controller has lost connectivity.”
Clicked on “SYNC” here and it was all good.
1st ESXi node has been configured and ready for NSX. Verify the NSX version and node status.

Go back to vCenter> ESXi Host> Configure> Virtual Switches,
We now see the “NSX Switch” added as a prefix to VDS name.

Let’s re-run the command,
esxcli software vib list | grep nsx

We now see all NSX vibs installed on this host.
Let’s move to the next ESXi node and configure it in same way.

All 3 ESXi hosts have been configured for NSX.

That’s all for this post.
I hope that the blog has valuable information. See you all in the next post.
Are you looking out for a lab to practice VMware products…? If yes, then click here to know more about our Lab-as-a-Service (LaaS).
Leave your email address in the box below to receive notification on my new blogs.
