No more NSX-V & NSX-T…!!!
It’s only NSX from version 4 onwards.
This series of NSX 4.0 includes following parts.
NSX 4.0 Series Part1-NSX Manager Installation
NSX 4.0 Series Part2-Add a Compute Manager & Configure the NSX VIP
NSX 4.0 Series Part3-Create Transport Zones & Uplink Profiles
NSX 4.0 Series Part4-Prepare Host Transport Nodes
NSX 4.0 Series Part5-Migrate workload from VDS To NSX
It’s been a while since I wrote my last blog post. And finally, I found something interesting to write about. Even if this blog starts with NSX installation and configuration, am sure you will definitely find something more interesting as and when I write more. We will be focusing on NSX Security, DFW & Micro-Segmentation in upcoming blogs.
Let’s get started…
First thing first, Release Notes. It’s always good to read release notes for any of the newly launched products. Here is the VMware official link for NSX 4.0…
https://docs.vmware.com/en/VMware-NSX/4.0/rn/vmware-nsx-4001-release-notes/index.html
It’s a major release focusing on NSX networking, security and services. As it mentions in the release notes,
Some of the major enhancements are the following:
- IPv6 external-facing Management Plane introduces support for IPv6 communication from external systems with the NSX management cluster (Local Manager only).
- Block Malicious IPs in Distributed Firewall is a new capability that allows the ability to block traffic to and from Malicious IPs.
What interests me most are,
Distributed Firewall
- Block Malicious IPs in Distributed Firewall is a new capability that allows the ability to block traffic to and from Malicious IPs. This is achieved by ingesting a feed of Malicious IPs provided by VMware Contexa. This feed is automatically updated multiple times a day so that the environment is protected with the latest malicious IPs. For existing environments, the feature will need to be turned on explicitly. For new environments, the feature will be default enabled.
- NSX Distributed Firewall has now added support for these following versions for physical servers: RHEL 8.2, 8.4, Ubuntu 20.04, CentOS 8.2, 8.4.
In this series of blogs, I will be focusing on NSX 4.0 env setup and later NSX Networking Security, Distributed firewall, Micro-Segmentation & will also touch base on IDS/IPS.
With that let’s get started with NSX 4.0 manager installation. This is pretty simple and straight forward process to deploy NSX manger like previous versions. Download the OVA file from the below link.
Make sure to download the 1st OVA file from the link.
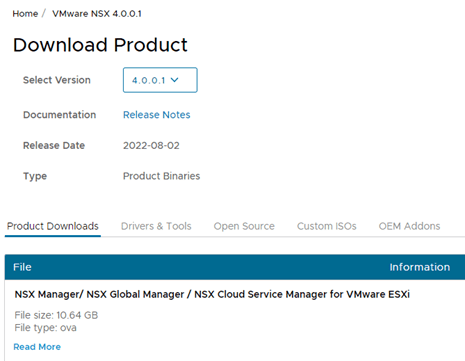
If you do not have access to download the file, you will see following message…
You either are not entitled or do not have permissions to download this product.
Check with your My VMware Super User, Procurement Contact or Administrator.
If you recently purchased this product through VMware Store or through a third-party, try downloading later.
Not to worry. Follow this link to get the trial version along with the trial license key…
Once you have the downloaded ova file, login to your vCenter and import the ova file. Before we import the ova, let me show you my existing env.
I have one vCenter with 3 VSAN enabled ESXi hosts.

Each host has 3 disks. All disks have been claimed for VSAN cluster.
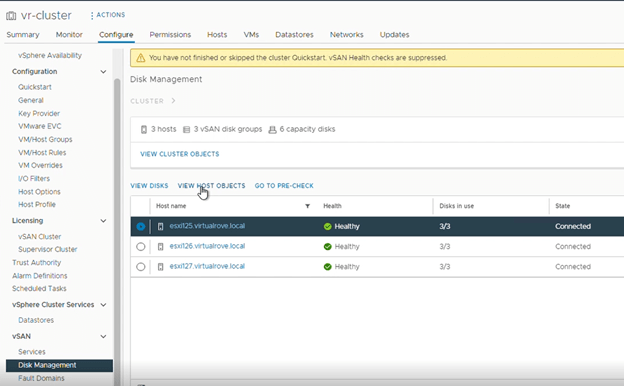
Here is the total compute capacity for this lab,

VDS has been configured in the env and it has 2 physical uplinks,
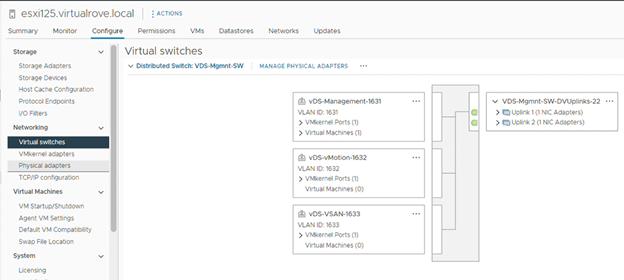
Each host has 3 vmkernel adaptors.
Management – VLAN 1631
vMotion – VLAN 1632
VSAN – VLAN 1633

I know that this is basic and anyone looking at the NSX blog will defiantly know this. However, believe me, I have seen networking (physical) background people working on NSX DFW & LB without having complete understanding of base vSphere setup. I have detailed blog on how to configure base vSphere setup here,
Anyways, let’s get going with NSX manager installation.
Let’s have a look at the NSX manager compute capacity requirements. The thin virtual disk size is 3.8 GB and thick virtual disk size is 300 GB.

Import the NSX ova,

Map the NSX ova,

Fill out / select appropriate options in the wizard and hit continue. Make sure to create a DNS record for 1st NSX Manager.

Fill out the required parameters in the wizard. And we should be good to click on finish.

If any of the required parameters are not as expected, the ova will get deployed with hostname.local. In this case, you must redeploy the ova.
Power ON the NSX VM after the deployment. Wait for 10 mins for all services to start and login.

Once logged in, Click on TOP right corner question mark > About, to check the version.

Review the dashboard,

Click on System> Appliances>, and make sure the cluster status is Stable.

Since it’s a lab env, We will not deploy remaining appliances. However, here is the link if you want to deploy 2 more appliances,
Before you deploy 2 more appliances, you need to add a Computer Manager. We will see the steps to add a Compute Manager in my next blog.
That’s all for this post.
I hope that the blog has valuable information. See you all in the next post.
Are you looking out for a lab to practice VMware products…? If yes, then click here to know more about our Lab-as-a-Service (LaaS).
Leave your email address in the box below to receive notification on my new blogs.
