We need our NSX-T networks to communicate with outside world and some network should also reach to internet. To achieve this, we need NSX Edge VM. Edge VM can perform routing services, east west routing as well as north south routing. Edge along with Tier 0 & Tier 1 routers provides routing services. In this post, we will focus on Edge deployment types and its configuration.
NSX-T 3.0 Series: Part1-NSX-T Manager Installation
NSX-T 3.0 Series: Part2-Add additional NSX-T Manger & Configure VIP
NSX-T 3.0 Series: Part3-Add a Compute Manager (vCenter Server)
NSX-T 3.0 Series: Part4-Create Transport Zones & Uplink Profiles
NSX-T 3.0 Series: Part5-Configure NSX on Host Transport Nodes
NSX-T 3.0 Series: Part6-Deploy Edge Transport Nodes & Create Edge Clusters
NSX-T 3.0 Series: Part7-Add a Tier-0 gateway and configure BGP routing
NSX-T 3.0 Series: Part8-Add a Tier-1 gateway
NSX-T 3.0 Series: Part9-Create Segments & attach to T1 gateway
NSX-T 3.0 Series: Part10-Testing NSX-T Environment
NSX-T Edge VM can be deployed using following methods.
- NSX Manager: This method is recommended by VMware and straight forward.
- vSphere Web Client: This method requires you to download the OVA file from VMware site and deploy it manually. In this method, you must manually join the Edge VM with NSX Management plane. Rest configuration remains same.
- Bare Metal Edge Server: In this method, you can install an ISO on physical server using PXE server and then join it to management plane.
We will continue with VMware recommended method. Additional information can be found on here.
Let’s get started with the deployment.
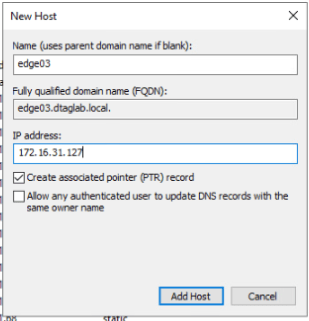
Create a DNS record for the new EDGE VM.
Log into NSX-T Manager VIP and navigate to System >Nodes >Edge Transport Nodes >Click on ‘ADD EDGE VM’

Provide Name, FQDN & Select Form Factor as ‘Medium’

Set the password for CLI and Root User. Make sure to set the password according to password policy.
At least 12 characters
At least one lower-case letter
At least one upper-case letter
At least one digit
At least one special character
At least five different characters
Allow SSH Login: Yes
Allow Root SSH Login: Yes
SSH Access is required for troubleshooting if routes doesn’t show up.

Select Compute Manager, Cluster & Datastore.

Select Static and enter Management IP & Gateway.
Click on ‘Select Interface’ and Select your management network.
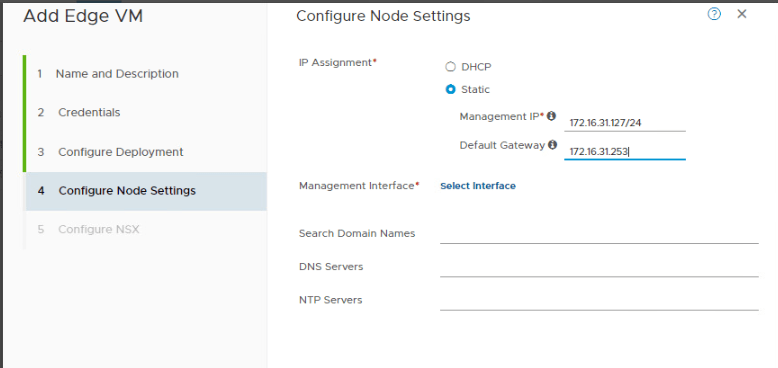
Enter remaining information and click Next.

Edge Switch Name: Give an appropriate name.
Transport Zone:
Select ‘Horizon-OverlayTZ’. This is the same Overlay TZ that we selected for Host.
Select ‘Horizon-Edge-VLAN-TZ’. We created this for Edge. Check my earlier post.
Uplink Profile: ‘uplink-profile-2713’
IP Assignment: I have selected ‘Static’. You can also use Pool if it is per created. These will be your EDGE VM TEP IP’s.
Fill out gateway and subnet mask and move to next section.

Map you Edge uplinks with the Uplink portgroups that you have created in your vCenter. Make sure that these port groups are Trunk for all VLAN traffic to pass.

We will use an IP address from these uplink portgroups to form BGP neighborship with TOR when we create Tier-0 router. This part of the edge is little tricky and takes time understand. I have tried to keep it as simple as possible.
Click Finish and check if you see a VM getting deployed in vCenter.

Edge VM will appear under ‘Edge Transport Node’

Monitor the status.

Edge VM has been installed and configured successfully. We now move to Edge Cluster.
Navigate to System >Nodes >Edge Cluster >Click on ADD

Name: HorizonEdgeClust
Edge Cluster Profile: Default profile is selected automatically.
Transport Node: Move ‘edge03’ from Available to Selected.
Click Save.

We are done with creating Edge Cluster. This cluster will be used when we create Tier-0 Router.
You can deploy one more Edge VM and add it to edge cluster at a later stage.
That’s it for this post. I hope that the information was helpful. 😊
Are you looking out for a lab to practice VMware products..? If yes, then click here to know more about our Lab-as-a-Service (LaaS).
Subscribe here to recevie emails for new posts on this website.
