Upgrading VMware Cloud Foundation to version 9.1: Part 3 – NSX Manager, vCenter & ESXi Upgrade

Step 6: Upgrade NSX Manager

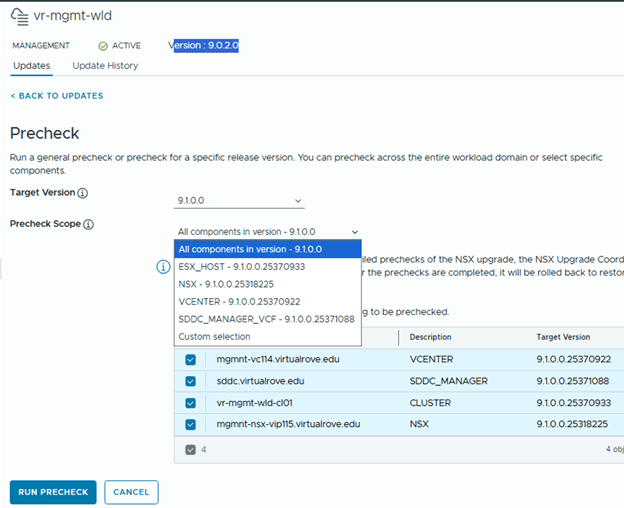
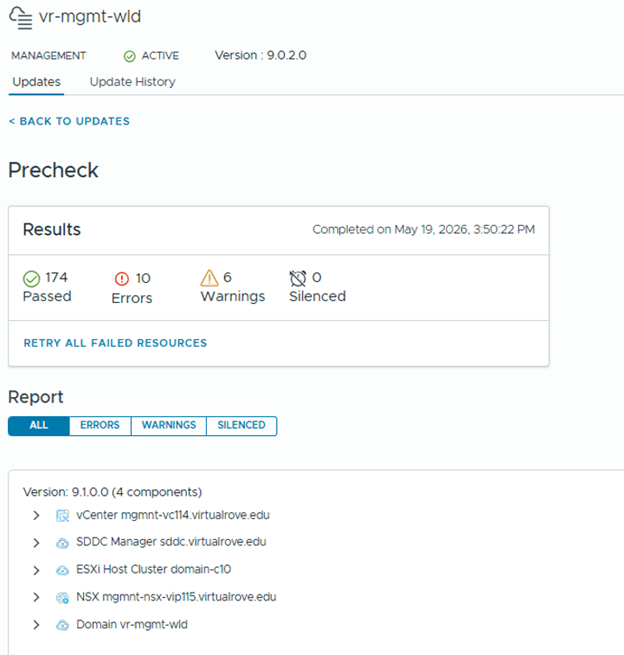
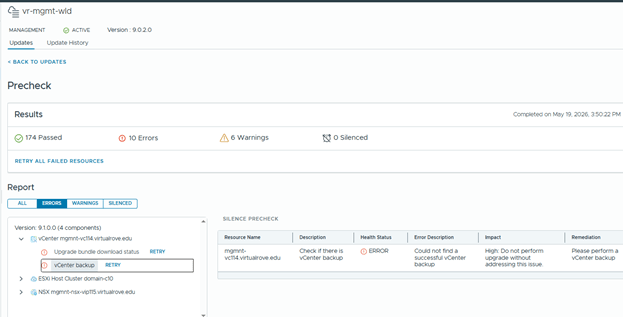
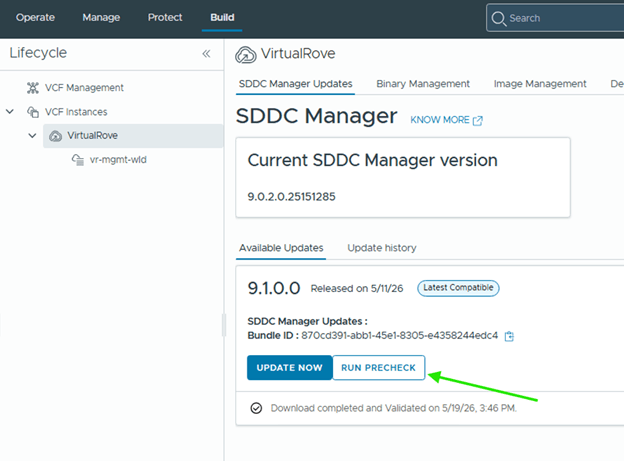
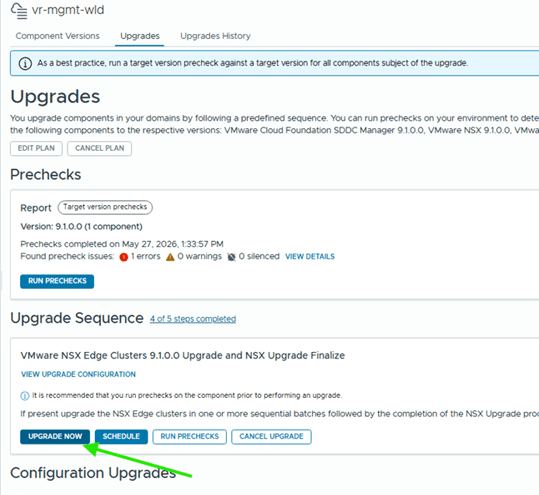
Run NSX upgrade prechecks and resolve any reported issue before starting the upgrade.

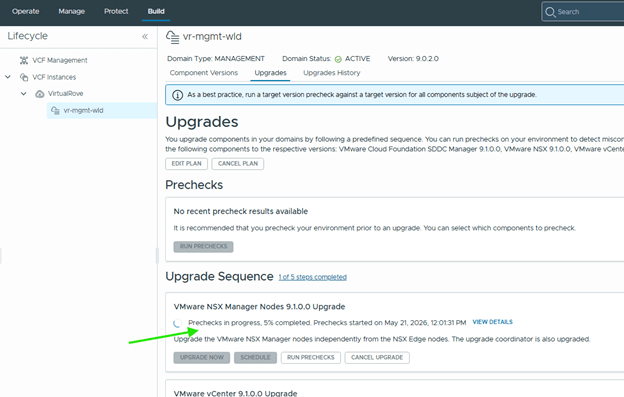
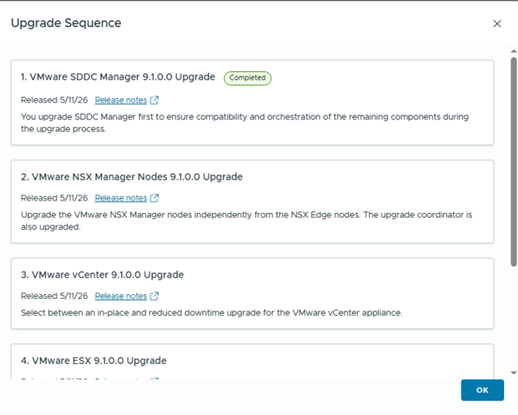
You can also check high level upgrade sequence,

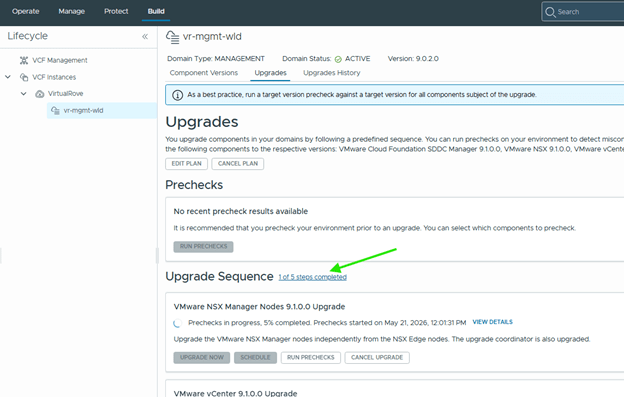
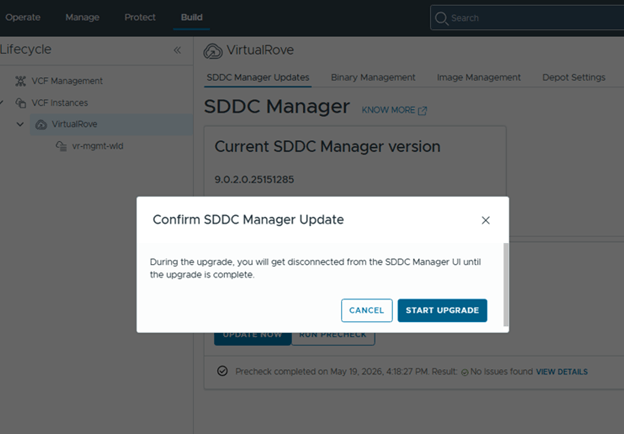
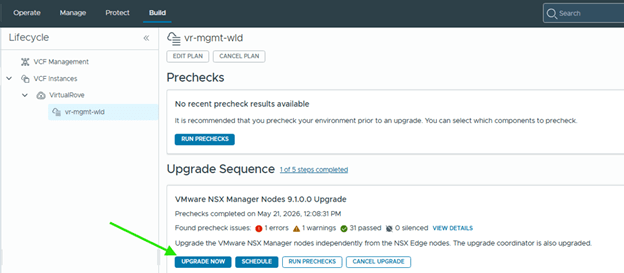
Once all prechecks completes, you can start the upgrade or schedule it,

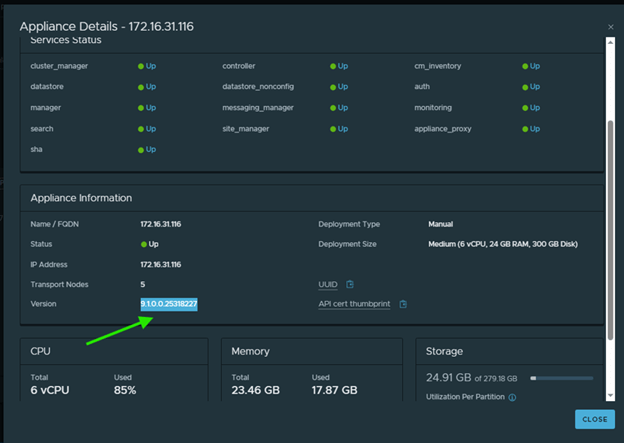
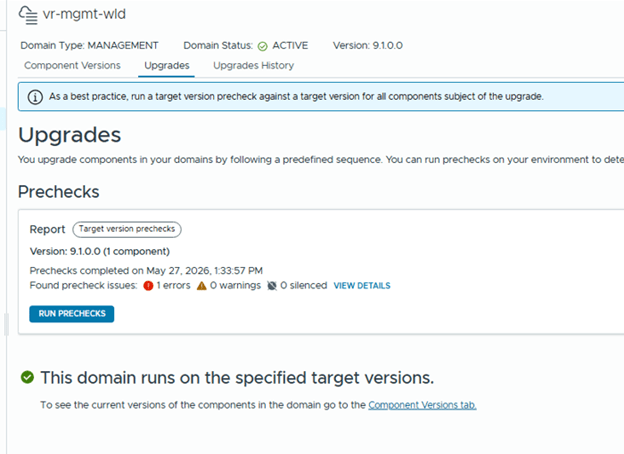
Important: You may not see the NSX version fully reflected immediately after the NSX Manager upgrade. NSX is not considered fully upgraded until all ESX hosts in every vSphere cluster that shares the NSX Manager are upgraded to 9.x and the NSX finalize procedure completes.

However, the latest version can be seen on NSX Appliance page,

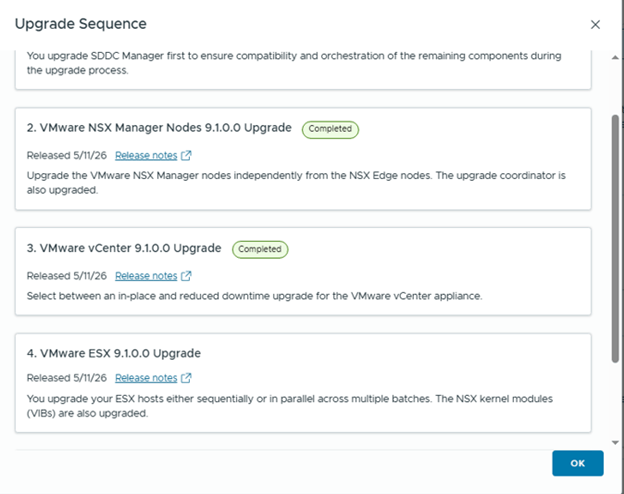
After NSX is upgraded, it disappears from the active upgrade list and the next component available for upgrade which is vCenter.

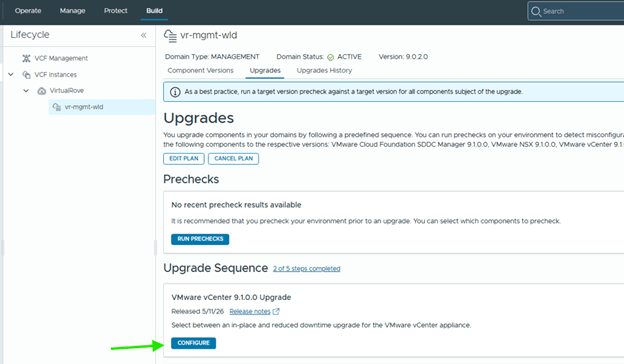
Step 7: Upgrade vCenter

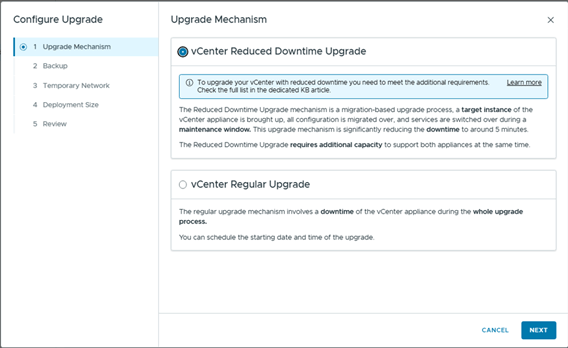
The vCenter upgrade workflow provides two upgrade options.

vCenter Reduced Downtime Upgrade: This method uses a migration-based approach. In this approach, a new vCenter appliance is deployed and the current vCenter data and configuration is copied to it. During the preparation phase of a reduced downtime upgrade, the source vCenter instance and all resources remain online. The only downtime occurs when the source vCenter instance is stopped, the configuration is switched over to the target vCenter, and the services are started.

vCenter Regular Upgrade: Requires downtime of the vCenter instance during the entire upgrade process.

The reduced downtime method requires an additional temporary IP address from the VM Management subnet. Provide the required details and complete the wizard.

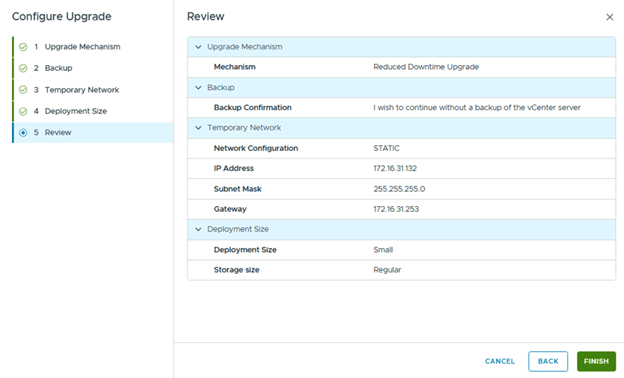
Completing this wizard prepares the upgrade configuration but does not immediately trigger the upgrade.

Return to VCF Operations to schedule the vCenter upgrade and cutover.

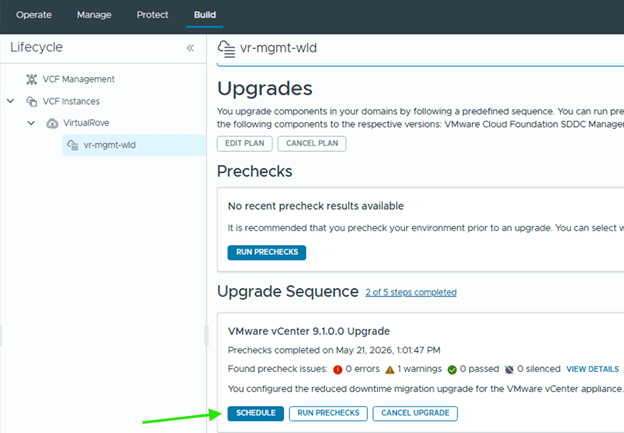
Choose appropriate options here,
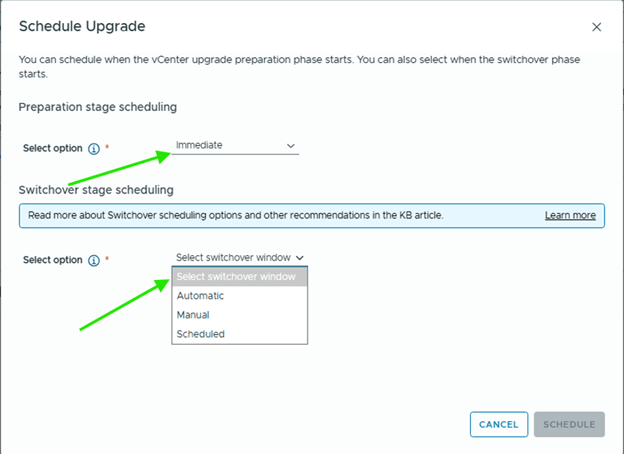
And schedule.

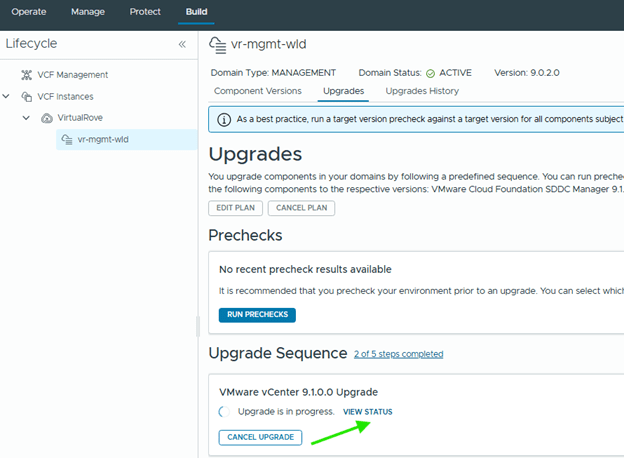
Upgrade status can be monitored,

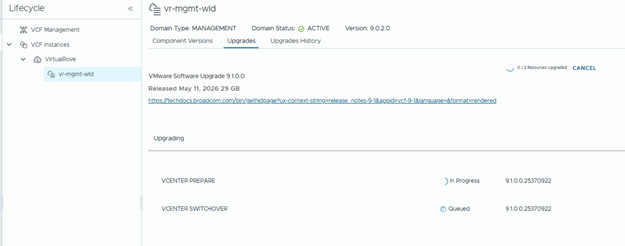
During the reduced downtime upgrade, a temporary vCenter appliance is created and data is migrated to it. After the workflow completes, review the upgrade sequence again to confirm the next available component.

Step 8: Configure and Upgrade ESX Hosts

Before upgrading ESX hosts, create and assign the correct vSphere Lifecycle Manager image with the required ESX version and vendor add-ons.

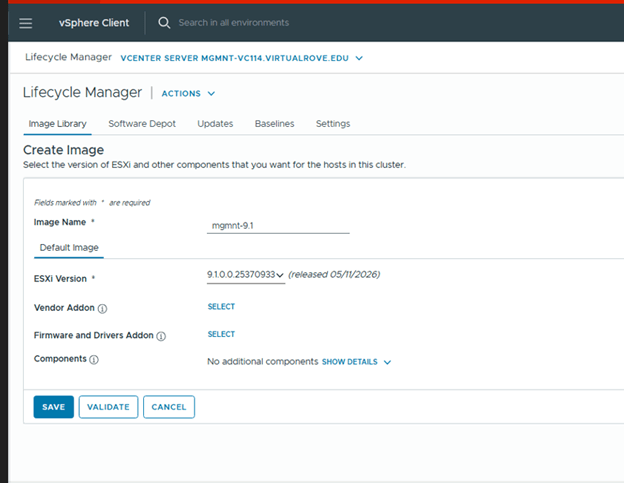
Create and assign the correct image with the target ESX version and vendor add-ons.

Login to MGMNT vCenter> Lifecycle Manager> Create New Image,

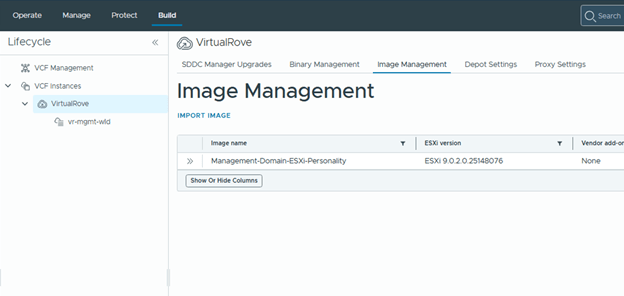
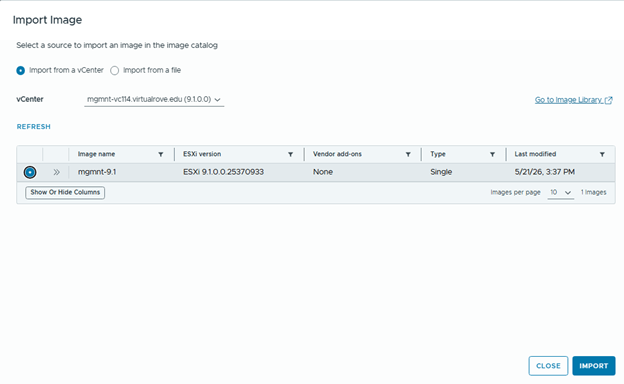
Then import the newly created image into VCF Operations.

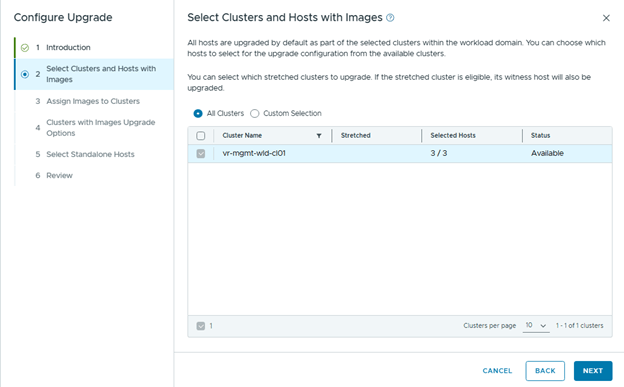
Assign the newly created image in “configure upgrade” wizard,

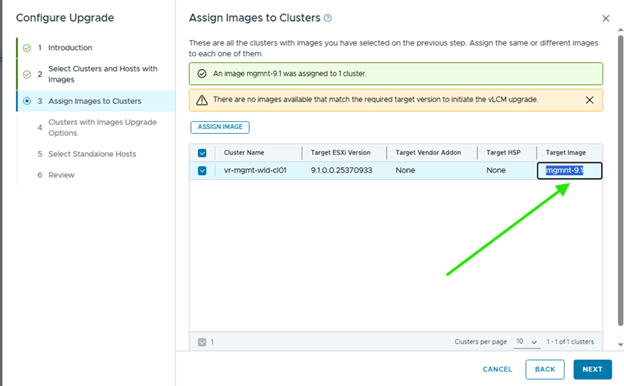
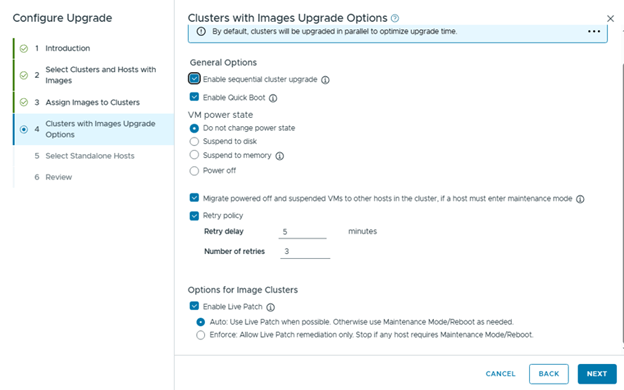
Choose the appropriate upgrade options. In my lab, I selected the sequential upgrade option.

Review and Finish,

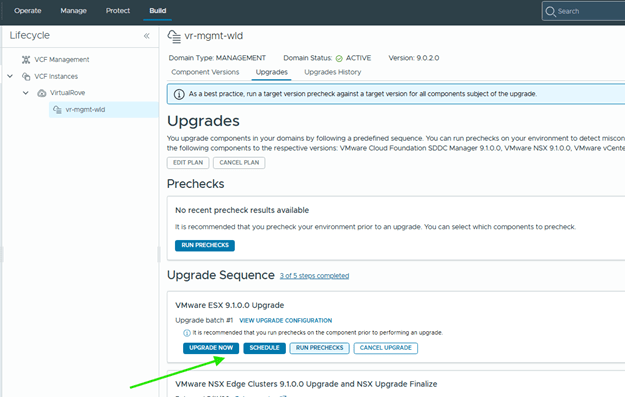
Then you can schedule or immediate upgrade from the upgrade page,

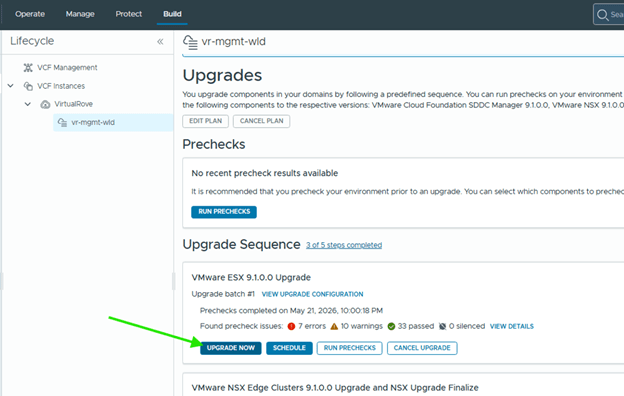
Got an error here in prechecks,

Error – The current vCenter is not licensed by a license server.

I’ve put together a short blog post on it,

VCF Upgrade Precheck Error: vCenter Is Not Licensed by a License Server

Back to upgrade process and hit upgrade for esxi,
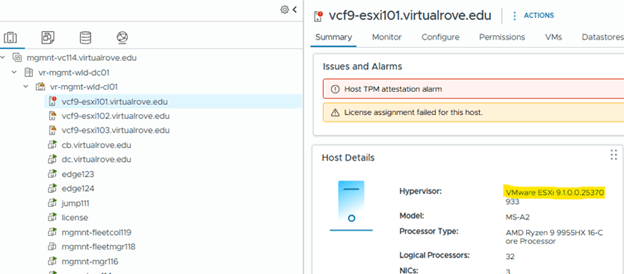
Monitor the status,

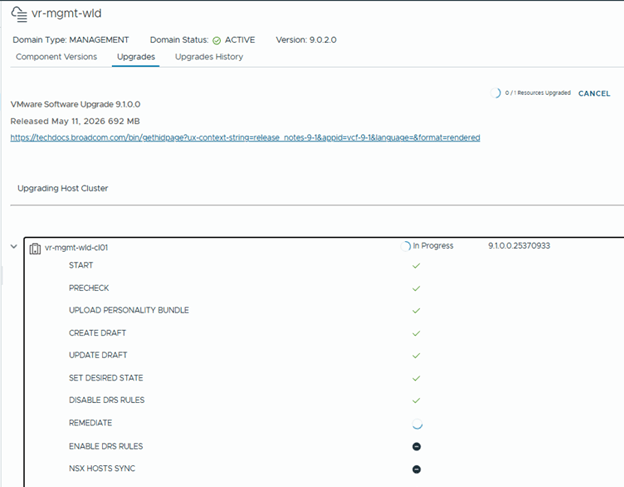
At a high level, each ESX host enters maintenance mode, virtual machines are migrated to other hosts, and the host is upgraded before moving to the next host.

After the workflow completes, all ESX hosts are upgraded to version 9.1.

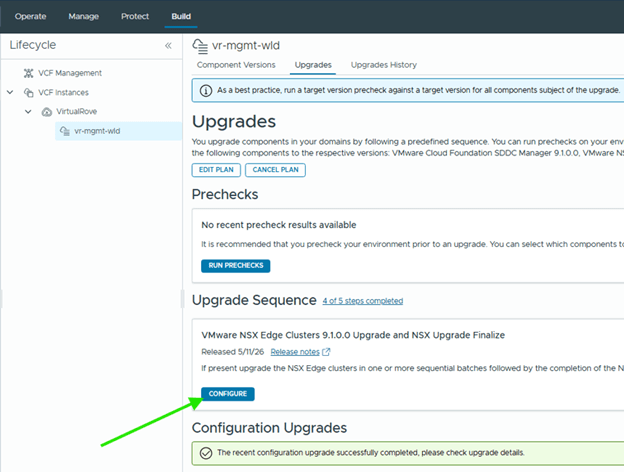
Step 9: Upgrade Edge Clusters

The final lifecycle step is to upgrade the NSX Edge clusters in the environment.

Click on Configure,

My lab environment does not have any Edge clusters, so I proceeded through the workflow and completed the step.

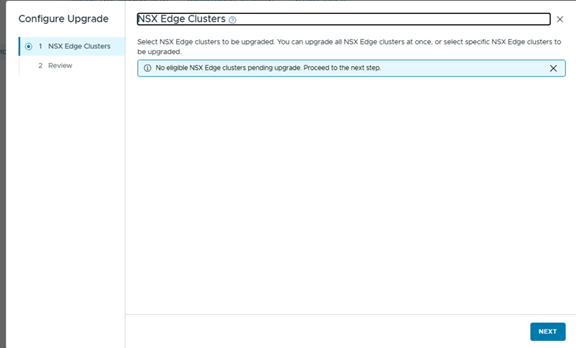
Click Upgrade on last step,
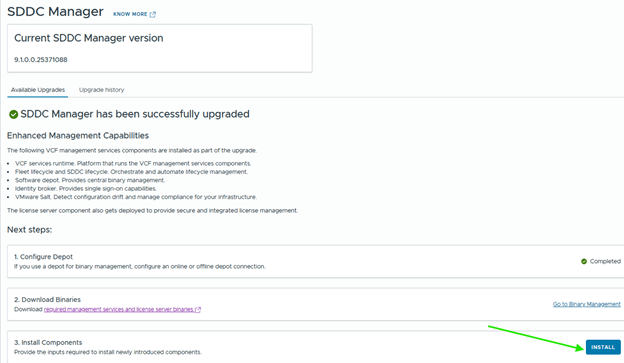
Upgrade Complete

At this point, the management domain upgrade from VCF 9.0.2 to VCF 9.1 is complete.

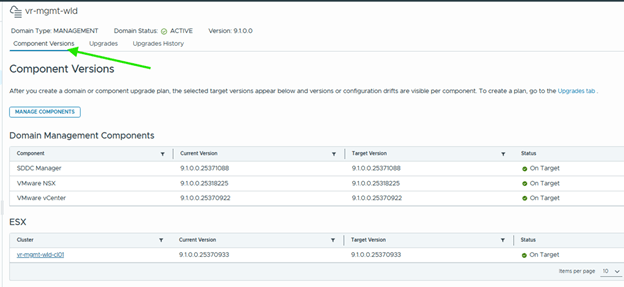
As a final validation, review the Component Versions tab and confirm that all upgraded components report the expected VCF 9.1 versions.

After the management domain is upgraded, follow the same procedure for each workload domain in the environment.

Here is the official documentation link for an upgrade process,

Upgrading to VMware Cloud Foundation 9.1

Reminder: This blog covers the upgrade process from VCF version 9.0.2 to VCF 9.1. If you are upgrading from VCF 5.x to VCF 9.1, review the official documentation and supported upgrade path before starting.

The next and final blog in this series will cover post-upgrade validation checks after upgrading to VCF 9.1. Stay tuned.

Lessons Learned and Practical Notes

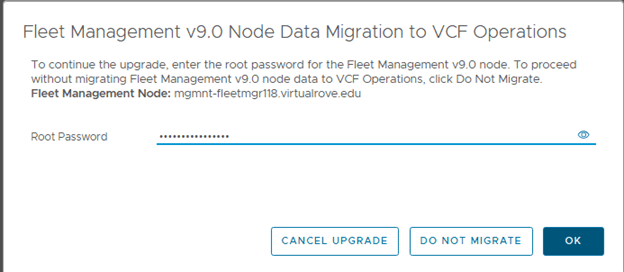
  • The upgrade process automatically decommissions the standalone VCF Operations Fleet Management appliance. Fleet management capabilities move into the updated VCF Operations and management services architecture.
  • VCF Identity Broker should be moved to the shared VM Management network before the upgrade if it is currently deployed on a different port group.
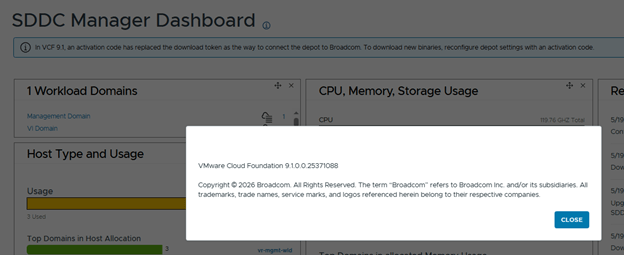
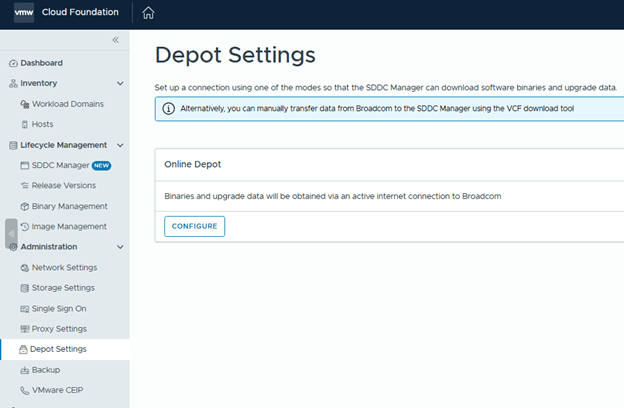
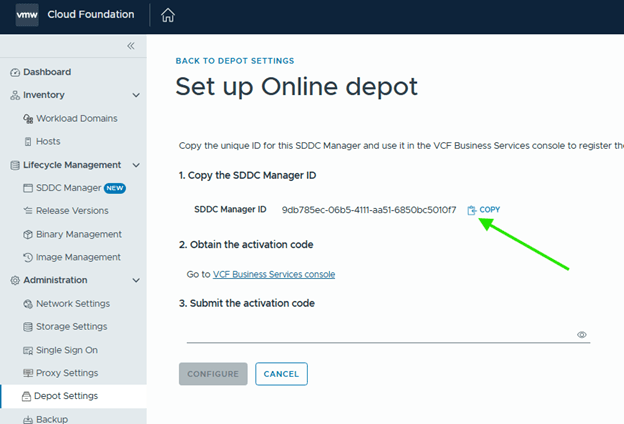
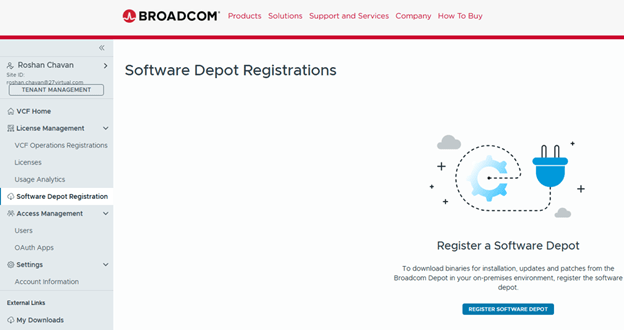
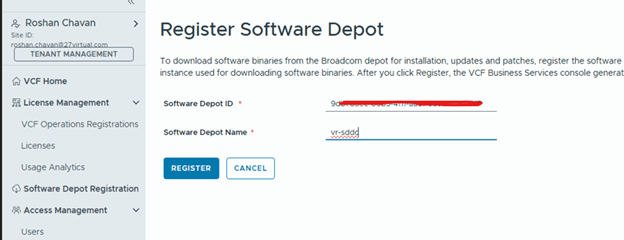
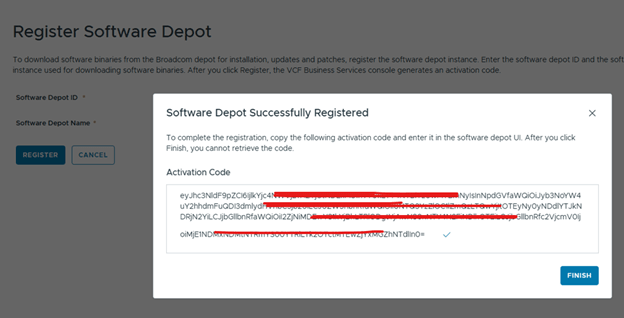
  • After upgrading SDDC Manager to version 9.1, reconfigure the online or offline depot to use an activation code from the VCF Business Services console instead of a download token.
  • Embedded VCF Identity Broker is automatically upgraded during the vCenter instance upgrade.
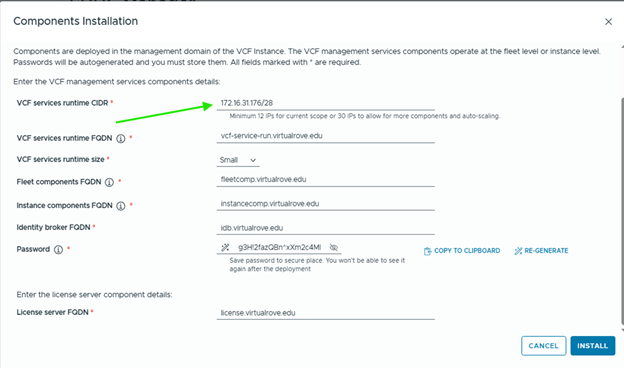
  • You must provide a dedicated IP range for the VCF Services Runtime. A minimum of 12 IP addresses is required.
  • After deployment, do not move the VCF management services VMs to a different resource pool or VM folder. If you move the VMs to a new resource pool or VM folder, subsequent patching, deployment, or scale out operations fail.
  • If you have VCF Identity Broker 9.0.x, identity broker 9.1 deployment is skipped and you can later upgrade. 
  • Embedded VCF Identity Broker is automatically upgraded during the vCenter instance upgrade.
  • After VCF management services are deployed, if VCF Operations is in connected mode, the license server is automatically registered and licenses are transferred to the license server.

Hope the content is helpful. Good luck with an upgrade. And post comments if you encounter new errors or if there are new lessons learned. Thank You.

Are you looking out for compute resources (CPU / Memory / Storage) to practice VMware products…? If yes, then click here to know more about our Lab-as-a-Service (LaaS).

Upgrading VMware Cloud Foundation to version 9.1: Part 2 – SDDC Manager upgrade & Inro to VCF Management Services

Step 3: Upgrade SDDC Manager

Log in to SDDC Manager and navigate to Binary Management > Upgrade Binaries. Select VCF 9.1 and download the required upgrade bundle.

You can also perform binary management from VCF Operations. Before downloading binaries, make sure the software depot is configured correctly and reachable.

Next, run a precheck against the management workload domain from VCF Operations.

Ops> Build> Lifecycle> Select mgmnt wld under the vcf instance and click on “Run Precheck”

Target Version: 9.1
Precheck scope: All

Run Precheck,

Review all failed checks and resolve them before continuing.

In my lab, I saw a few minor issues related to missing backups and support bundles. Each precheck failure included details and remediation guidance.

After resolving issues, select Retry All Failed to rerun the failed checks.

Mine came down to 6 errors from 10 after resolving some.

Note: Some warnings or errors may not block the upgrade, but you should understand each reported issue before proceeding.

Once done, go back to the instance level, and perform prechecks against the SDDC manager again,

Once all required issues are addressed, start the SDDC Manager upgrade and monitor the workflow for failures.

Monitor the upgrade for any errors,

After the workflow completes successfully, SDDC Manager is upgraded to VCF 9.1.

Step 4: Reconfigure Software Depot Authentication

After upgrading SDDC Manager to version 9.1, log in to SDDC Manager and navigate to Administration > Depot Settings. Reconfigure your online or offline depot to use an activation code from the VCF Business Services console instead of the previous download token model.

Copy the depot registration ID and log in to the VCF Business Services console.

From the Business Services console (VCF Business Services), go to Software Depot Registration and register the SDDC Manager depot.

Paste the ID and Register,

Copy the generated activation code, but do not complete the registration workflow until the code has been applied in SDDC Manager.

SDDC Manager> Enter the copied code and configure,

Step 5: Deploy VCF Management Services

Click on the instance level,

In VCF Operations, return to the instance-level upgrade workflow. The first task, Configure Depot, should now show as completed.

VCF 9.1 introduces enhanced management capabilities through a new set of VCF management services.

The following VCF management services components are installed as part of the upgrade.

  • VCF services runtime. Platform that runs the VCF management services components.
  • Fleet lifecycle and SDDC lifecycle. Orchestrate and automate lifecycle management.
  • Software depot. Provides central binary management.
  • Identity broker. Provides single sign-on capabilities.
  • VMware Salt. Detect configuration drift and manage compliance for your infrastructure.
  • The license server component also gets deployed to provide secure and integrated license management.

Next, download the required binaries for the additional VCF 9.1 management services.

Required Binaries:
1. Fleet Lifecycle
2. SDDC Lifecycle
3. VCF Services Runtime
4. Salt RaaS
5. Salt Master
6. VCF Identity Broker
7. Software Depot
8. Telemetry
9. License Server

Go to the Binary Management> Select the version> Install Binaries,

Select all required binaries and download it,

Once downloaded, back to upgrade page install all required components,

Enter the password and connect,

This is one of the areas where the workflow can become confusing, especially when providing the VCF Services Runtime CIDR.

VCF Servies runtime CIDR

VCF Services Runtime CIDR: Provide a dedicated IP range for the VCF Services Runtime. A minimum of 12 IP addresses is required. In my lab, I allocated 12 IP addresses from the VM Management network in CIDR format.

Create DNS records for the new management services components.
VCF Service Runtime
Fleet Components
Instance Components
Identity Broker
License Server

During the upgrade of the first VCF instance that hosts VCF Operations, the following management services are deployed.

VCF services runtime
Fleet lifecycle
SDDC lifecycle
Software depot
Identity broker
Salt RaaS
Salt master
Telemetry

Generate and copy the password for VCF Identity Broker, then start the installation.

Monitor the task from SDDC Manager. This workflow deploys the required management service appliances on the management domain vCenter.

With SDDC Manager upgraded and the new VCF Management Services deployed, the VCF 9.1 environment is now ready for the next phase of the upgrade journey. These steps are important because they establish the updated lifecycle, depot, identity, licensing, and management service foundation required for the rest of the platform upgrade.

See you in the next blogpost.

Are you looking out for compute resources (CPU / Memory / Storage) to practice VMware products…? If yes, then click here to know more about our Lab-as-a-Service (LaaS).

Upgrading VMware Cloud Foundation to version 9.1: Part 1 – Intro & VCF Operations upgrade

VMware Cloud Foundation 9.1 is an important follow-on release that builds on the architectural changes introduced in VCF 9.0 and continues the shift toward a more unified private cloud operating model. The release introduces enhancements across lifecycle management, operational services, compute, storage, Kubernetes, security, and resilience, including updated VCF management services, enhanced lifecycle workflows, centralized licensing, and new operational capabilities.

For administrators currently running VMware Cloud Foundation 9.0.2, upgrading to VCF 9.1 is more than a routine patch cycle. It is a structured platform upgrade that must be performed in the correct order, with careful attention to prerequisites, interoperability, binary management, management service deployment, licensing, and post-upgrade validation. In this blog, I’ll walk through my lab upgrade experience from VCF 9.0.2 to VCF 9.1 and highlight the key steps, gotchas, and lessons learned along the way.

High-Level Upgrade Sequence from VCF 9.0.2 to VCF 9.1

  1. Review the VCF 9.1 release notes, supported upgrade path, and target bill of materials before making any changes.
  2. Validate prerequisites such as backups, DNS/NTP health, certificate status, available capacity, component compatibility, and any third-party or adjacent integrations.
  3. Upgrade VCF Operations first, because lifecycle workflows in the VCF 9.x model begin there and additional management services are introduced as part of the newer architecture.
  4. Configure or verify access to the software depot and download the required VCF 9.1 binaries.
  5. If your environment includes dependent services such as Avi Load Balancer, recovery, or replication products, validate and upgrade those components according to the supported interoperability guidance.
  6. Upgrade SDDC Manager to version 9.1.
  7. Deploy or activate the required VCF 9.1 management services introduced during the upgrade workflow.
  8. Run upgrade planning and prechecks for the management domain.
  9. Upgrade management domain components in the supported order, typically starting with NSX, followed by vCenter, and then ESX hosts.
  10. Complete post-upgrade validation to confirm component health, service status, lifecycle inventory accuracy, and overall platform readiness before moving on to any Day-N workload domain upgrades.

Note: This walkthrough focuses specifically on upgrading from VCF 9.0.2 to VCF 9.1. If you are upgrading from VCF 5.x to VCF 9.x, review the official upgrade path and planning guidance before proceeding.

Before starting, review the VCF 9.1 Bill of Materials and confirm that every component in your environment is compatible with the target release.

Lab Environment and Pre-Upgrade Preparation

Here is the starting point for my lab environment: VMware Cloud Foundation 9.0.2.

The first step is to protect the environment before making any changes. Back up all required appliances, validate that SFTP-based backups are working where applicable, and take snapshots of supported appliances according to your operational standards. Also confirm DNS, NTP, certificate health, available capacity, and access to required credentials before beginning the upgrade.

VCF Operations Fleet Management: In my existing VCF 9.0.2 environment, the Fleet Manager appliance was deployed. With VCF 9.1, this standalone appliance is no longer required and is powered off as part of the upgrade process.

VCF Identity Broker: Starting with VCF 9.1, VCF Identity Broker becomes a required component. SSO capabilities are migrated into the containerized VCF Management Services architecture. If your existing VCF Identity Broker appliance is deployed on a port group other than the VM Management network, move it to the VM Management network before the upgrade. At a high level, the process is to back up the appliance, power it off, remove it, redeploy it with the same FQDN and certificates, and then restore the backup.

Step 1: Upgrade VCF Operations

Download the VCF Operations 9.1 .pak file from the Broadcom Support Portal.

Next, log in to the VCF Operations admin console and take the cluster offline before applying the update.

Wait for the status to be changed to offline,

Install the software bundle,

Select the downloaded .pak file and upload it to begin staging the software update.

Complete the remaining steps and upgrade.

You will be prompted for root password once the upgrade process starts,

During the upgrade, the VCF Operations UI is unavailable. Users are presented with a maintenance banner until the upgrade completes.

You can also monitor the upgrade from the same page,

About 14 steps and VCF Operations is upgraded to version 9.1,

Important: The Fleet Collector / Cloud Proxy appliance is still required and is upgraded during this process.

At this point, the VCF Operations upgrade is complete and the environment is ready for the next phase.

Step 2: Review Adjacent Component Requirements

I do not have vSphere Replication or VMware Live Site Recovery installed in my lab environment. If these products are present in your environment, validate the supported upgrade path and follow the official product documentation (Upgrading to VMware Cloud Foundation 9.1) before continuing with the main VCF upgrade sequence.

If Avi Load Balancer is deployed, validate compatibility and upgrade Avi according to the VCF 9.1 guidance before proceeding.

That’s all for this blogpost. Next blog will consist of SDDC Manager upgrade process.

Are you looking out for compute resources (CPU / Memory / Storage) to practice VMware products…? If yes, then click here to know more about our Lab-as-a-Service (LaaS).